User Guide
![]()
Tutor’s Pet - User Guide
- Introduction
- About
- Quick Start
-
Commands
- Command Format
- Command Overview
- General
- Managing Students
-
Managing Classes
- Adding a class :
add-class - Listing all classes :
list-class - Listing all students within a class :
list-student - Editing a class :
edit-class - Finding a class by name :
find-class - Deleting a class :
delete-class - Clearing all classes :
clear-class - Adding a student to a class :
link - Removing a student from a class :
unlink
- Adding a class :
- Managing Lessons
- Managing Attendance Records
- FAQ
- Glossary
Introduction
Tutor’s Pet is a student management application for teaching assistants in NUS Computing. Tutor’s Pet reduces the amount of time you spend on administrative tasks as a teaching assistant. It is a one stop solution to keep track of your classes and students.
As a teaching assistant, administrative chores such as attendance taking and grading students’ participation can be troublesome with existing solutions such as spreadsheets. This is why we have created Tutor’s Pet, a solution for teaching assistants, by students.
About
This user guide provides documentation on the installation and usage of Tutor’s Pet. It also provides a comprehensive description of features available to you and includes a quick-start section that helps you get started.
This guide uses the following features to make it easier for you to navigate around:
- Words that look like this can be clicked to jump to the related section.
- Words that look like
thisrefer to keywords used as part of commands or responses from your Tutor’s Pet. - Words that look like this refer to keyboard keys that you can press.
![]() Boxes with the
Boxes with the ![]() icon contain additional useful information.
icon contain additional useful information.
![]() Boxes with the
Boxes with the ![]() icon contain additional tips and tricks to help you get the most out of your Tutor’s Pet.
icon contain additional tips and tricks to help you get the most out of your Tutor’s Pet.
![]() Boxes with the
Boxes with the ![]() icon contain important information on how to keep your Tutor’s Pet data safe.
icon contain important information on how to keep your Tutor’s Pet data safe.
Quick Start
This section provides information on how to quickly start using Tutor’s Pet.
Installing Tutor’s Pet
Here are a few steps to get you started on Tutor’s Pet:
-
Ensure you have Java 11 or above installed in your computer.
-
Download the latest version of Tutor’s Pet here.
-
Copy the downloaded Tutor’s Pet to a folder of your choice. This is known as the home folder of your Tutor’s Pet.
-
Double-click the file to start the application. An application similar to the one below should appear in a few seconds.
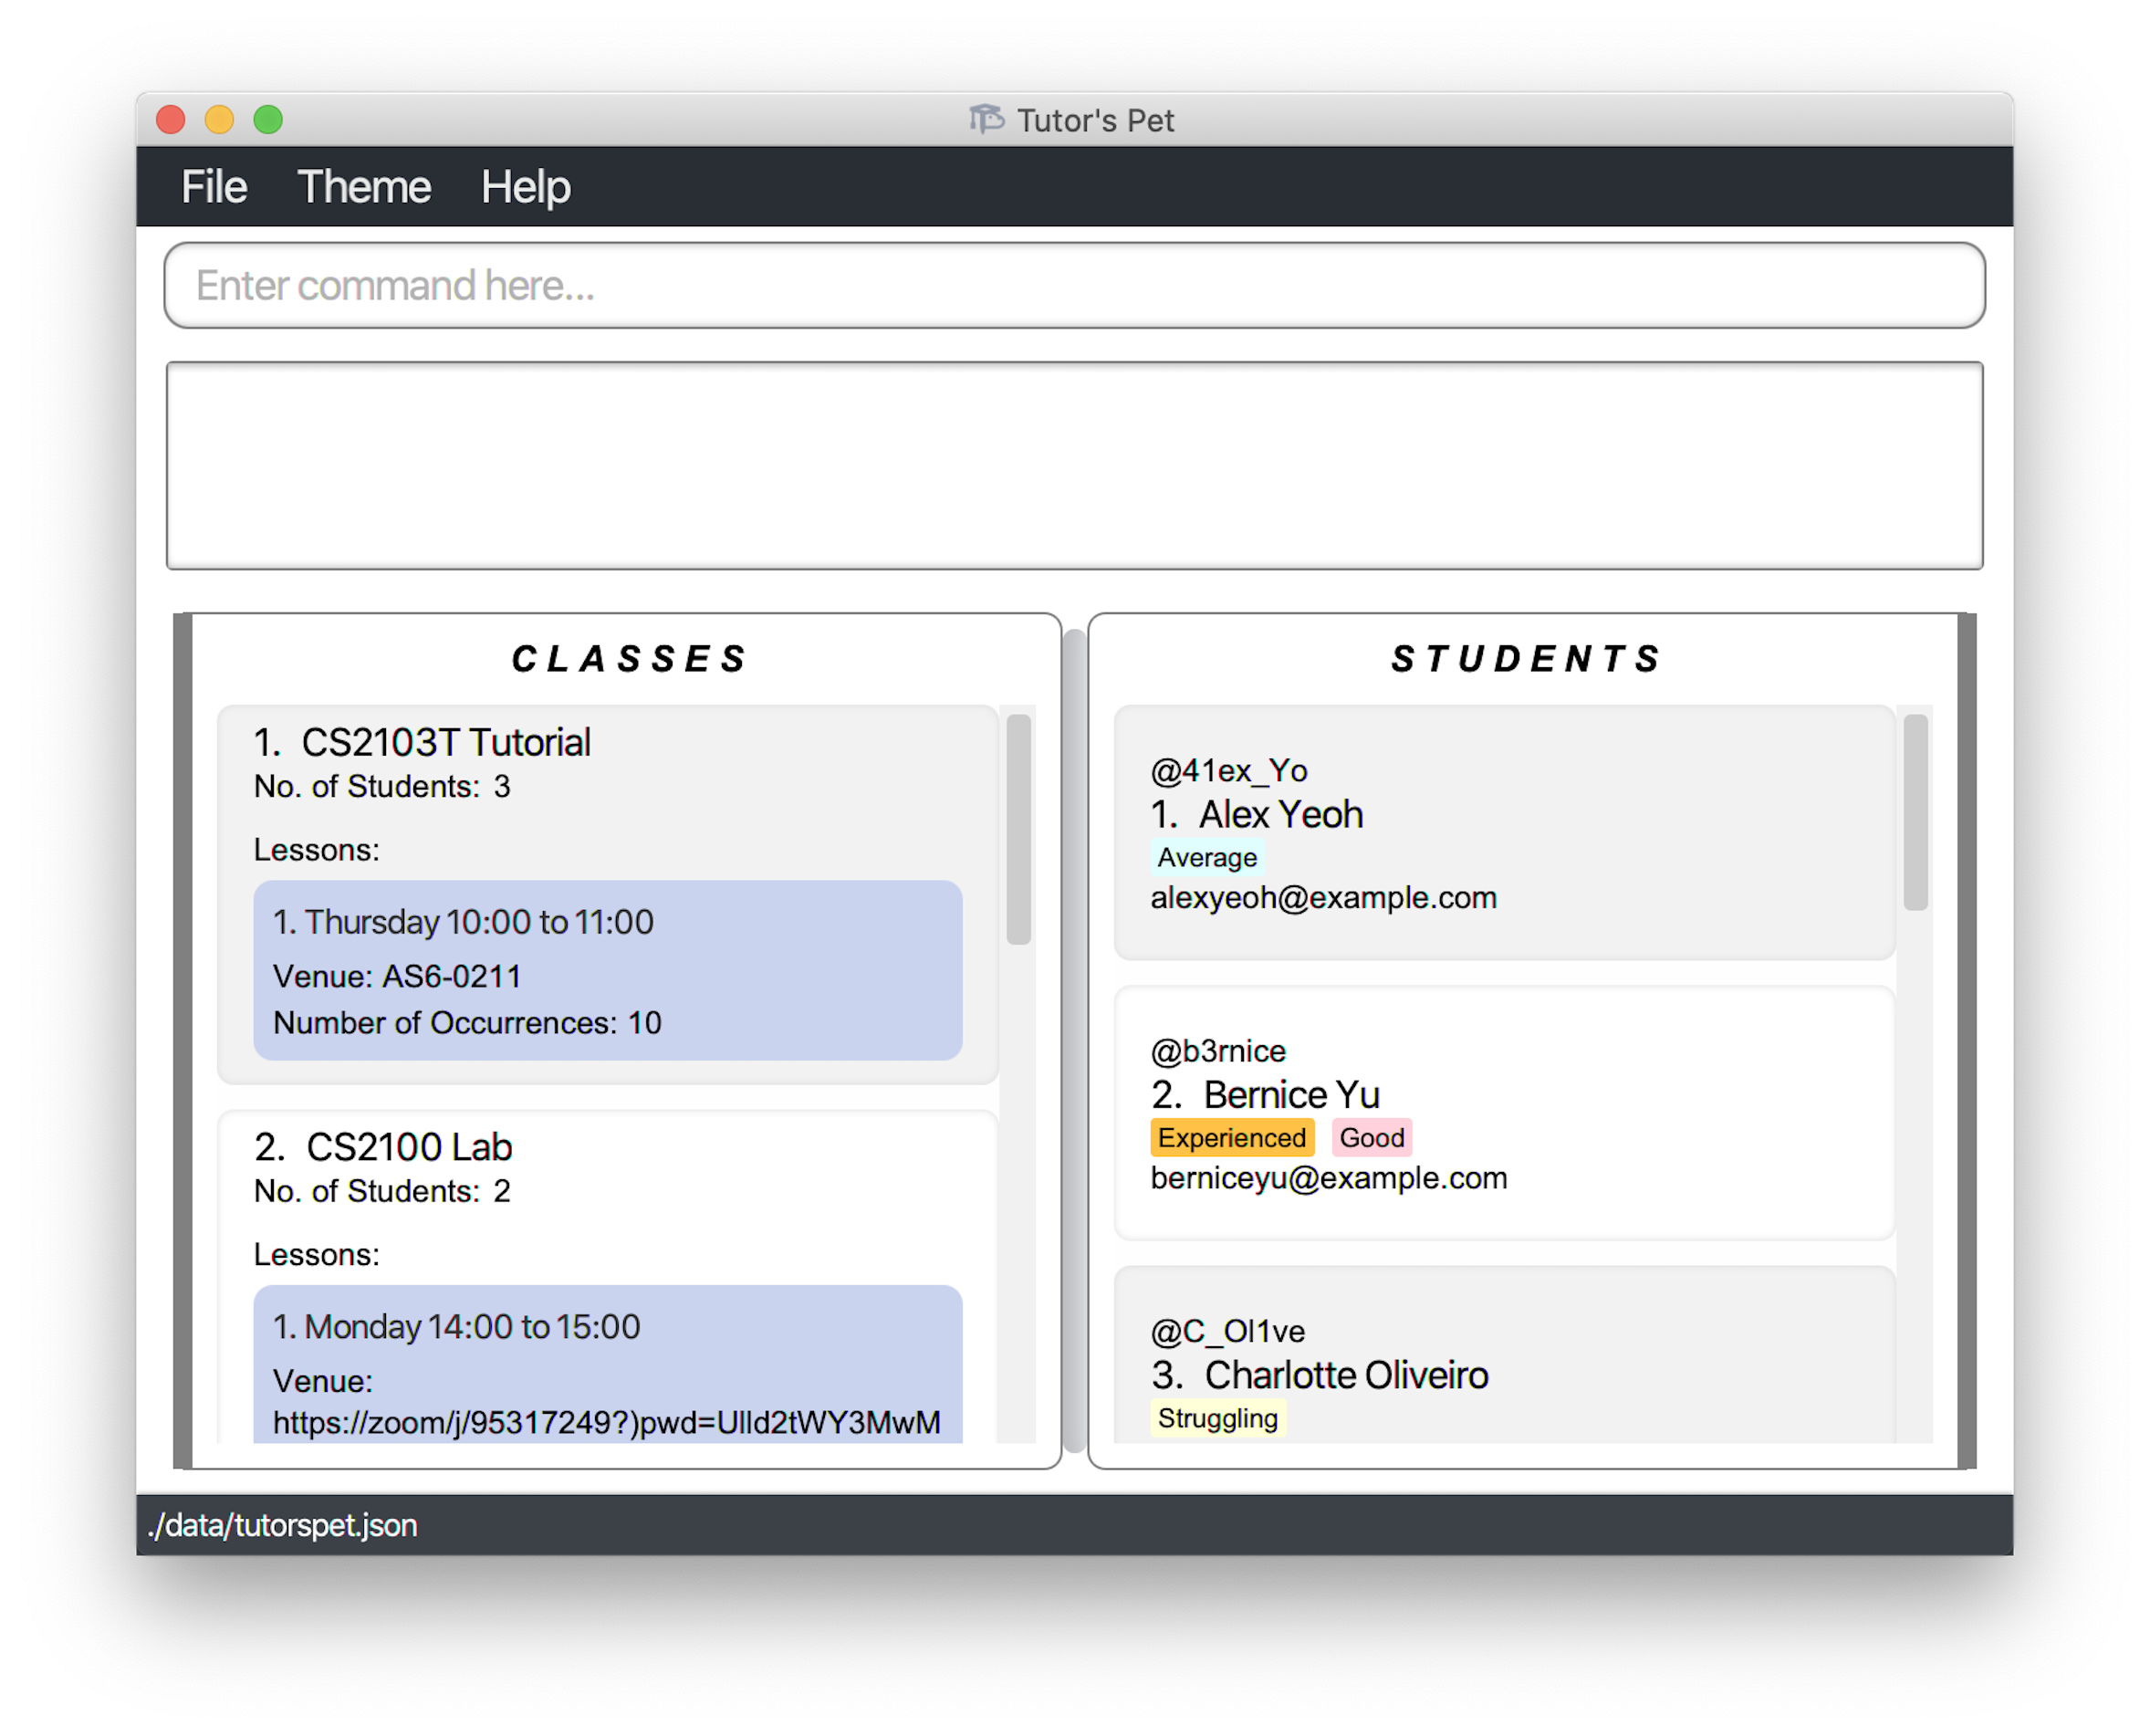
Using Tutor’s Pet
This section offers an overview of the layout in Tutor’s Pet.
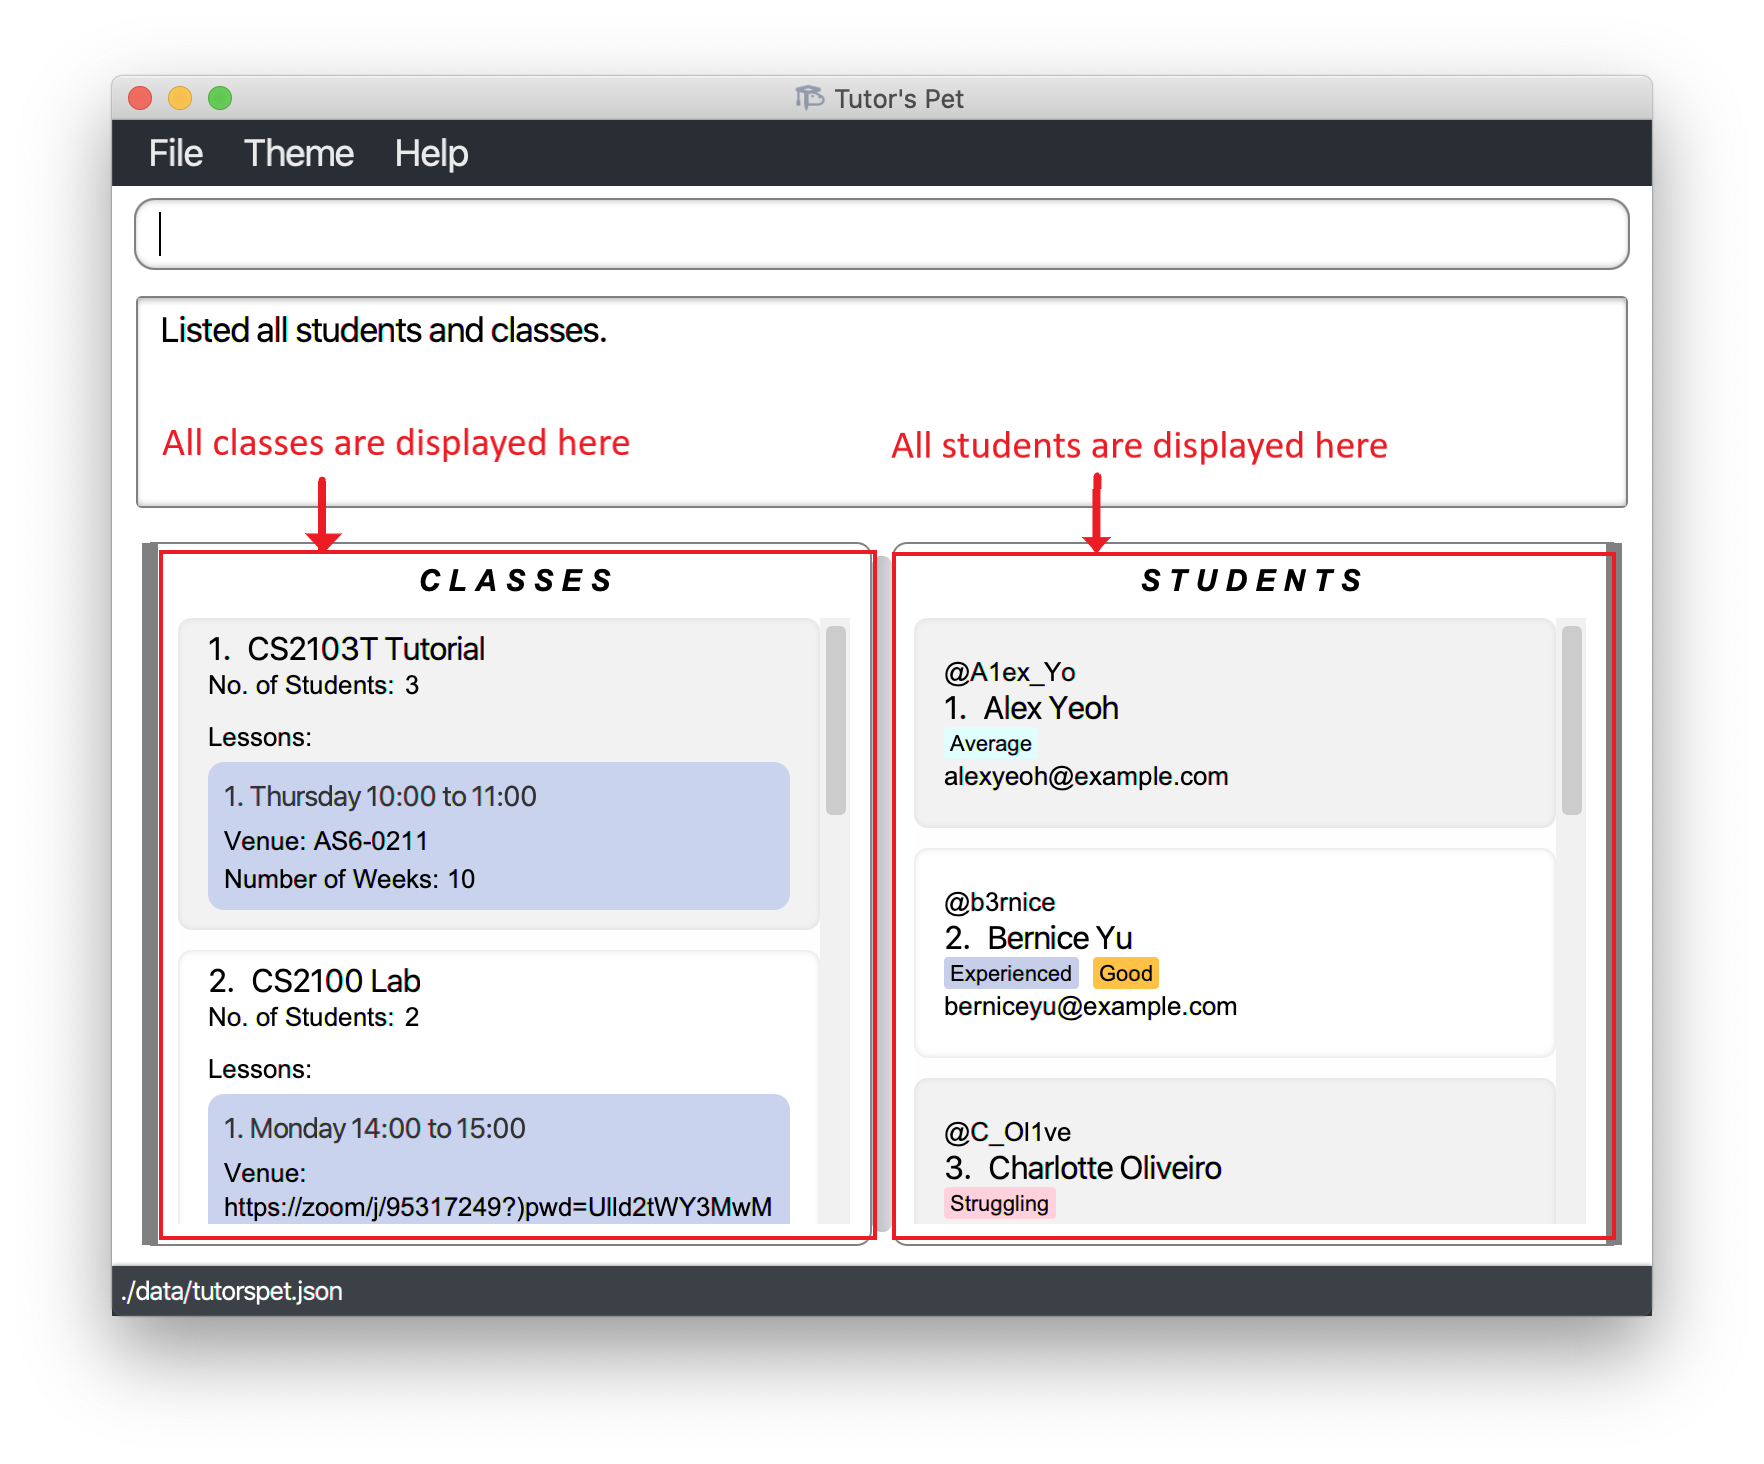
There are three main areas in Tutor’s Pet:
-
the command box and result display box,
-
the main viewing area,
-
the utility area.
The command box is the area for you to enter your commands. The result of each command will be shown in the result display box, which is located immediately below the command box.
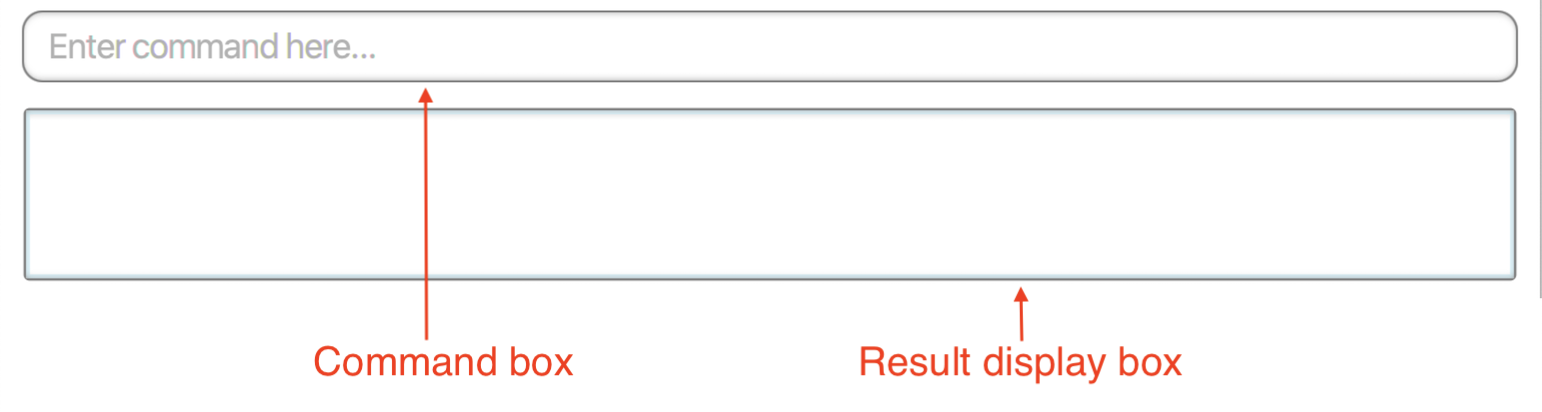
-
Type a command in the command box and press Enter to execute it.
e.g. Typehelpand press Enter to open the help window.Here are some example commands you can try:
-
list: Lists all students and classes. -
add-studentn\John Doe t\johndoe e\johnd@example.com tag\student: Adds a student namedJohn Doeto the application. -
delete-student3: Deletes the 3rd student shown in the current displayed student list. -
clear-student: Deletes all students. -
exit: Exits the application.
-
-
Refer to the Commands section below for details of each command.
The main viewing area consists of two sections: Classes and Students.
-
The Classes section contains information on classes and lessons in Tutor’s Pet. Use the
list-classcommand to view the list of all classes in Tutor’s Pet.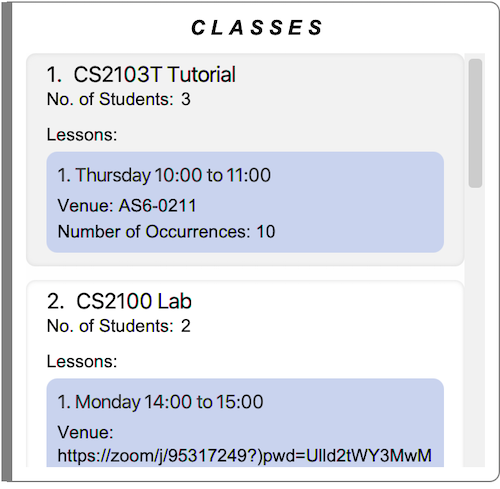
-
The Students section contains information on students in Tutor’s Pet. Use the
list-studentcommand to view the list of all students in Tutor’s Pet.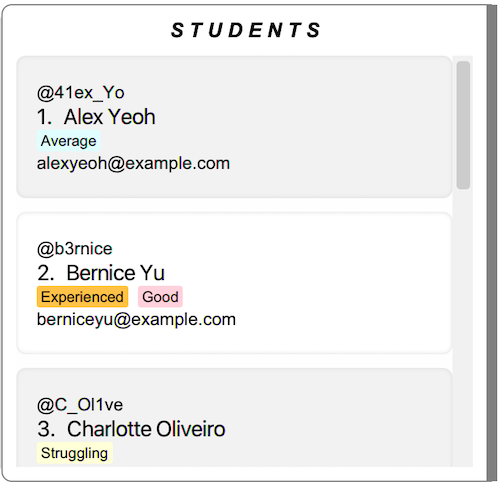
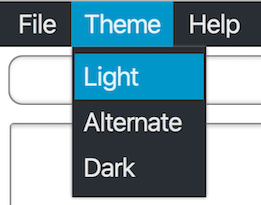
The utility area consists of three tabs: File, Theme and Help.

-
The File tab consists of an exit button. To exit Tutor’s Pet, click on the exit button. Alternatively, use the
exitcommand to exit the application. -
The Theme tab consist of 3 different themes: Light, Alternate and Dark. To change the theme of your Tutor’s Pet, click on one of these buttons.
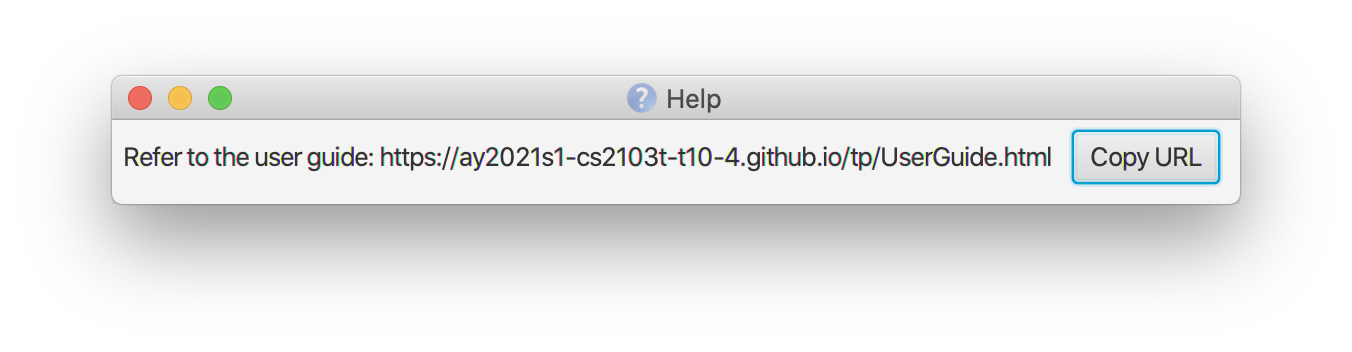
- The Help tab consists of a help button. If you require any assistance, click on the help button, copy the link displayed and paste it into any web browser. Alternatively, press F1 to bring up the help window.
Commands
Commands are the main way you interact with your Tutor’s Pet.
This section provides information about the command format, overview of available commands, and detailed instructions on how to use each command.
Command Format
![]() Notes about the command format:
Notes about the command format:
This section details the format of the commands available in Tutor’s Pet. We will adhere to the following:
-
Words in
UPPER_CASEare the parameters to be supplied by the user.
e.g. Inadd-student n\NAME,NAMEis a parameter which can be used asadd-student n\John Doe. -
Items in square brackets are optional.
e.gn\NAME [tag\TAG]can be used asn\John Doe tag\studentor asn\John Doe. -
Items with
…after them can be used zero or more times.
e.g.[tag\TAG]…can be used astag\student,tag\average tag\TA candidateetc. -
Parameters can be in any order.
e.g. If the command specifiesn\NAME t\TELEGRAM_USERNAME, typingt\TELEGRAM_USERNAME n\NAMEis also acceptable. -
Indexes must be positive whole numbers 1, 2, 3, …
-
The
STUDENT_INDEXrefers to the index number shown in the displayed student list. -
The
CLASS_INDEXrefers to the index number shown in the displayed class list. -
The
LESSON_INDEXrefers to the index number of a lesson shown in its class. -
Time must be input in the format,
hh:mm.
e.g.13:00is allowed, but not1300.
Command Overview
This section provides an overview of all commands in Tutor’s Pet and illustrates the usage of each command in detail.
| Action | Format | Example (if applicable) |
|---|---|---|
| Add attendance record | add-attendance c\CLASS_INDEX l\LESSON_INDEX s\STUDENT_INDEX w\WEEK p\PARTICIPATION_SCORE |
add-attendance c\1 l\1 s\1 w\1 p\1 |
| Add class | add-class n\CLASS_NAME |
add-class n\CS2103T Tutorial T10 |
| Add lesson | add-lesson c\CLASS_INDEX d\DAY st\START_TIME et\END_TIME v\VENUE r\NO_OF_TIMES |
add-lesson c\1 d\MONDAY st\08:00 et\10:00 v\COM1 #01-01 r\13 |
| Add student | add-student n\NAME t\TELEGRAM_USERNAME e\EMAIL [tag\TAG]… |
add-student n\John Doe t\johndoe e\johnd@example.com tag\student |
| Add student to a class | link s\STUDENT_INDEX c\CLASS_INDEX |
link s\1 c\2 |
| Clear all classes | clear-class |
|
| Clear all students | clear-student |
|
| Delete attendance record | delete-attendance c\CLASS_INDEX l\LESSON_INDEX s\STUDENT_INDEX w\WEEK |
delete-attendance c\1 l\1 s\1 w\1 |
| Delete class | delete-class CLASS_INDEX |
delete-class 2 |
| Delete lesson | delete-lesson c\CLASS_INDEX l\LESSON_INDEX |
delete-lesson c\1 l\1 |
| Delete student | delete-student STUDENT_INDEX |
delete-student 3 |
| Display statistics | stats c\CLASS_INDEX s\STUDENT_INDEX |
stats c\1 s\1 |
| Display venue | display-venue c\CLASS_INDEX l\LESSON_INDEX |
display-venue c\1 l\1 |
| Edit attendance record | edit-attendance c\CLASS_INDEX l\LESSON_INDEX s\STUDENT_INDEX w\WEEK p\PARTICIPATION_SCORE |
edit-attendance c\1 l\1 s\1 w\1 p\10 |
| Edit class | edit-class CLASS_INDEX n\CLASS_NAME |
edit-class 1 n\CS2103T Tutorial T10 |
| Edit lesson | edit-lesson c\CLASS_INDEX l\LESSON_INDEX [d\DAY] [st\START_TIME] [et\END_TIME] [v\VENUE] |
edit-lesson c\1 l\1 d\TUESDAY st\10:00 et\12:00 v\COM2 #02-02 |
| Edit student | edit-student STUDENT_INDEX [n\NAME] [t\TELEGRAM_USERNAME] [e\EMAIL] [tag\TAG]… |
edit-student 2 n\James Lee e\jameslee@example.com |
| Exit | exit |
|
| Find attendance record | find-attendance c\CLASS_INDEX l\LESSON_INDEX s\STUDENT_INDEX w\WEEK |
find-attendance c\1 l\1 s\1 w\1 |
| Find class | find-class KEYWORD [MORE_KEYWORDS] |
find-class CS2103T |
| Find student | find-student KEYWORD [MORE_KEYWORDS] |
find-student James Jake |
| Help | help |
|
| List all classes | list-class |
|
| List all students | list-student |
|
| List all students and classes | list |
|
| List students in a class | list-student c\CLASS_INDEX |
list-student c\3 |
| Redo | redo |
|
| Remove student from a class | unlink s\STUDENT_INDEX c\CLASS_INDEX |
unlink s\1 c\2 |
| Reset | reset |
|
| Undo | undo |
|
| View change history | view-history |
The following subsections will elaborate on the specific details of each Tutor’s Pet command.
General
Viewing help : help
If you require any assistance, you can use this command. The link to this user guide will be displayed.
Format: help
Listing all students and classes : list
You can use this command to see the entire list of students and classes.
Format: list
For example:
-
After finding the class CS2103T and student Alex, you wish to view all your students and classes.
-
You type in the command
listand press Enter.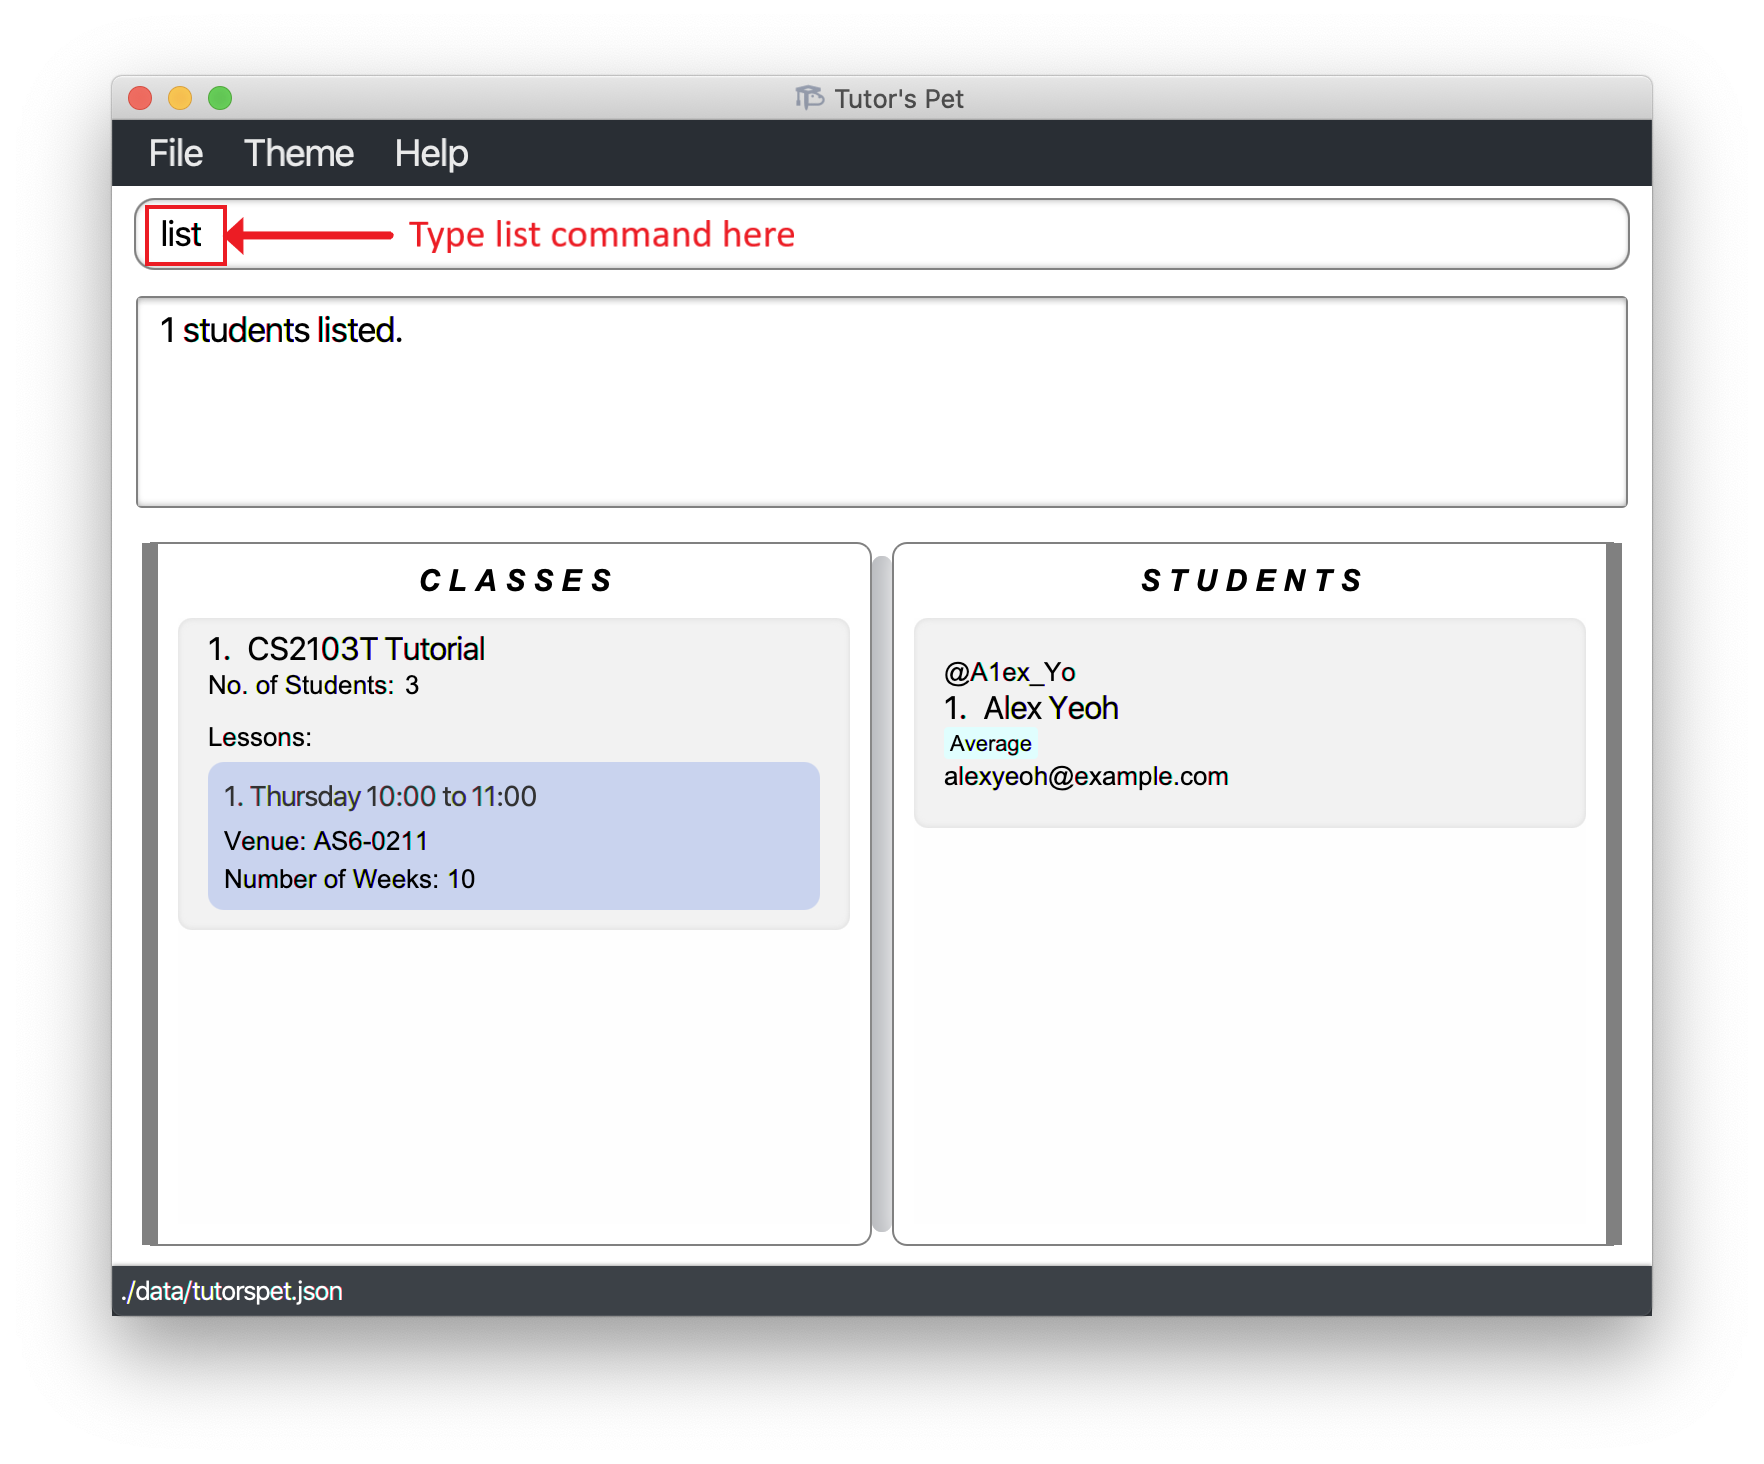
-
Now, you can see all your students and classes.
Undoing a previous change : undo
If you have accidentally entered a command that permanently changes the data in your Tutor’s Pet, you can use this command to undo the change.
Format: undo
For example:
-
You want to delete Alex from your Tutor’s Pet. However, you accidentally deleted Bernice instead of Alex.
-
You type
undoand press Enter.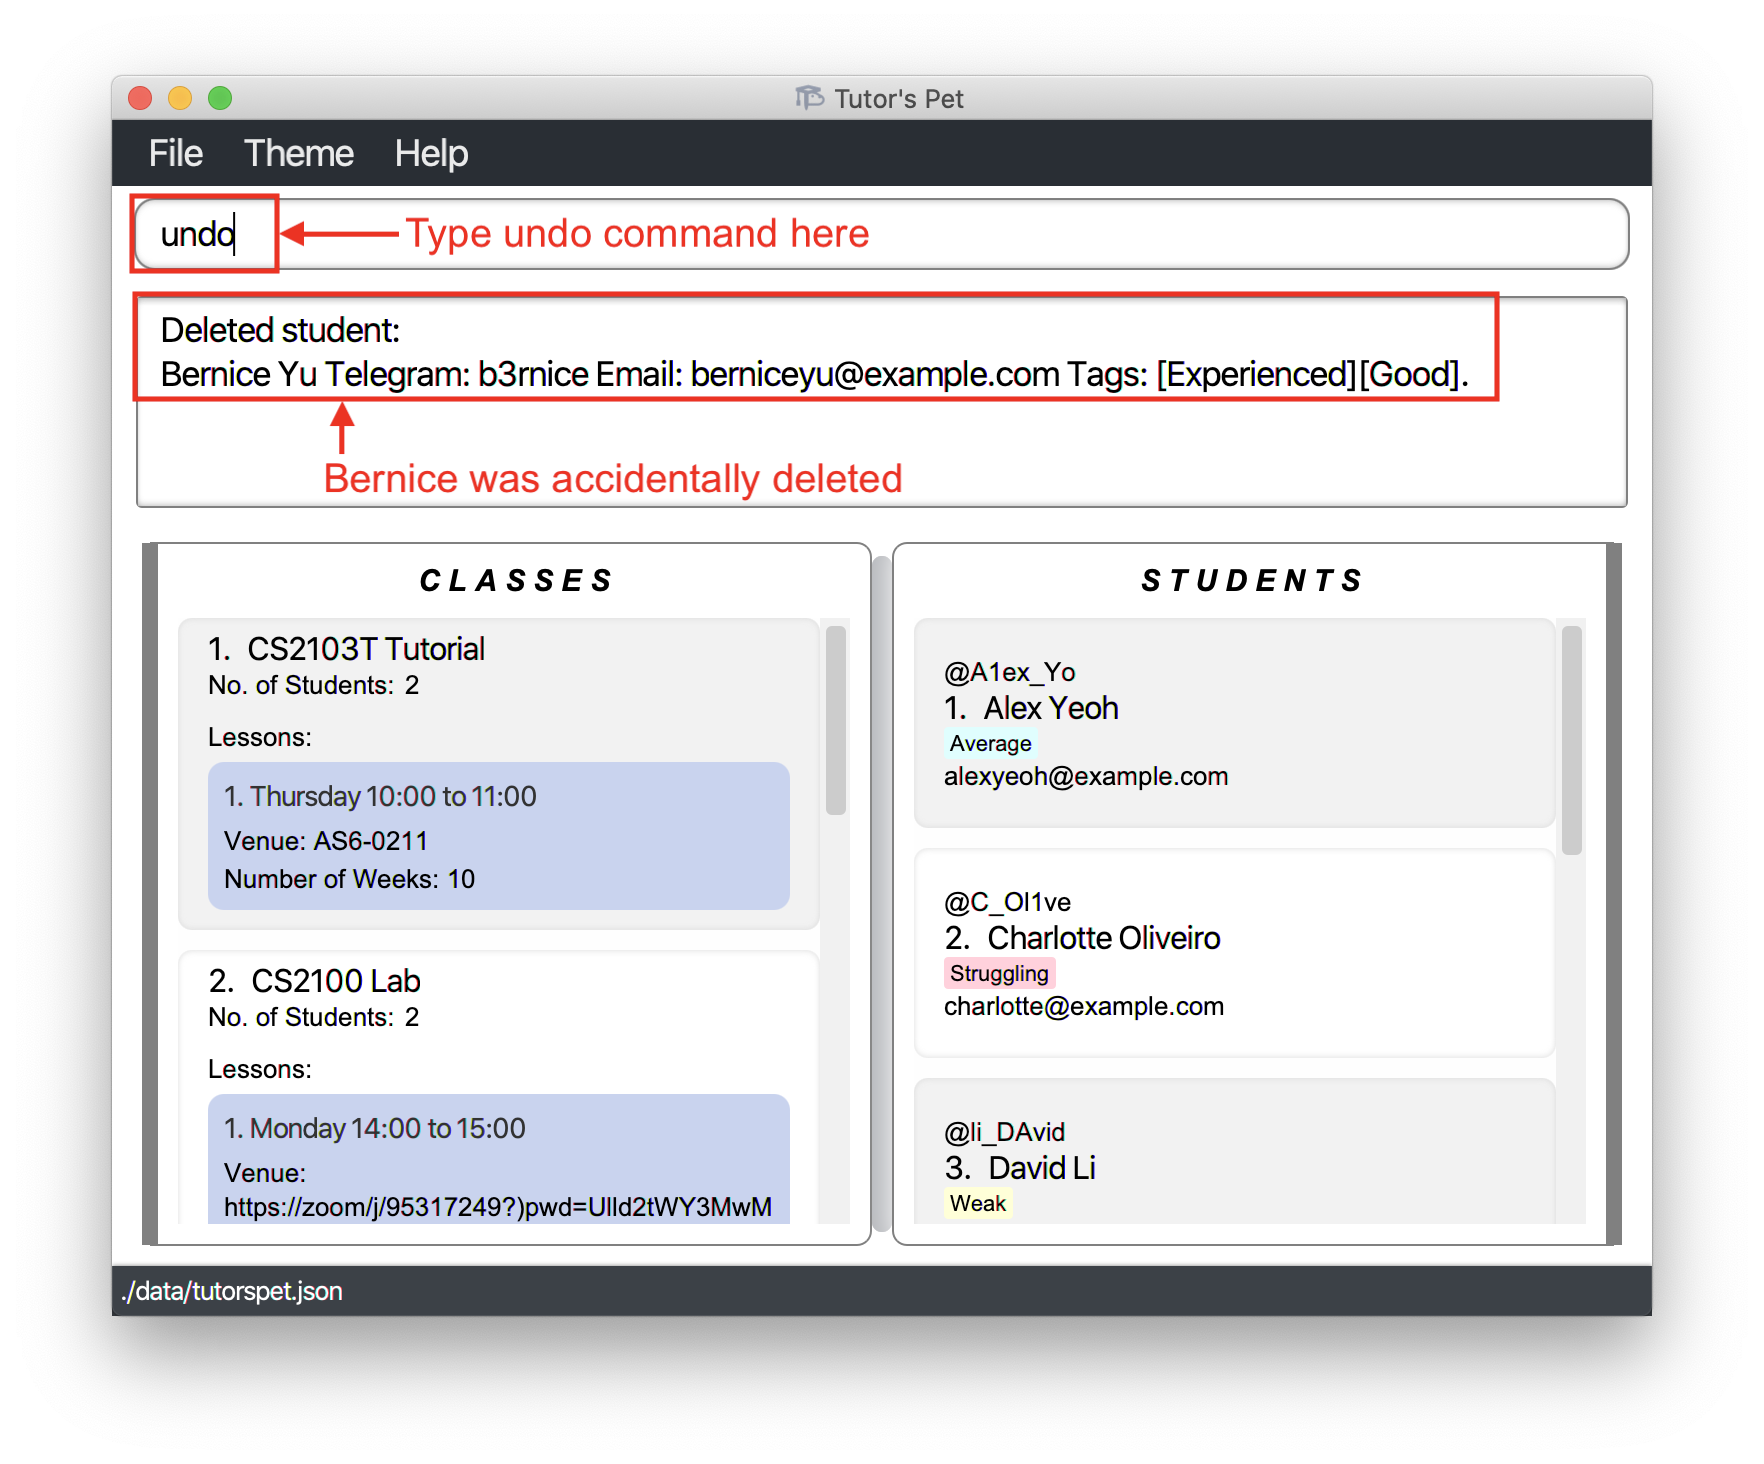
-
Bernice has been undeleted and now you can delete Alex.

![]() Notes about the command: Changes that can be undone include those from the
Notes about the command: Changes that can be undone include those from the
add-, edit-, delete-, clear-, link, unlink, and reset commands.
![]() Tip: To view a list of changes that can be undone, use the
Tip: To view a list of changes that can be undone, use the view-history command.
Redoing an undone change : redo
If you decide that you do not need to undo a change, you can use this command to redo it.
Format : redo
For example:
-
You want to undo the last four changes in your Tutor’s Pet. However, you accidentally undid the last five changes instead.
-
You type
redoand press Enter. -
The undone change will be restored.
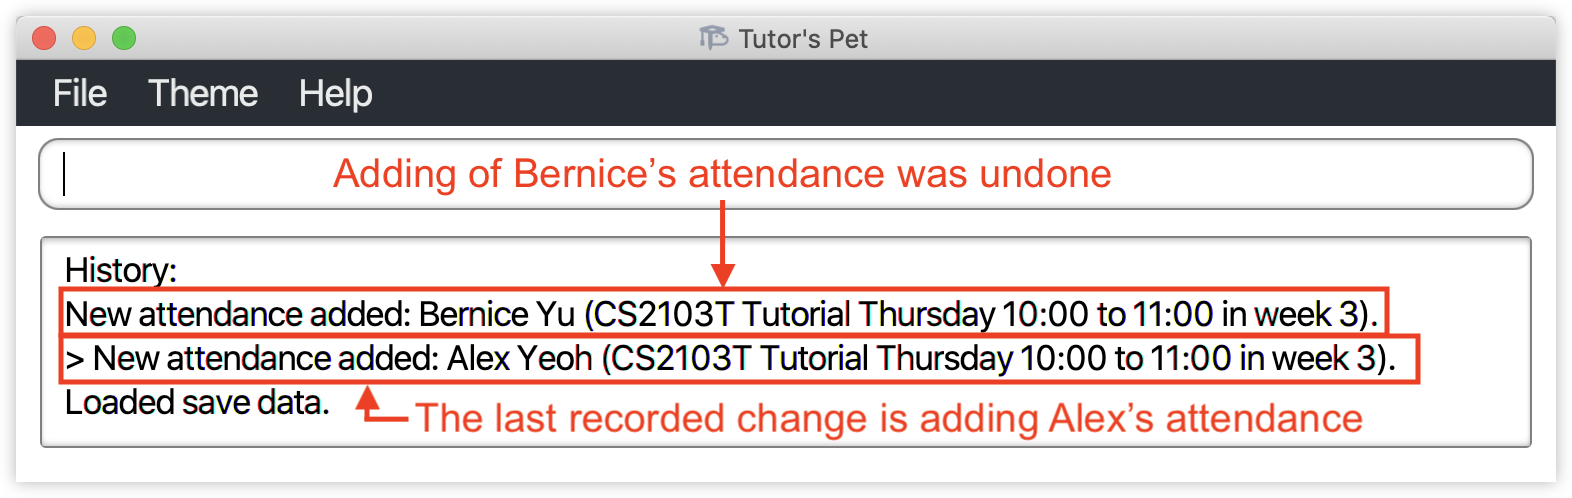
Viewing change history : view-history
You can use this command to see a list of changes that can be undone or redone.
Format : view-history
For example:
-
You are marking the attendance of your students but accidentally lost track of which student you were at.
-
You type
view-historyinto the command box and press Enter.
-
The result box will display a list of changes with the latest shown at the top.
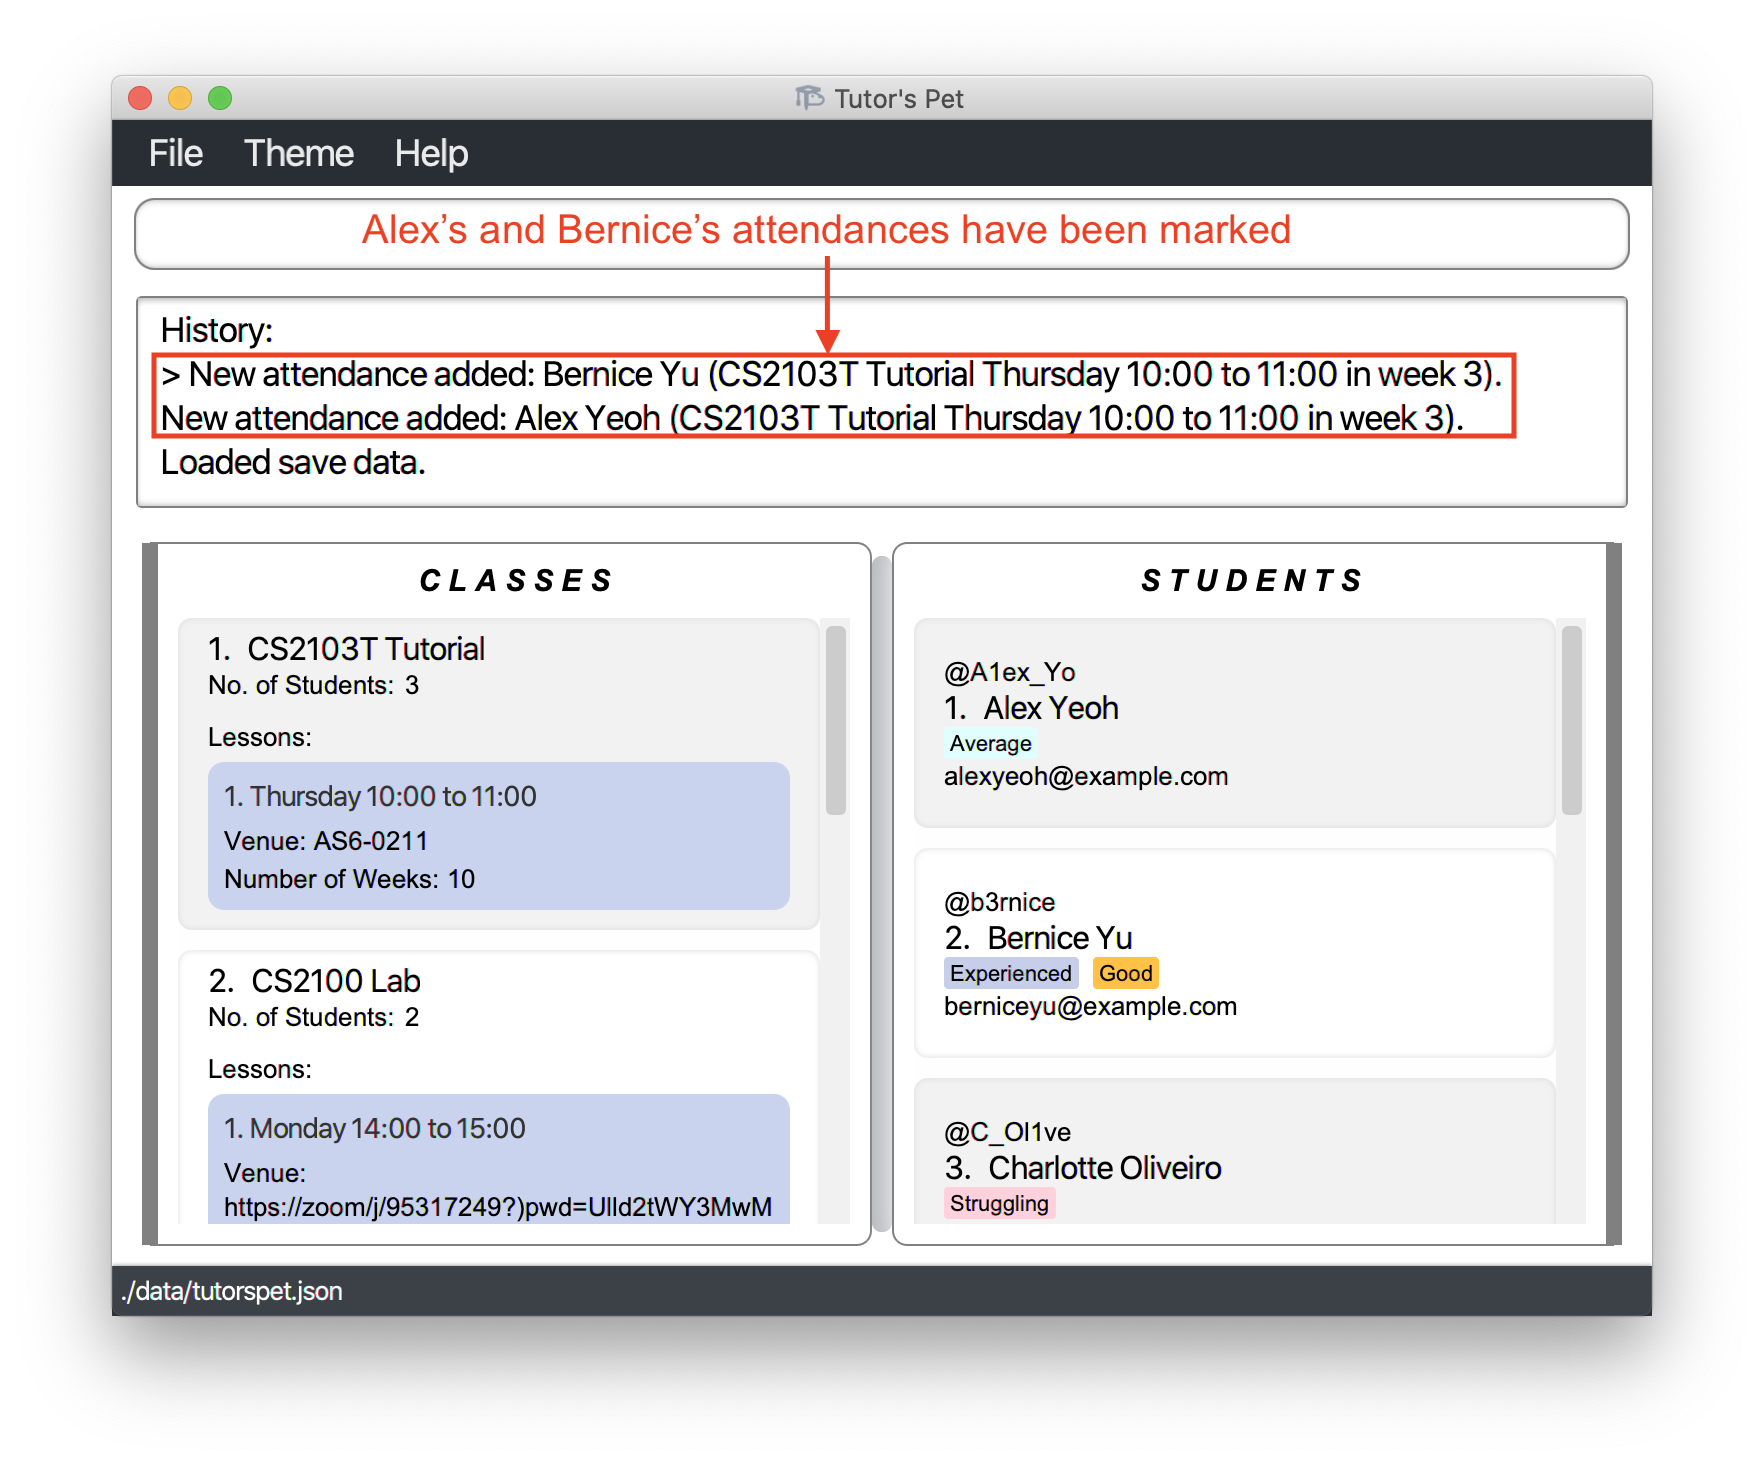
![]() Tip:
The
Tip:
The > indicator shows which point of your Tutor’s Pet history is currently being displayed.
You can use this feature to check if there are any changes that you can undo or redo.
The diagram below shows an example where the last change has been undone.
Notice how the > indicator now points to the second change listed.
Exiting the program : exit
You can exit Tutor’s Pet by typing this command. All changes you have made to your Tutor’s Pet will be saved.
Format: exit
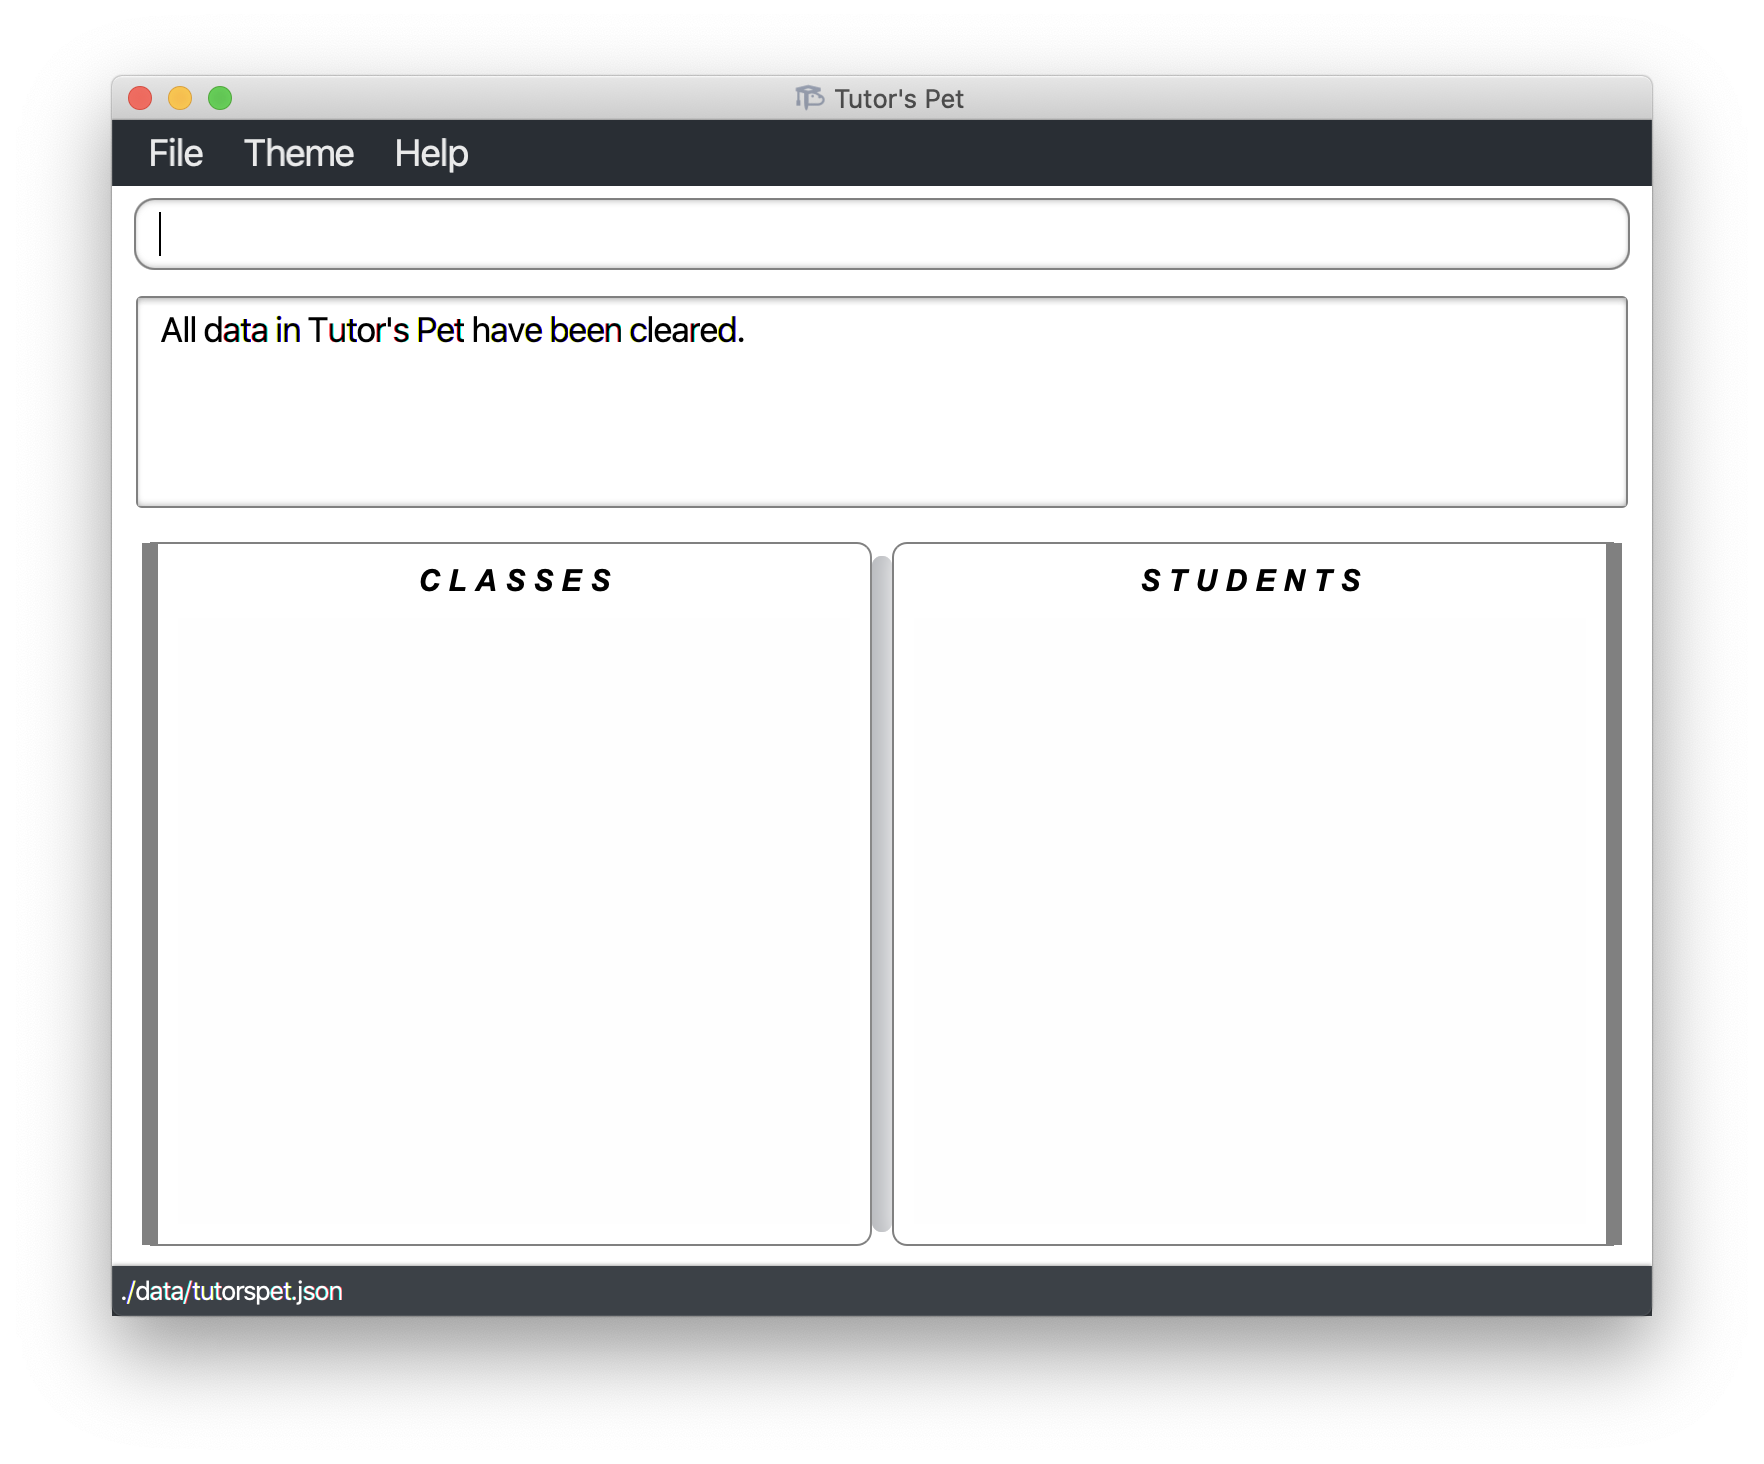
Resetting the program : reset
You can use this command to reset Tutor’s Pet. All existing classes and students will be deleted.
Format: reset
For example:
-
It is the start of a new semester and you want to delete all students and classes.
-
You type in the command
resetand press Enter.
-
You can see that all students and classes have been deleted.
Recalling previously entered commands
If you have to enter a similar command repeatedly, you can use this feature to type less.
When the command box is selected, press the ↑ or ↓ key to navigate around previously entered commands.
For example:
-
You are taking the attendance for one of your lessons in CS2103T Tutorial. You have just recorded the attendance of the first student. You now want to record the attendance of the second student.
-
You press the ↑ key.
-
The previous command will be displayed in the command box.
-
Now, you can edit and reuse the command to record the attendance of other students.
Saving the data
Tutor’s Pet automatically saves your data to your home folder after any changes are made. There is no need for you to save manually.
Managing Students
Adding a student : add-student
If you would like to add a student to Tutor’s Pet, use this command.
Format: add-student n\NAME t\TELEGRAM_USERNAME e\EMAIL [tag\TAG]…
- Adds a student with the specified
NAME+TELEGRAM_USERNAME+EMAIL+TAG.
For example:
-
You would like to add a new student,
Joel Leeto Tutor’s Pet. Type inadd-student n\Joel Lee t\joeleee e\jlee@example.comand press Enter.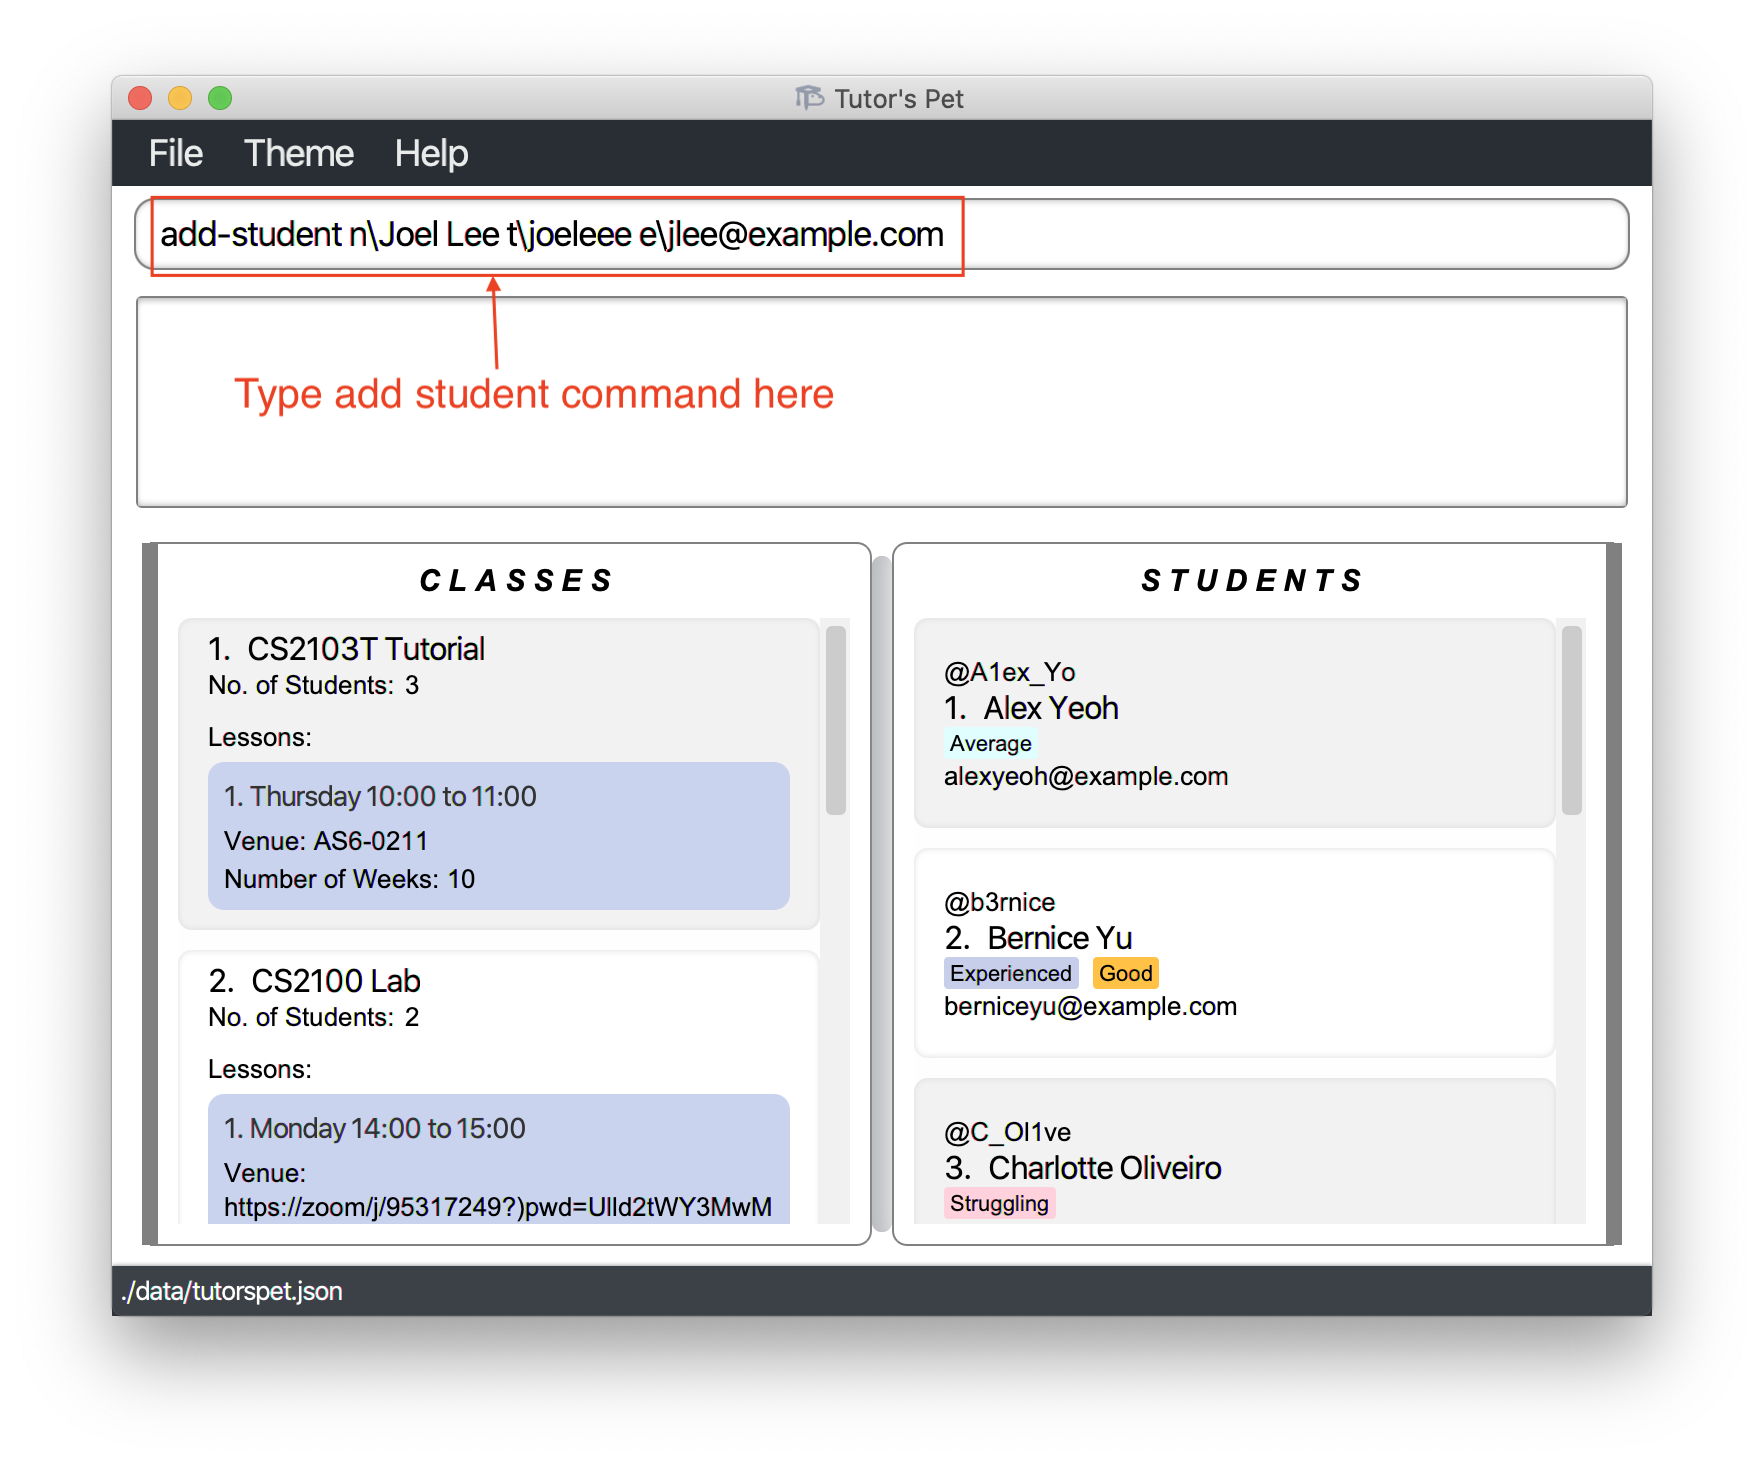
-
Scrolling down the list of students, you will see that
Joel Leehas been added to Tutor’s Pet.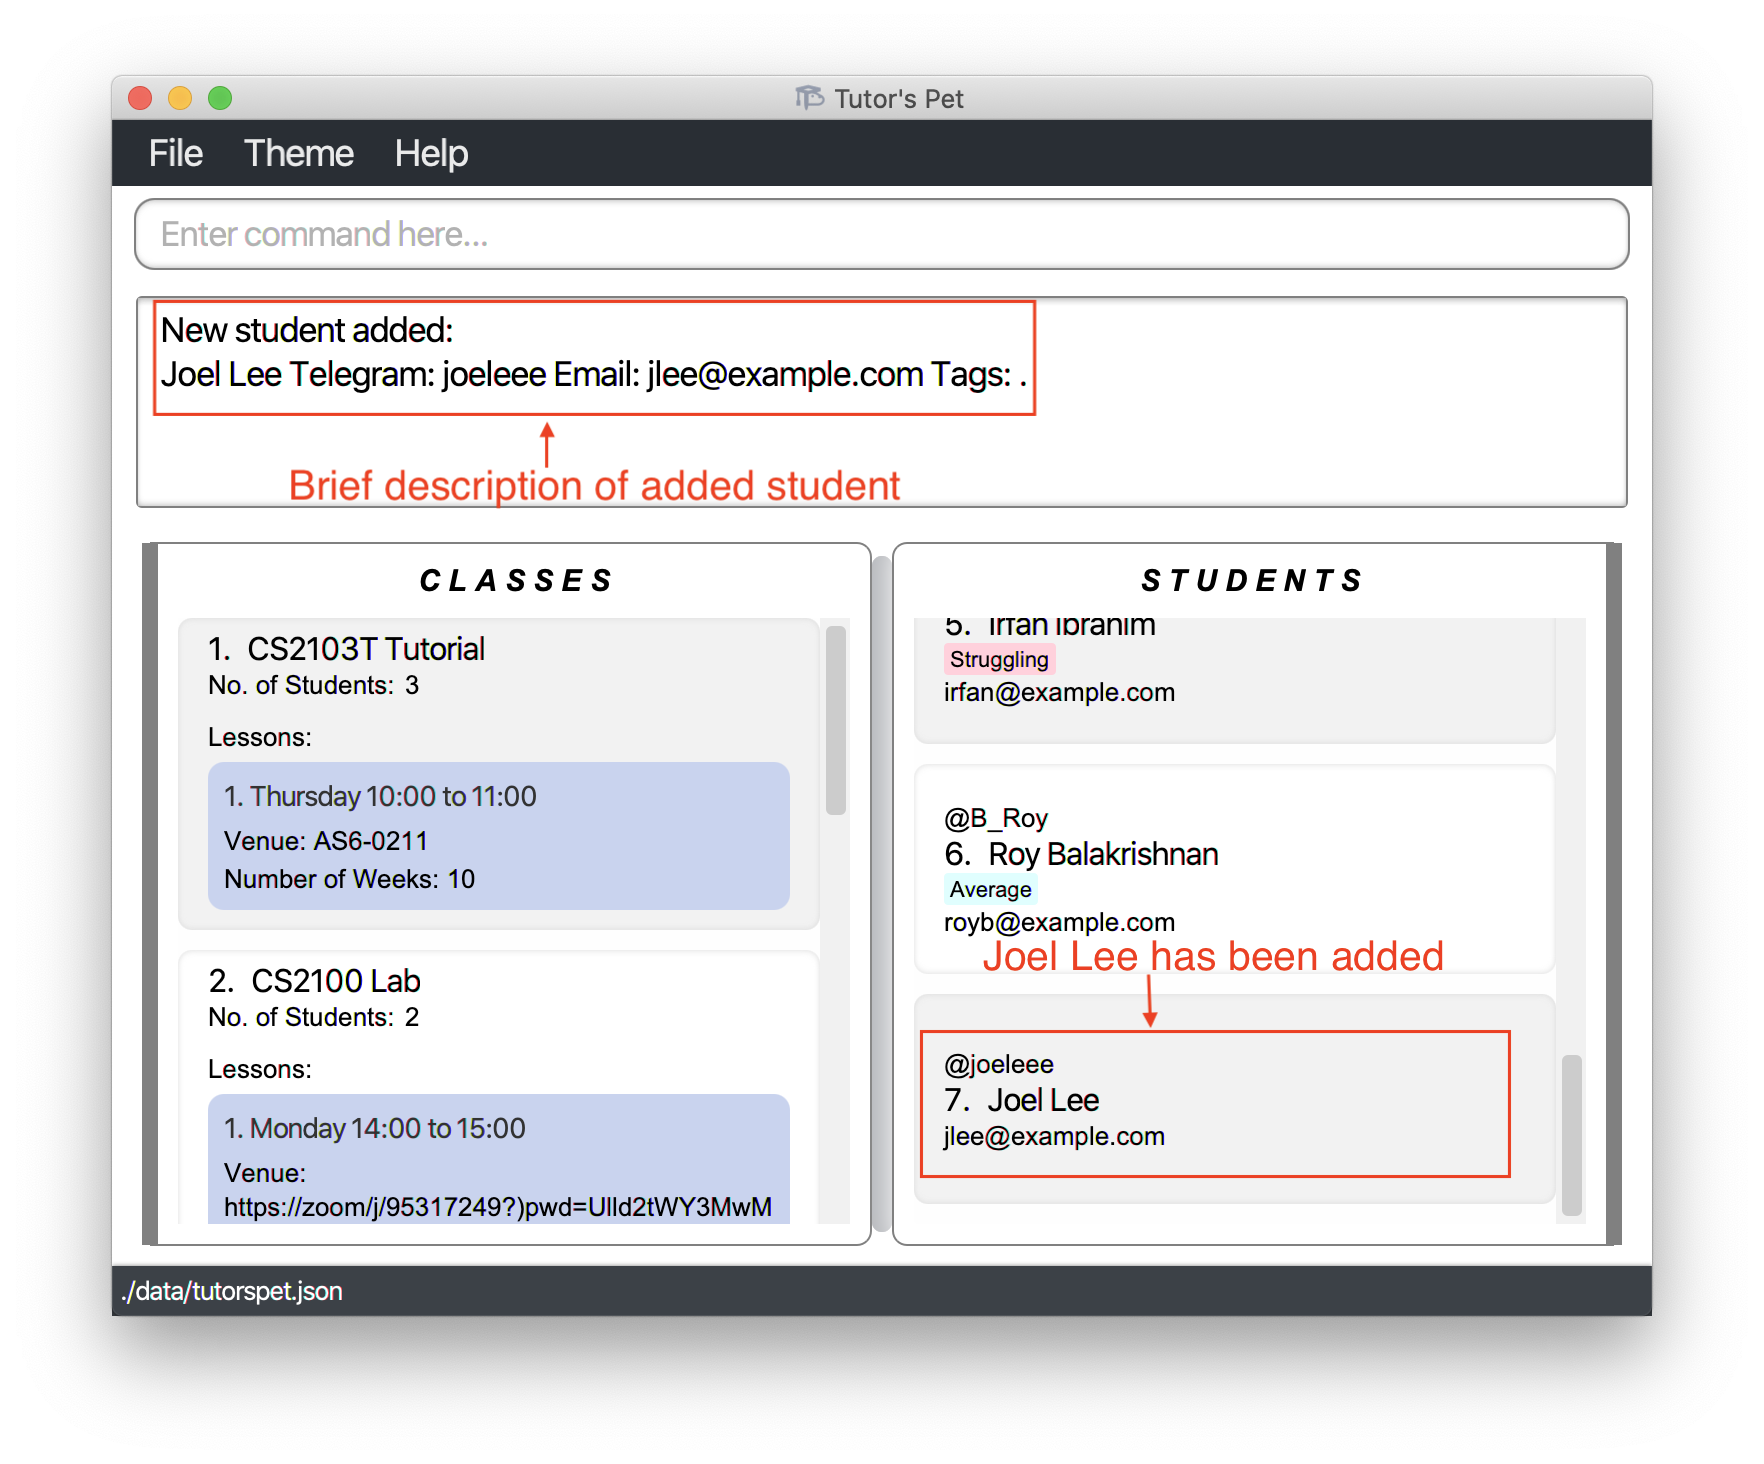
Other examples:
-
add-student n\Betsy Crowe t\betsycrowe e\betsycrowe@example.com tag\excellent
AddsBetsy Croweto Tutor’s Pet along with anexcellenttag.
![]() Tip: A student can have any number of tags (including 0).
Tip: A student can have any number of tags (including 0).
Listing all students : list-student
If you would like to view all students you teach, use this command.
Format: list-student
Editing a student : edit-student
If you would like to change a student’s particulars, use this command.
Format: edit-student STUDENT_INDEX [n\NAME] [t\TELEGRAM_USERNAME] [e\EMAIL] [tag\TAG]…
- Edits the student at the specified
STUDENT_INDEX.
For example:
-
Charlotte Oliveirogave you the wrong email address on the first day of class. You need to replace her email address. -
You type
edit-student 3 e\charlotteolive@example.comand press Enter.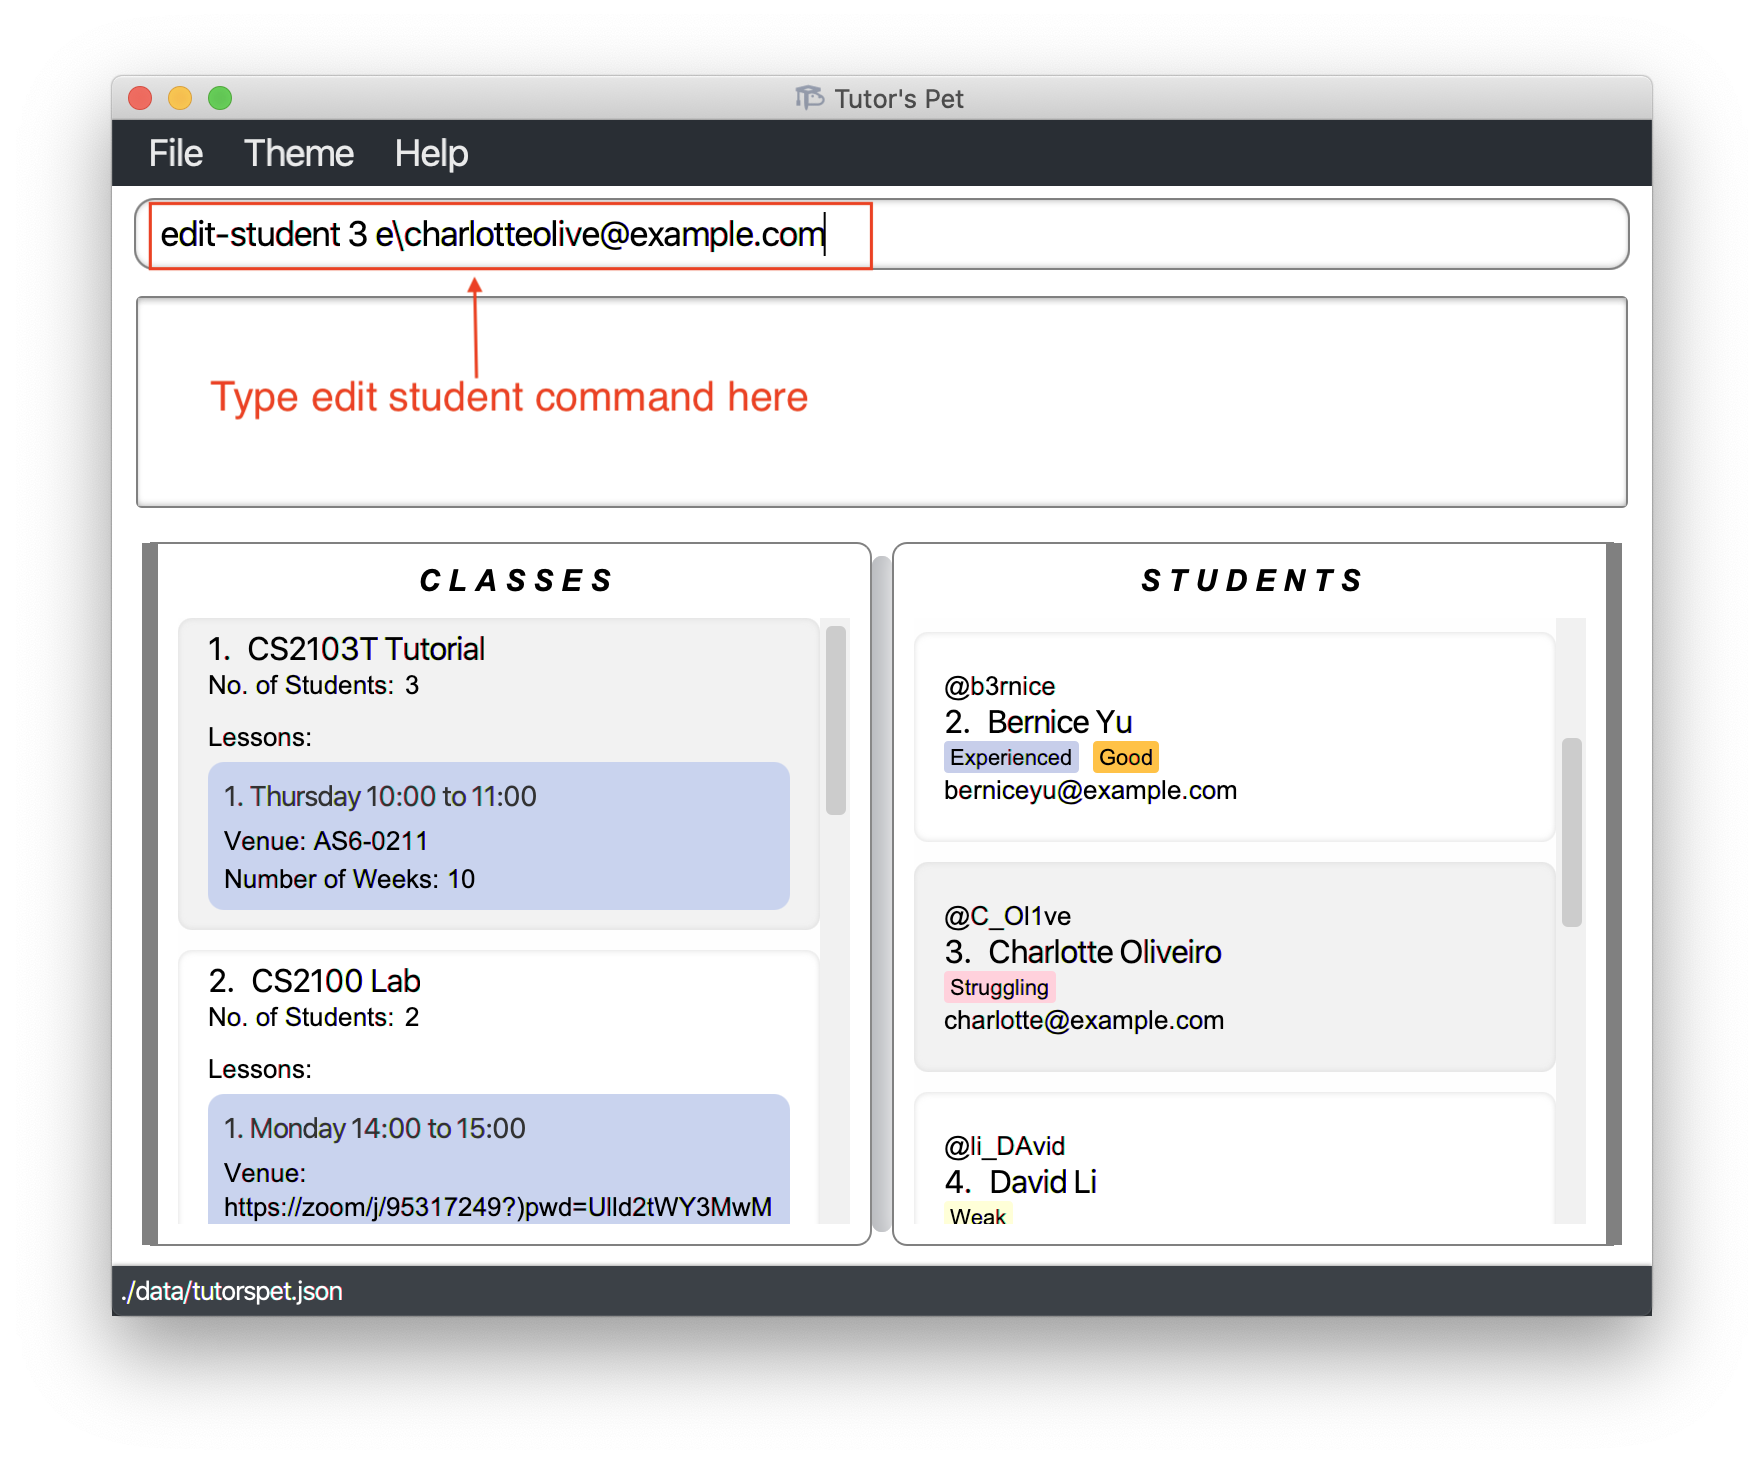
-
Scrolling down the list of students, you can see that
Charlotte’s email has changed tocharlotteolive@example.com.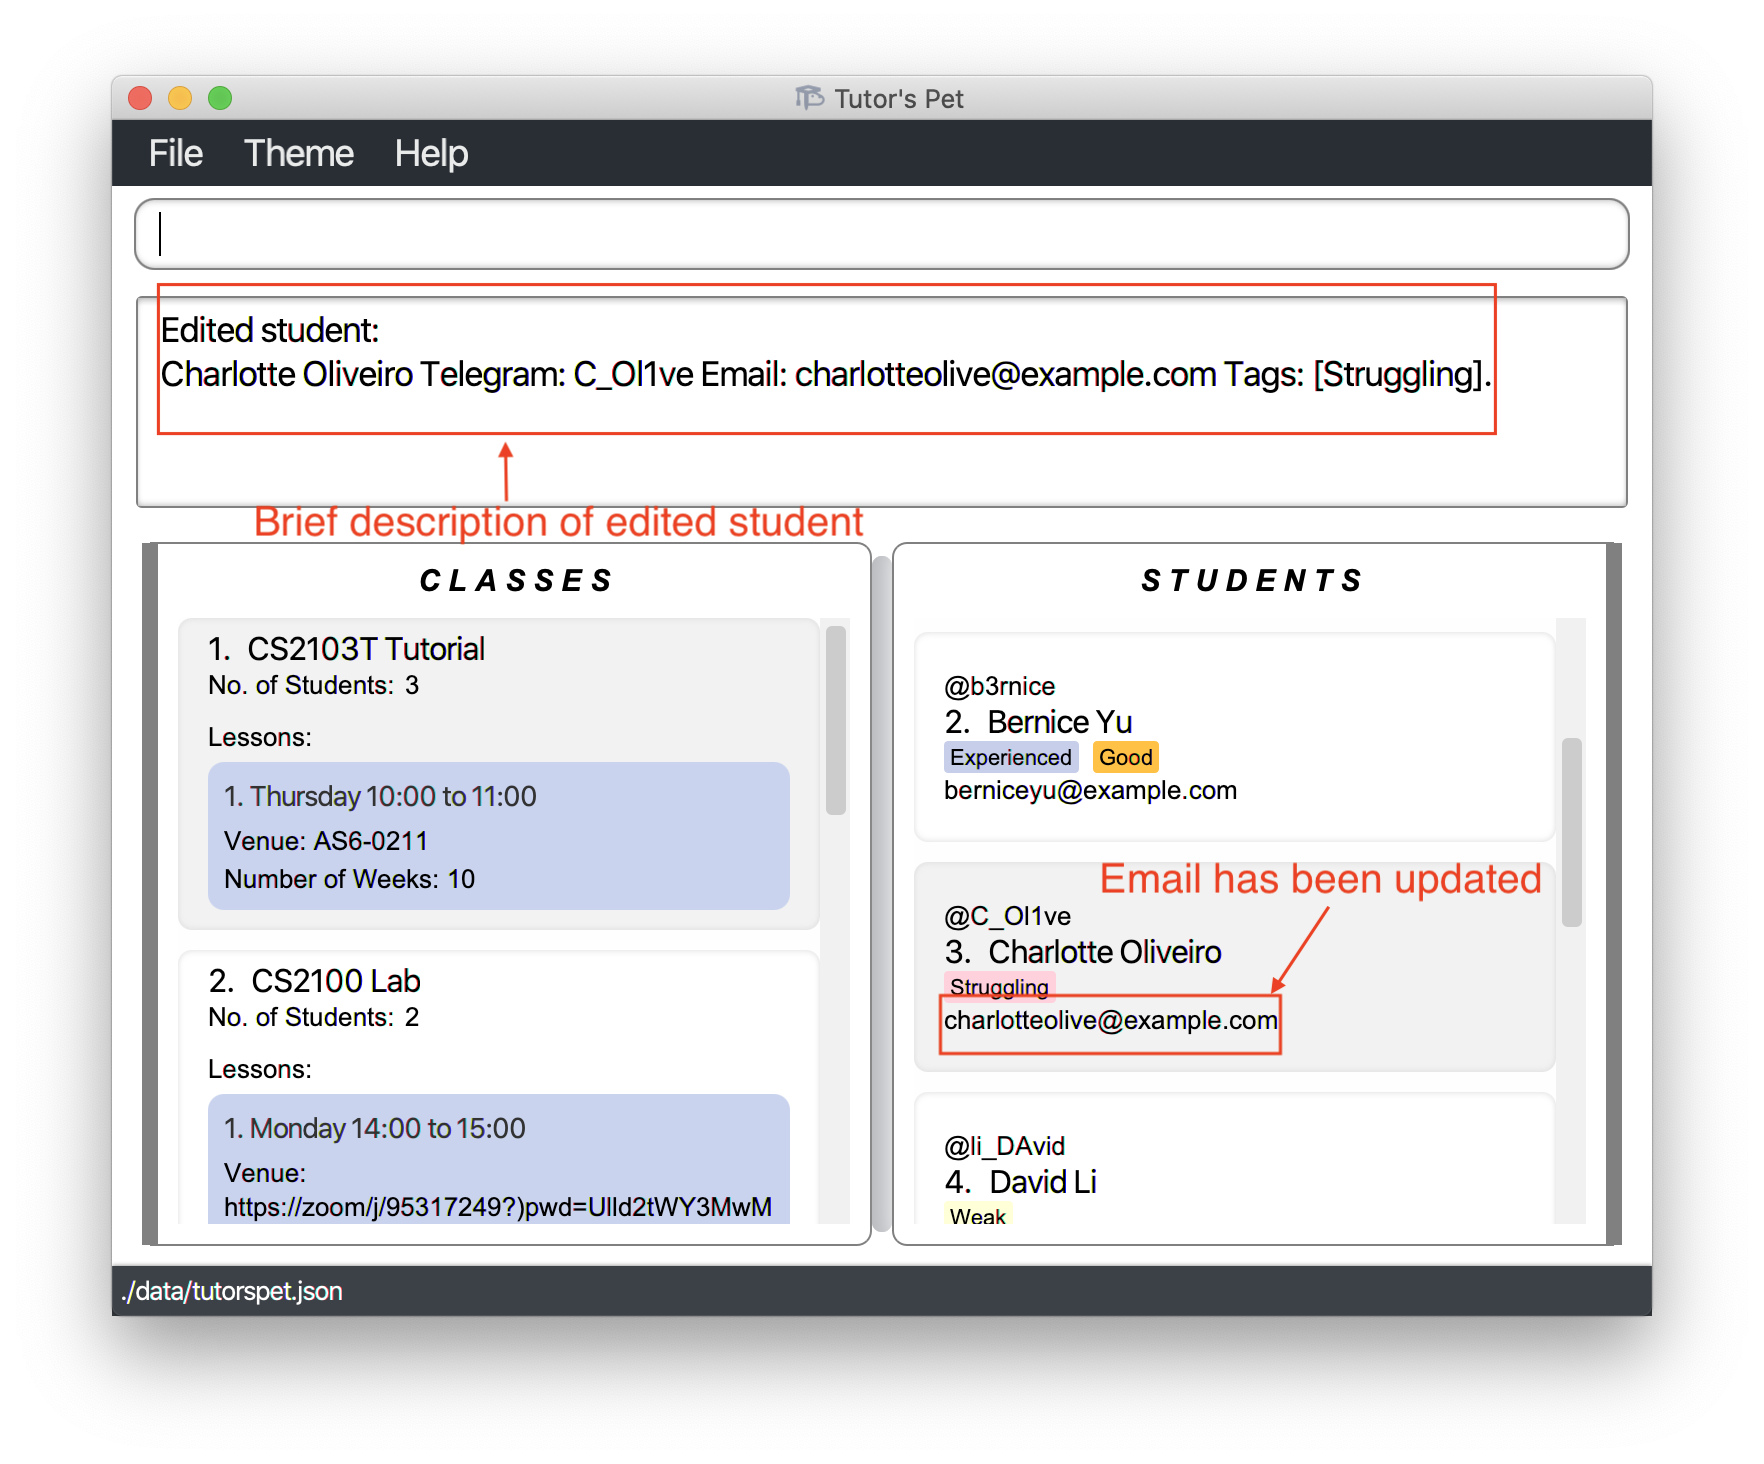
![]() Notes about the command:
Notes about the command:
-
You must provide at least one of the optional fields.
-
When editing tags, the existing tags of the student will be removed and replaced by the newly typed in tags.
-
You can remove all the tags of a student by typing
tag\without specifying any tags after it.
Other examples:
-
edit-student 1 t\smartlex e\yeohalex@example.com
Edits the telegram username and email address of the 1st student tosmartlexandyeohalex@example.comrespectively. -
edit-student 2 n\Betsy Yu tag\
Edits the name of the 2nd student toBetsy Yuand deletes all of her existing tags.
Finding a student by name : find-student
If you would like to search for a student by name, use this command.
Format: find-student KEYWORD [MORE_KEYWORDS]
For example:
-
Royrequested for supplementary notes in class today. You want to email him these notes. -
You type
find-student royand press Enter.
-
You can now retrieve
Roy’s email and send him the notes.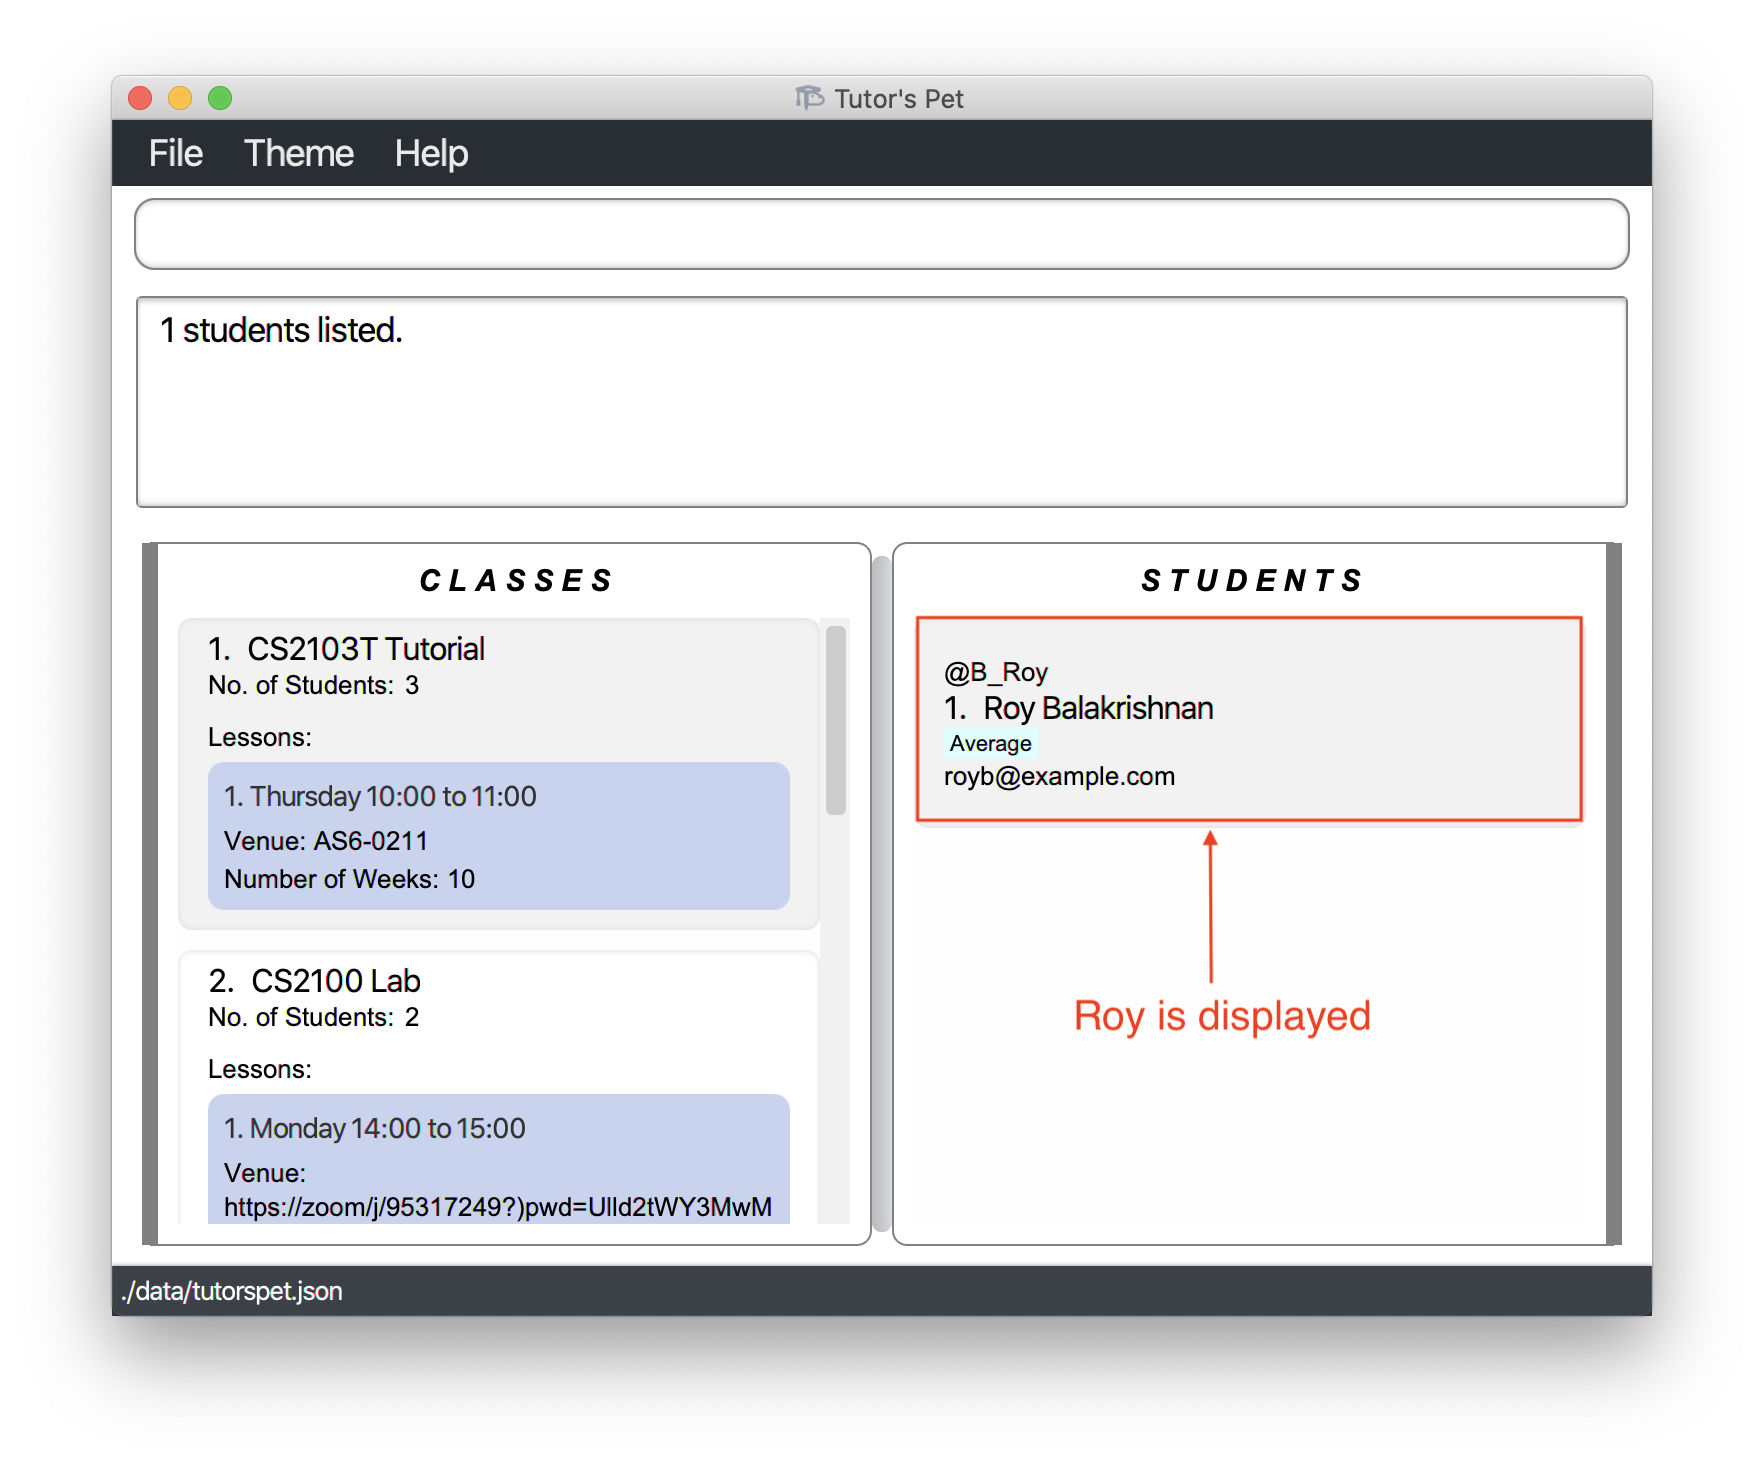
![]() Notes about the command:
Notes about the command:
-
The search is case-insensitive.
e.g You will receiveRoyif you type inroy. -
The order of the keywords does not matter.
e.g. You will receiveAlex Yeohif you type inYeoh Alex. -
Only the name is searched.
-
Only full words will be matched.
e.g. You will not receiveIrfanif you only type inIrfa. -
Students matching at least one keyword will be returned.
e.g. You will receive bothAlex YeohandDavid Liif you type inAlex Li.
Deleting a student : delete-student
If you would like to delete a student, you can make use of this command.
Format: delete-student STUDENT_INDEX
- Deletes the student at the specified
STUDENT_INDEX.
For example:
-
Bernice, the 2nd student displayed in Tutor’s Pet, has swappedCS2103T Tutorialslots and you no longer teach her. -
You want to delete her entry from Tutor’s Pet.
-
You type in
delete-student 2and press Enter.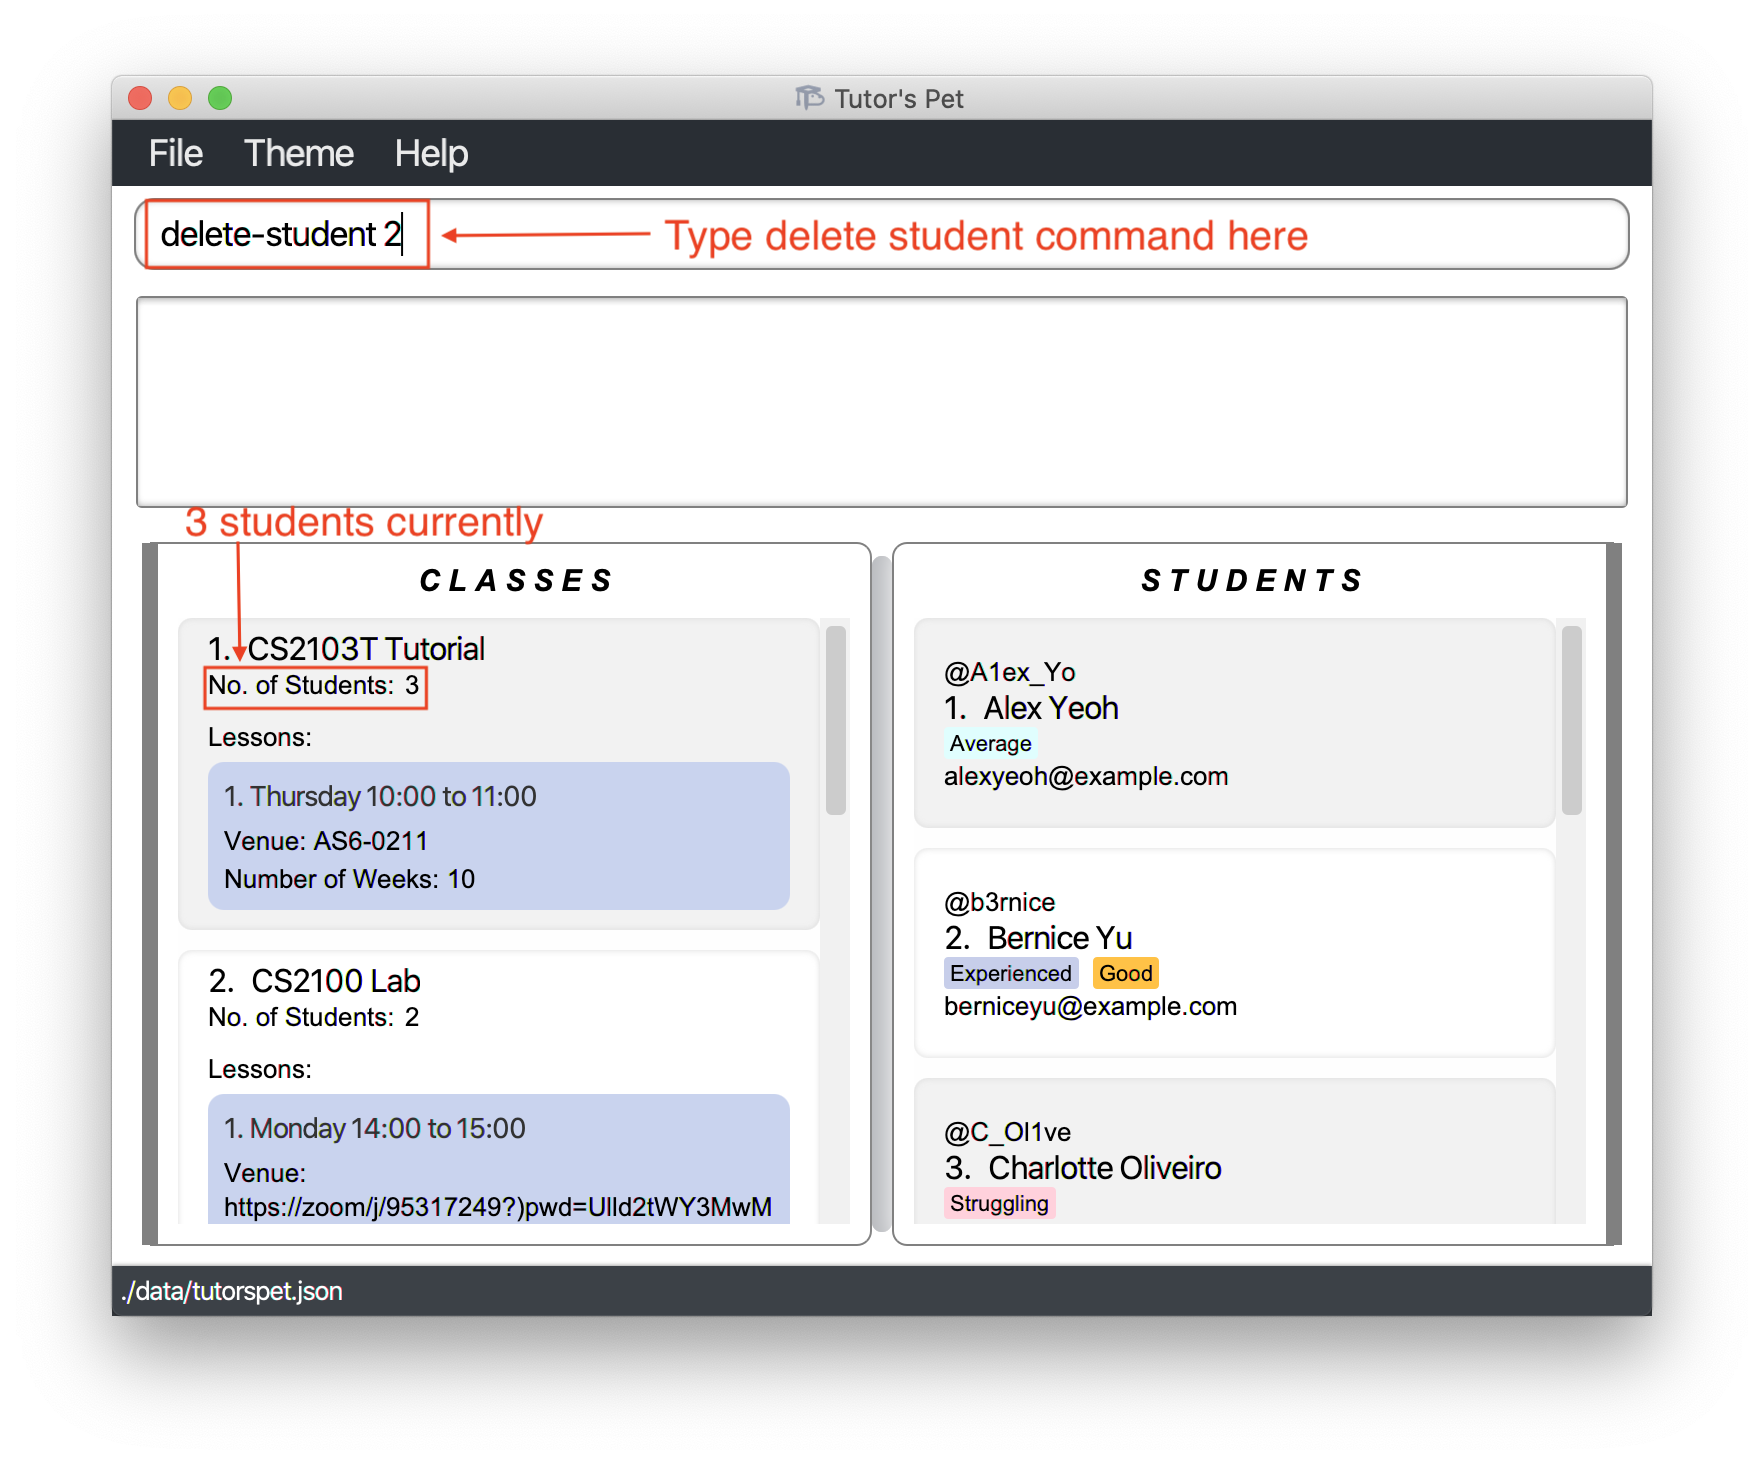
-
Notice that the number of students in
CS2103T Tutorialdecreases to 2.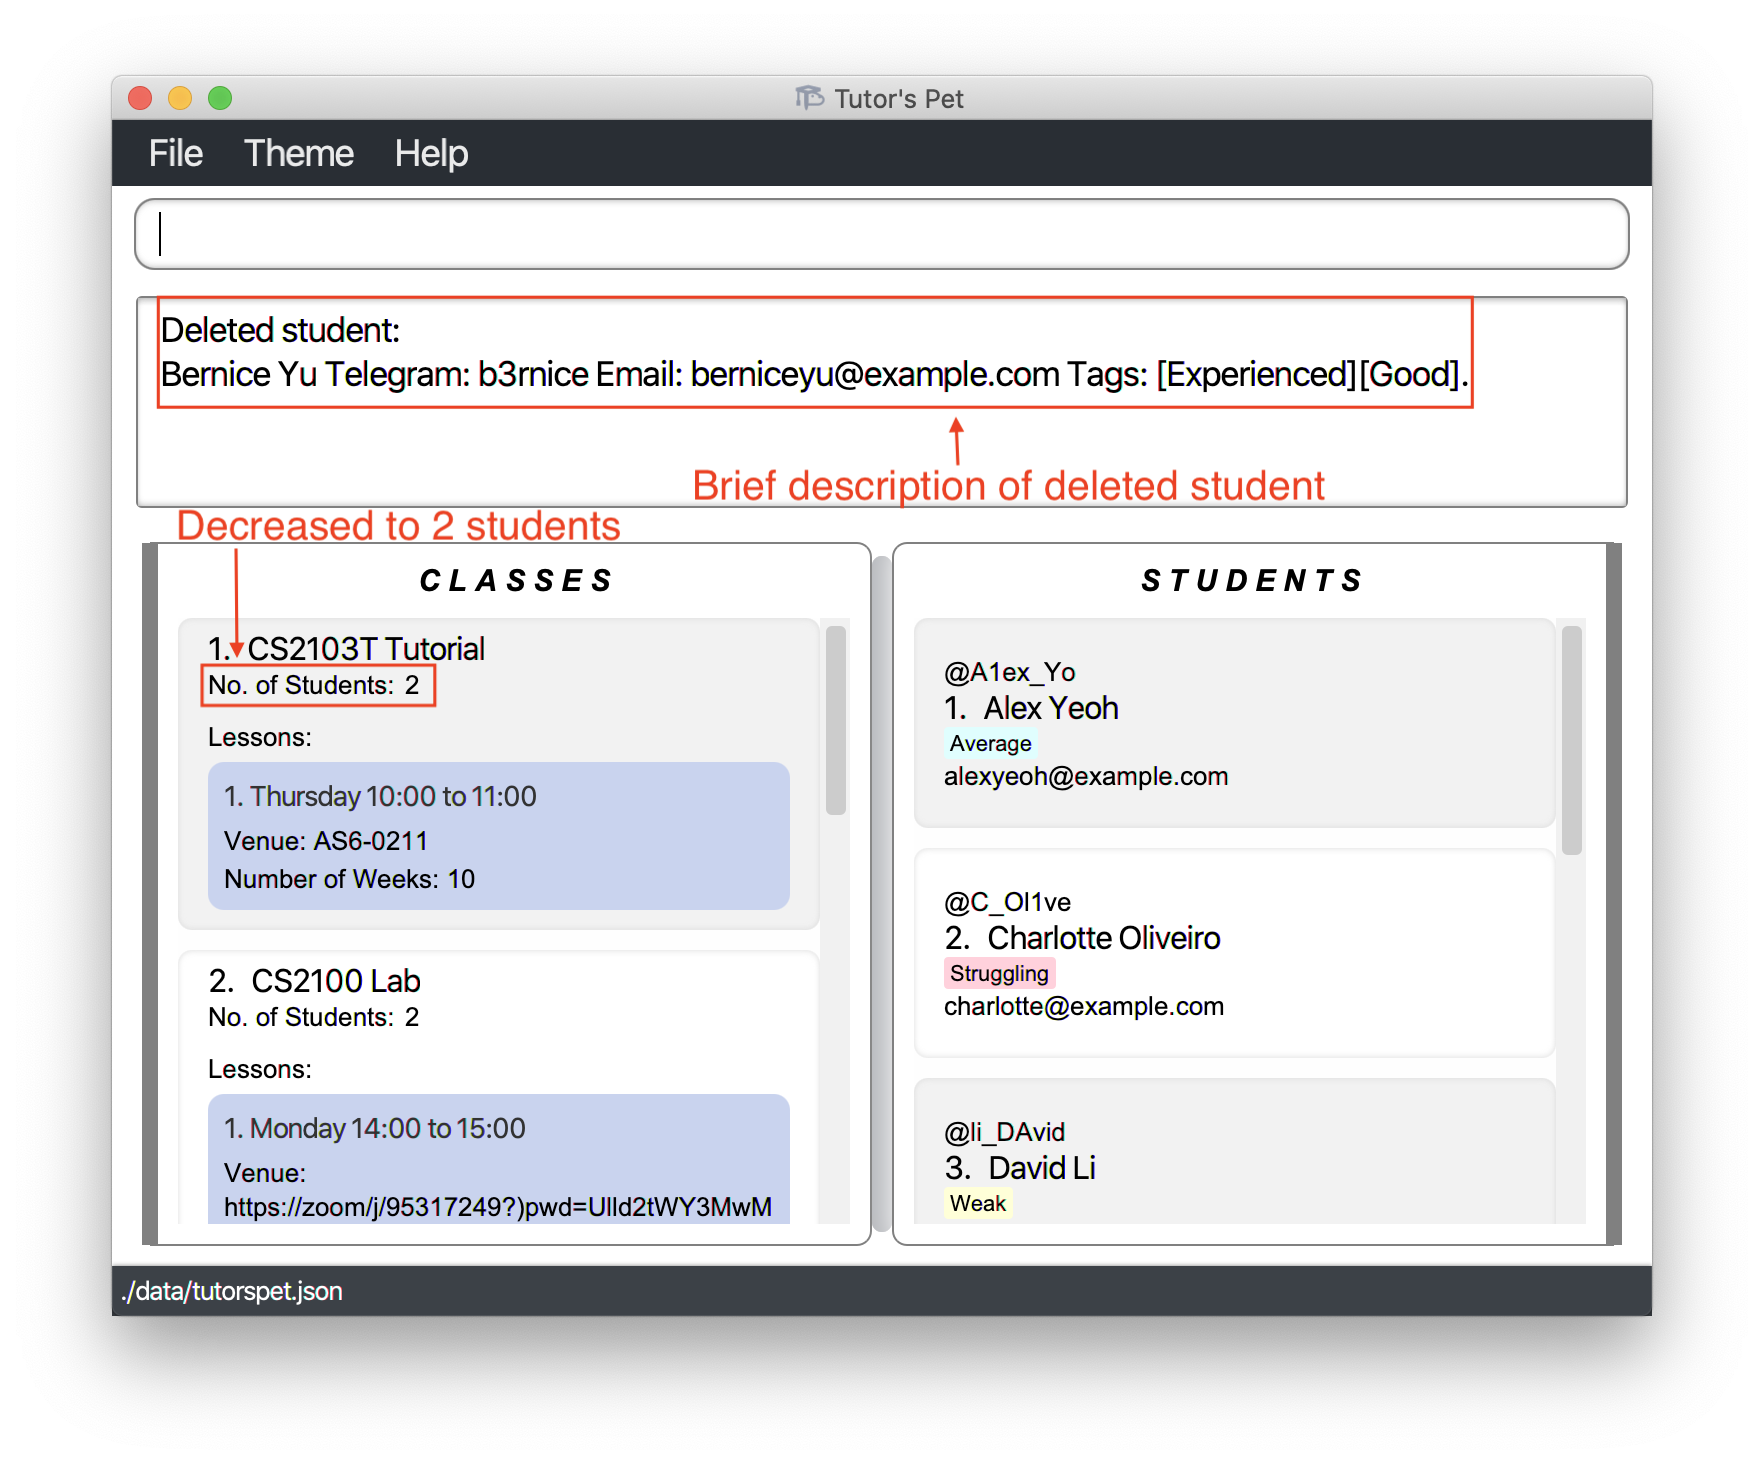
Clearing all students : clear-student
If you would like to delete all students in the application, you can use this command.
Format: clear-student
Managing Classes
Adding a class : add-class
If you would like to add a new class, you can use this command.
Format: add-class n\CLASS_NAME
- Adds a class with the specified
CLASS_NAME.
For example:
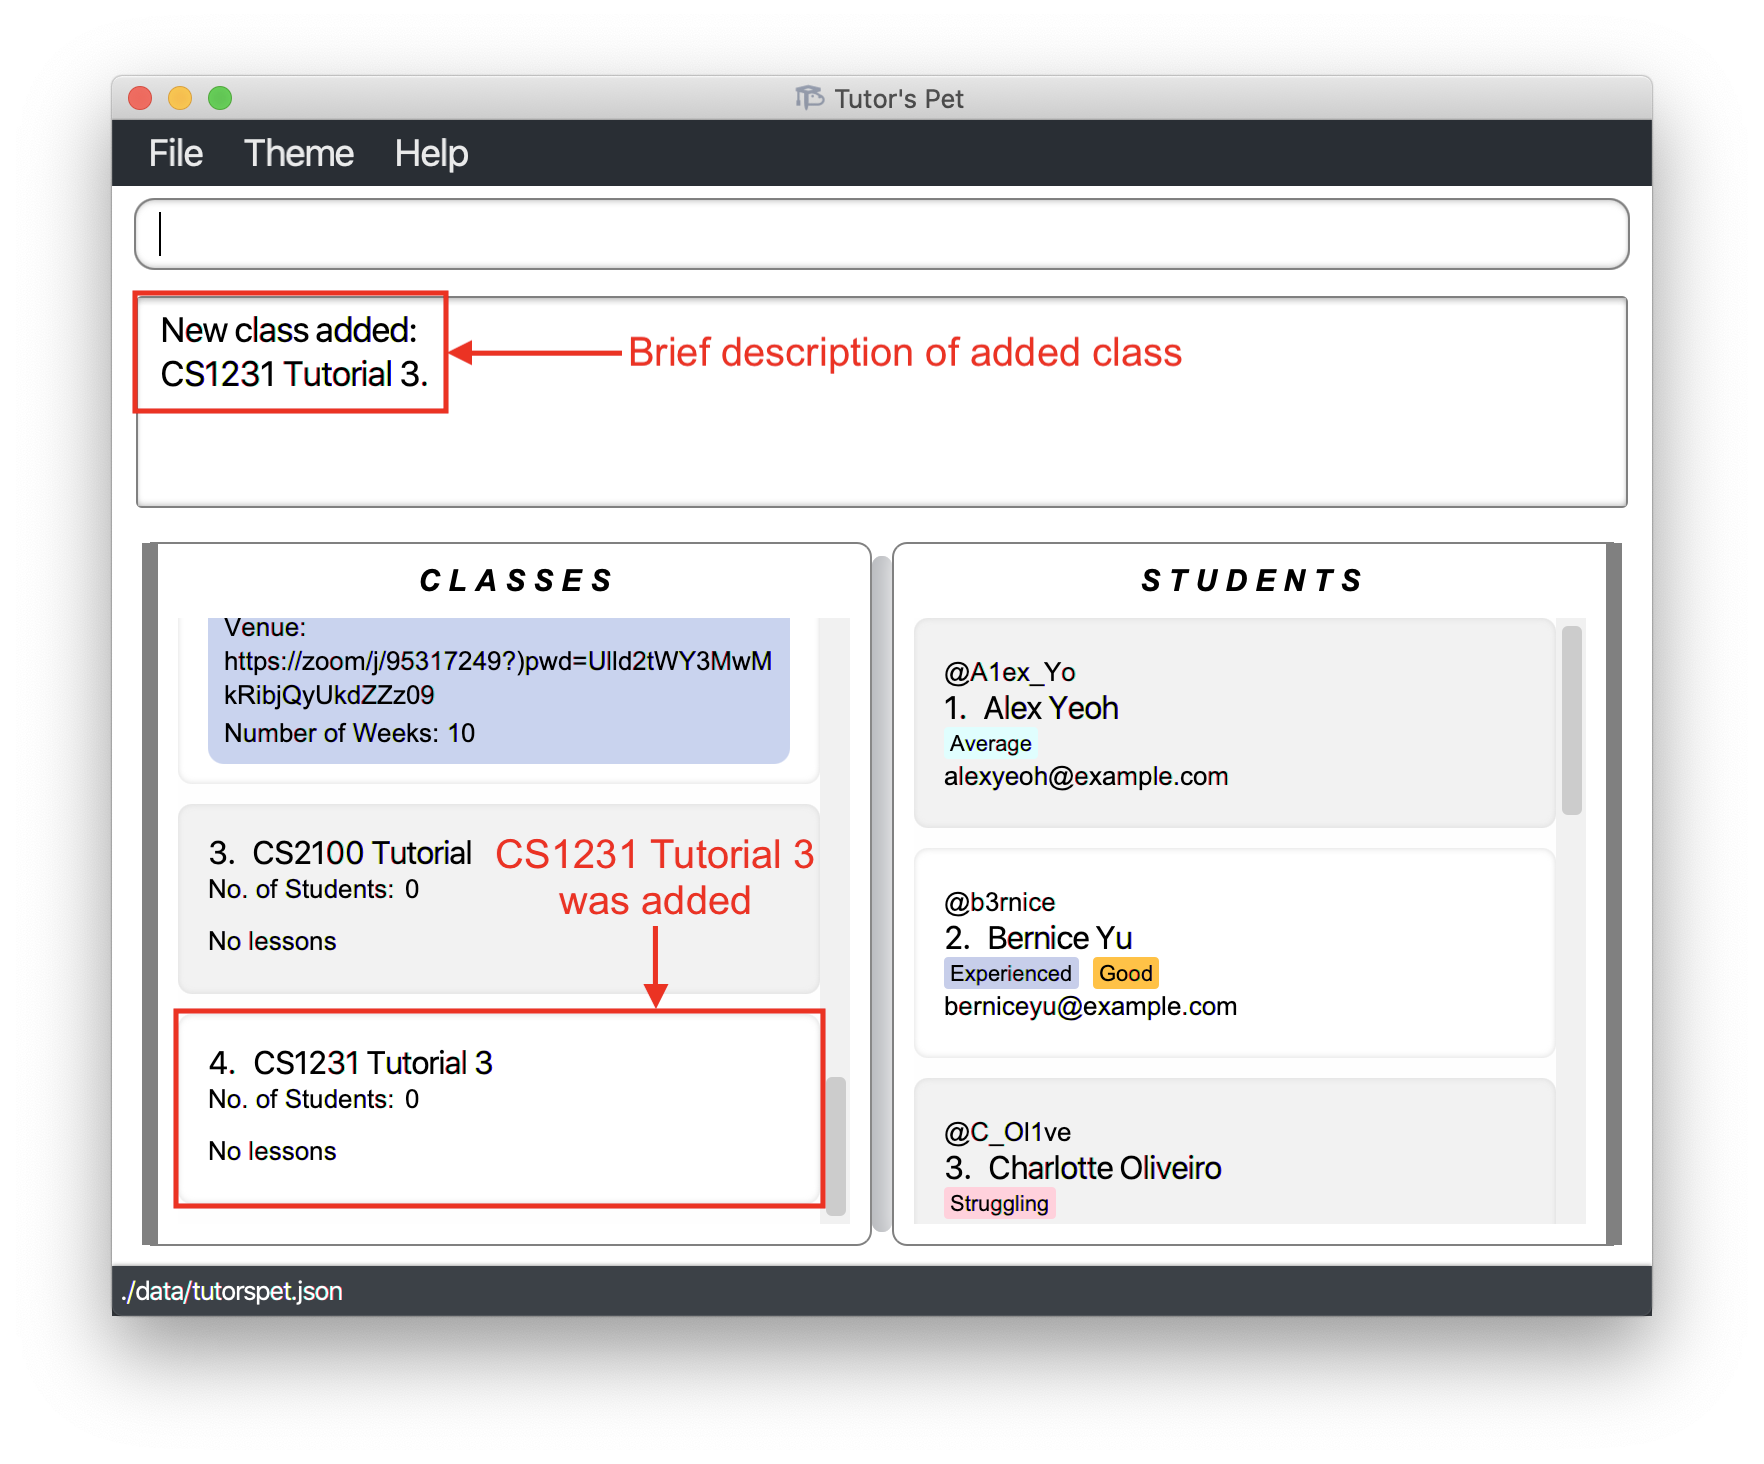
-
You have just been assigned to teach a tutorial class - Tutorial 3 of module CS1231. Hence, you decide to add this new tutorial class to your Tutor’s Pet.
-
You type
add-class n\CS1231 Tutorial 3and press Enter.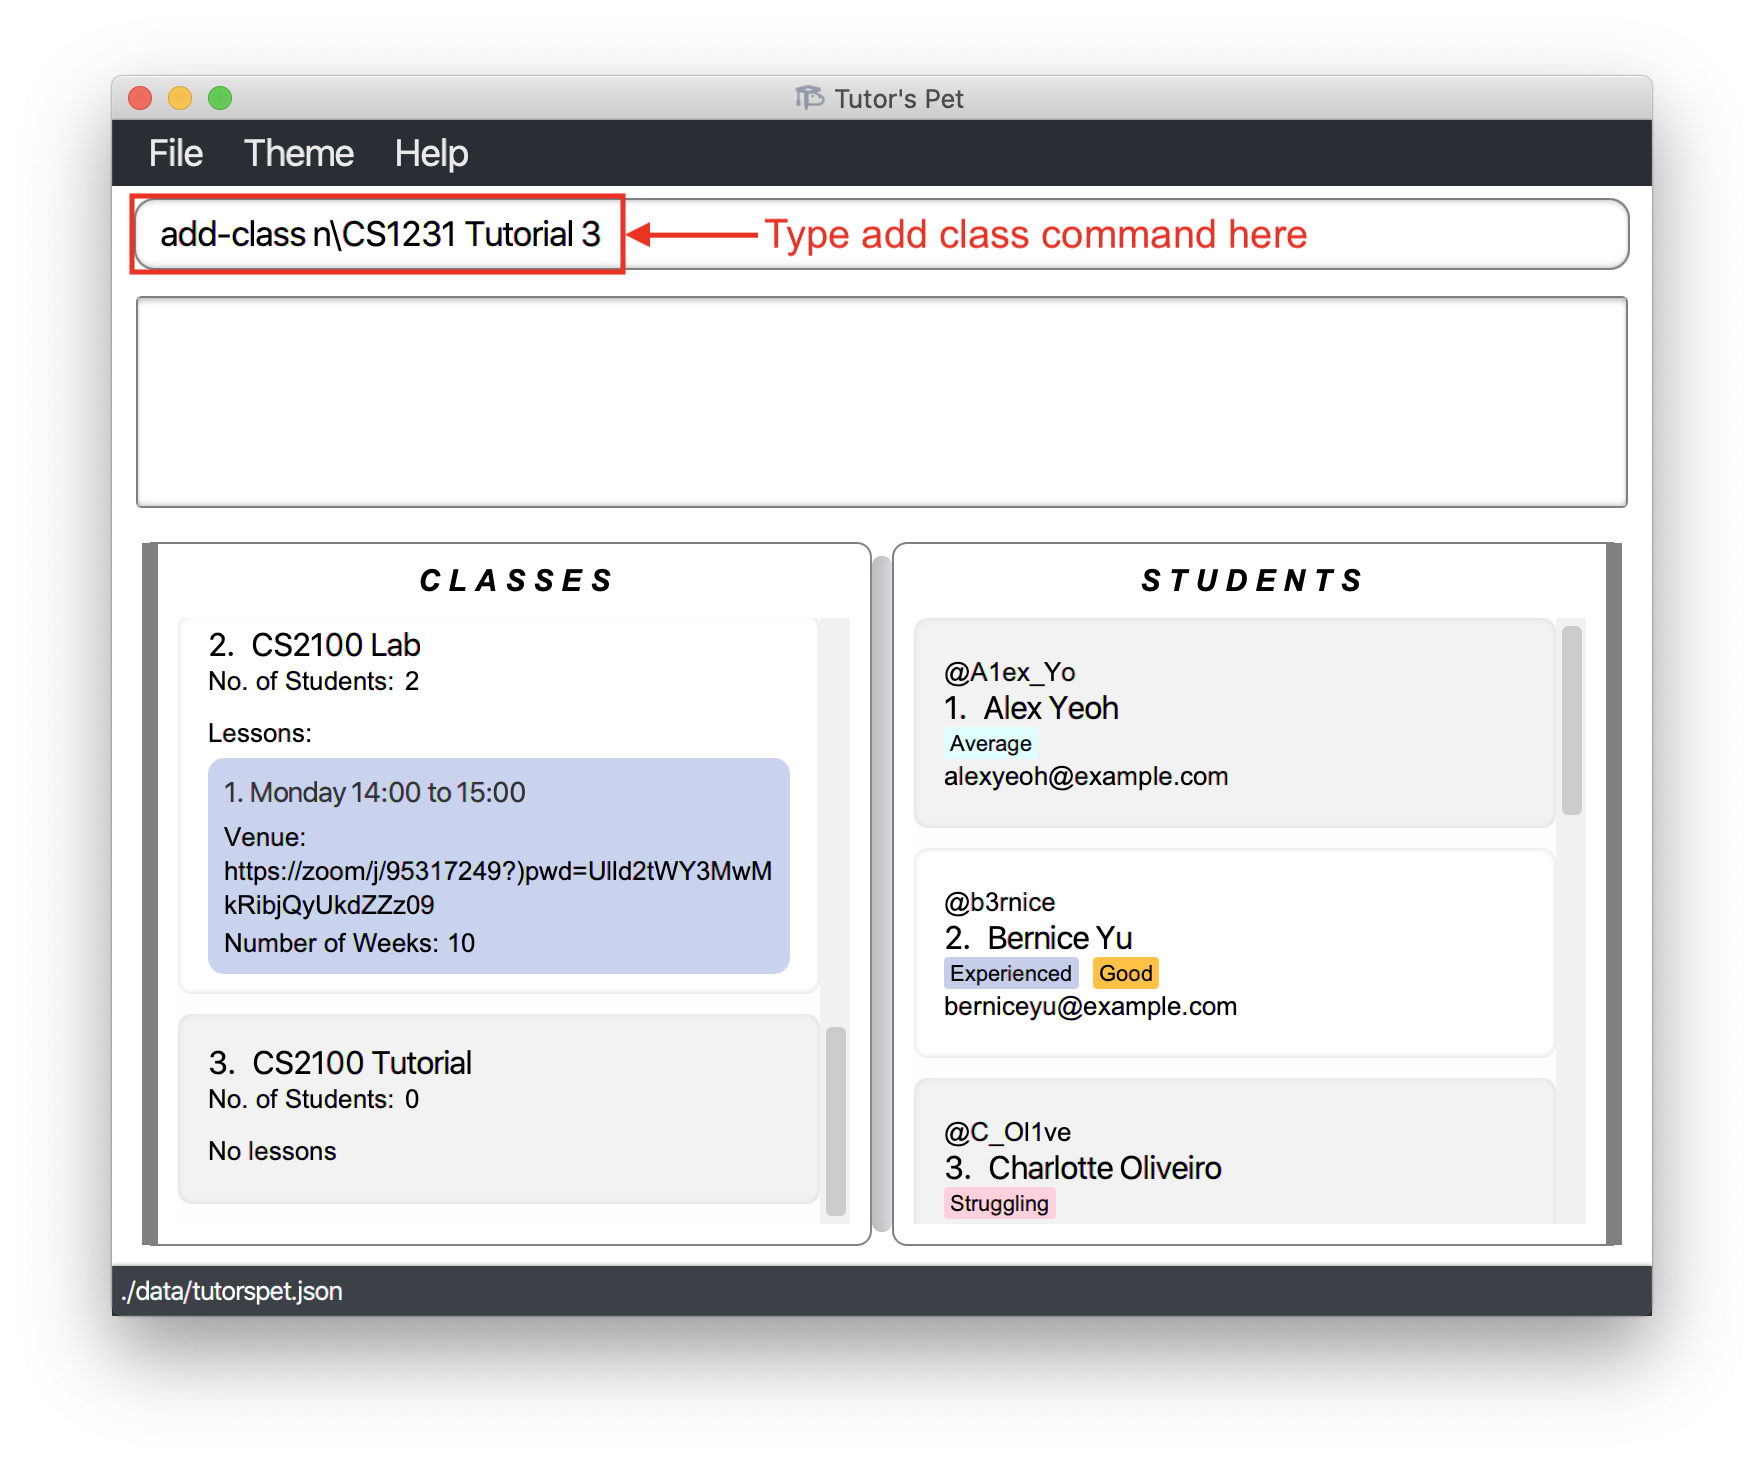
-
The class has been added, and you can see it in the displayed class list.
![]() Notes about the command:
Notes about the command:
-
The class name can only contain alphabets, numbers and spaces.
-
The class name cannot be the same as an existing class in your Tutor’s Pet.
Other examples:
-
add-class n\CS1101S T02D
AddsCS1101S T02Dto your Tutor’s Pet.
Listing all classes : list-class
If you would like to see a list of all classes in your Tutor’s Pet, make use of this command.
Format: list-class
Listing all students within a class : list-student
If you would like to see a list of all students in a particular class, make use of this command.
Format: list-student c\CLASS_INDEX
- Lists the students in the class at the specified
CLASS_INDEX.
For example:
-
You want to send an email to students in your
CS2100 Laband hence would want to see a list of students in this class. -
You type in the command
list-student c\2and press Enter.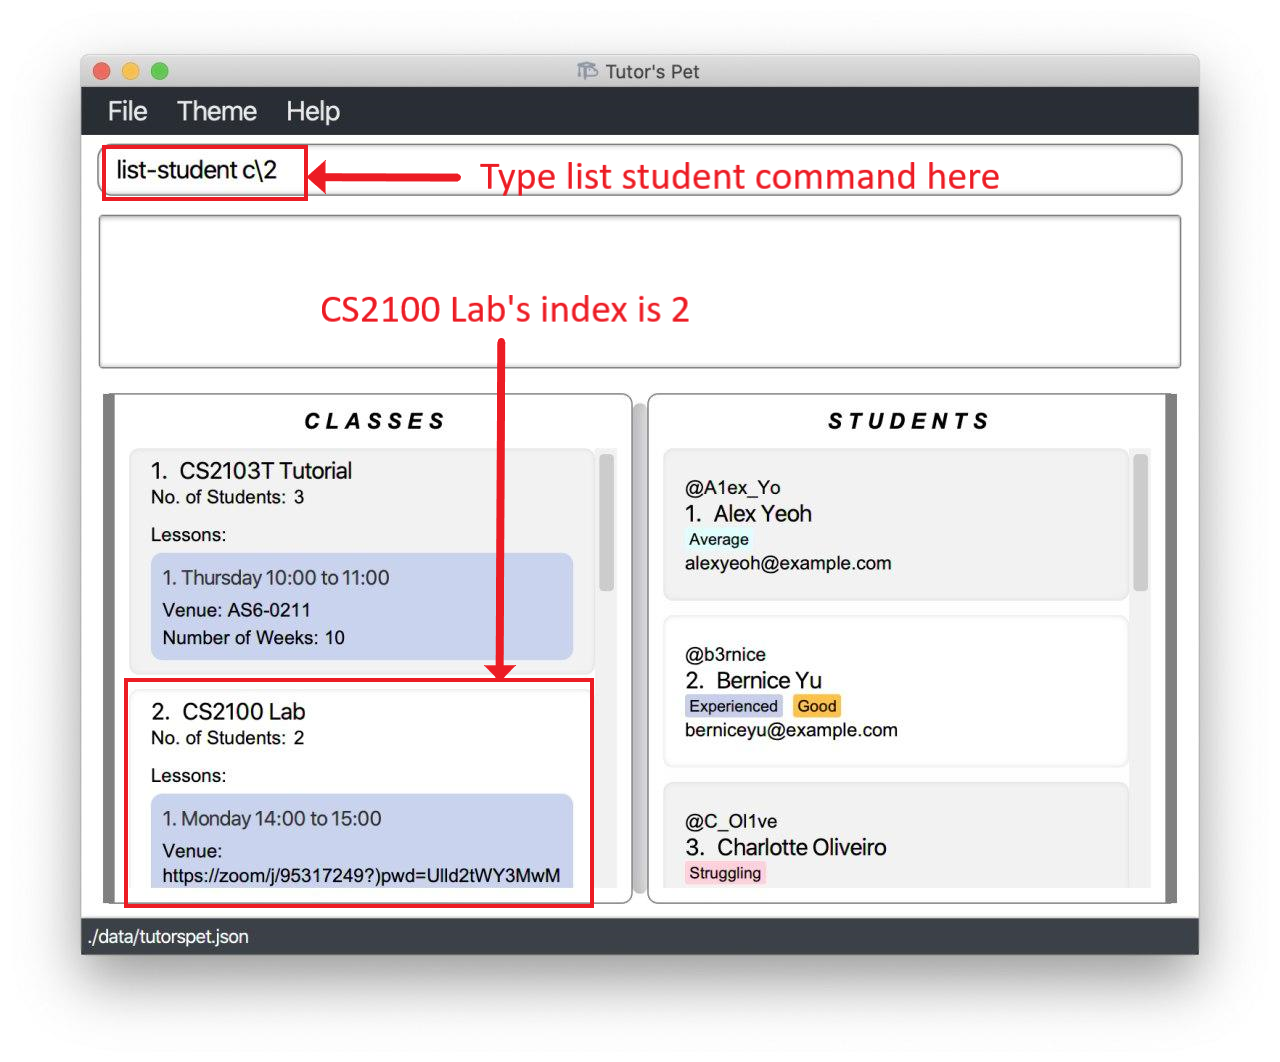
-
You can see that the 2 students in your
CS2100 Labhave been listed.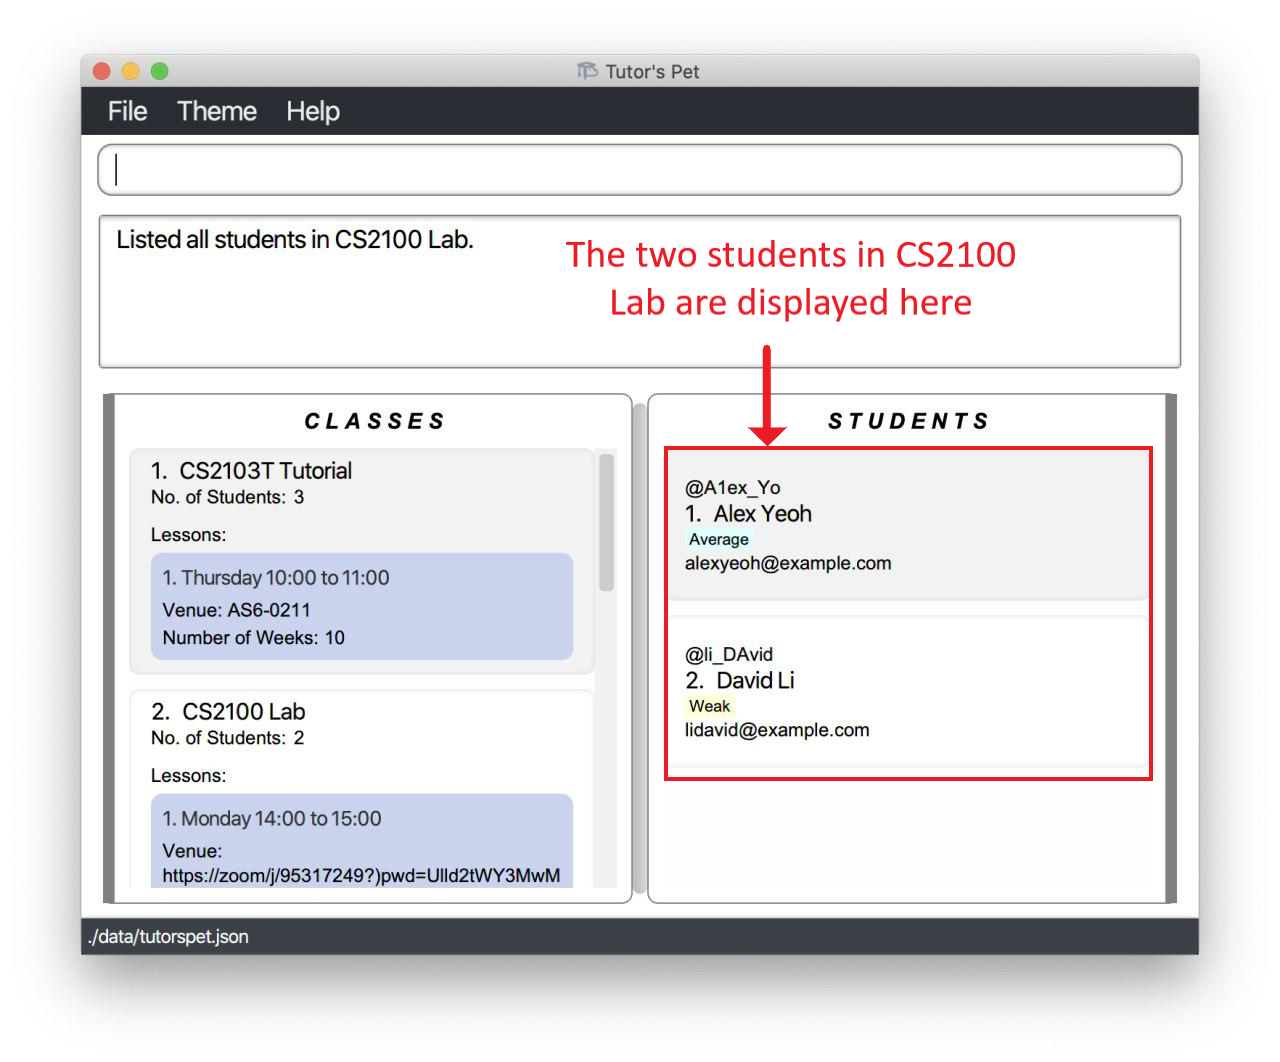
Other examples:
-
list-student c\3
Lists all students in the 3rd class.
Editing a class : edit-class
If you entered the wrong class name or would like to change the name of a class, you can make use of this command.
Format: edit-class CLASS_INDEX n\CLASS_NAME
- Edits the class at the specified
CLASS_INDEX.
For example:
-
Your module coordinator decides to allocate another class to you and you want to be able to distinguish between the two classes. Hence you decide to edit the
CS2103T Tutorialclass toCS2103T Tutorial T10. -
You type the command
edit-class 1 n\CS2103T Tutorial T10and press Enter.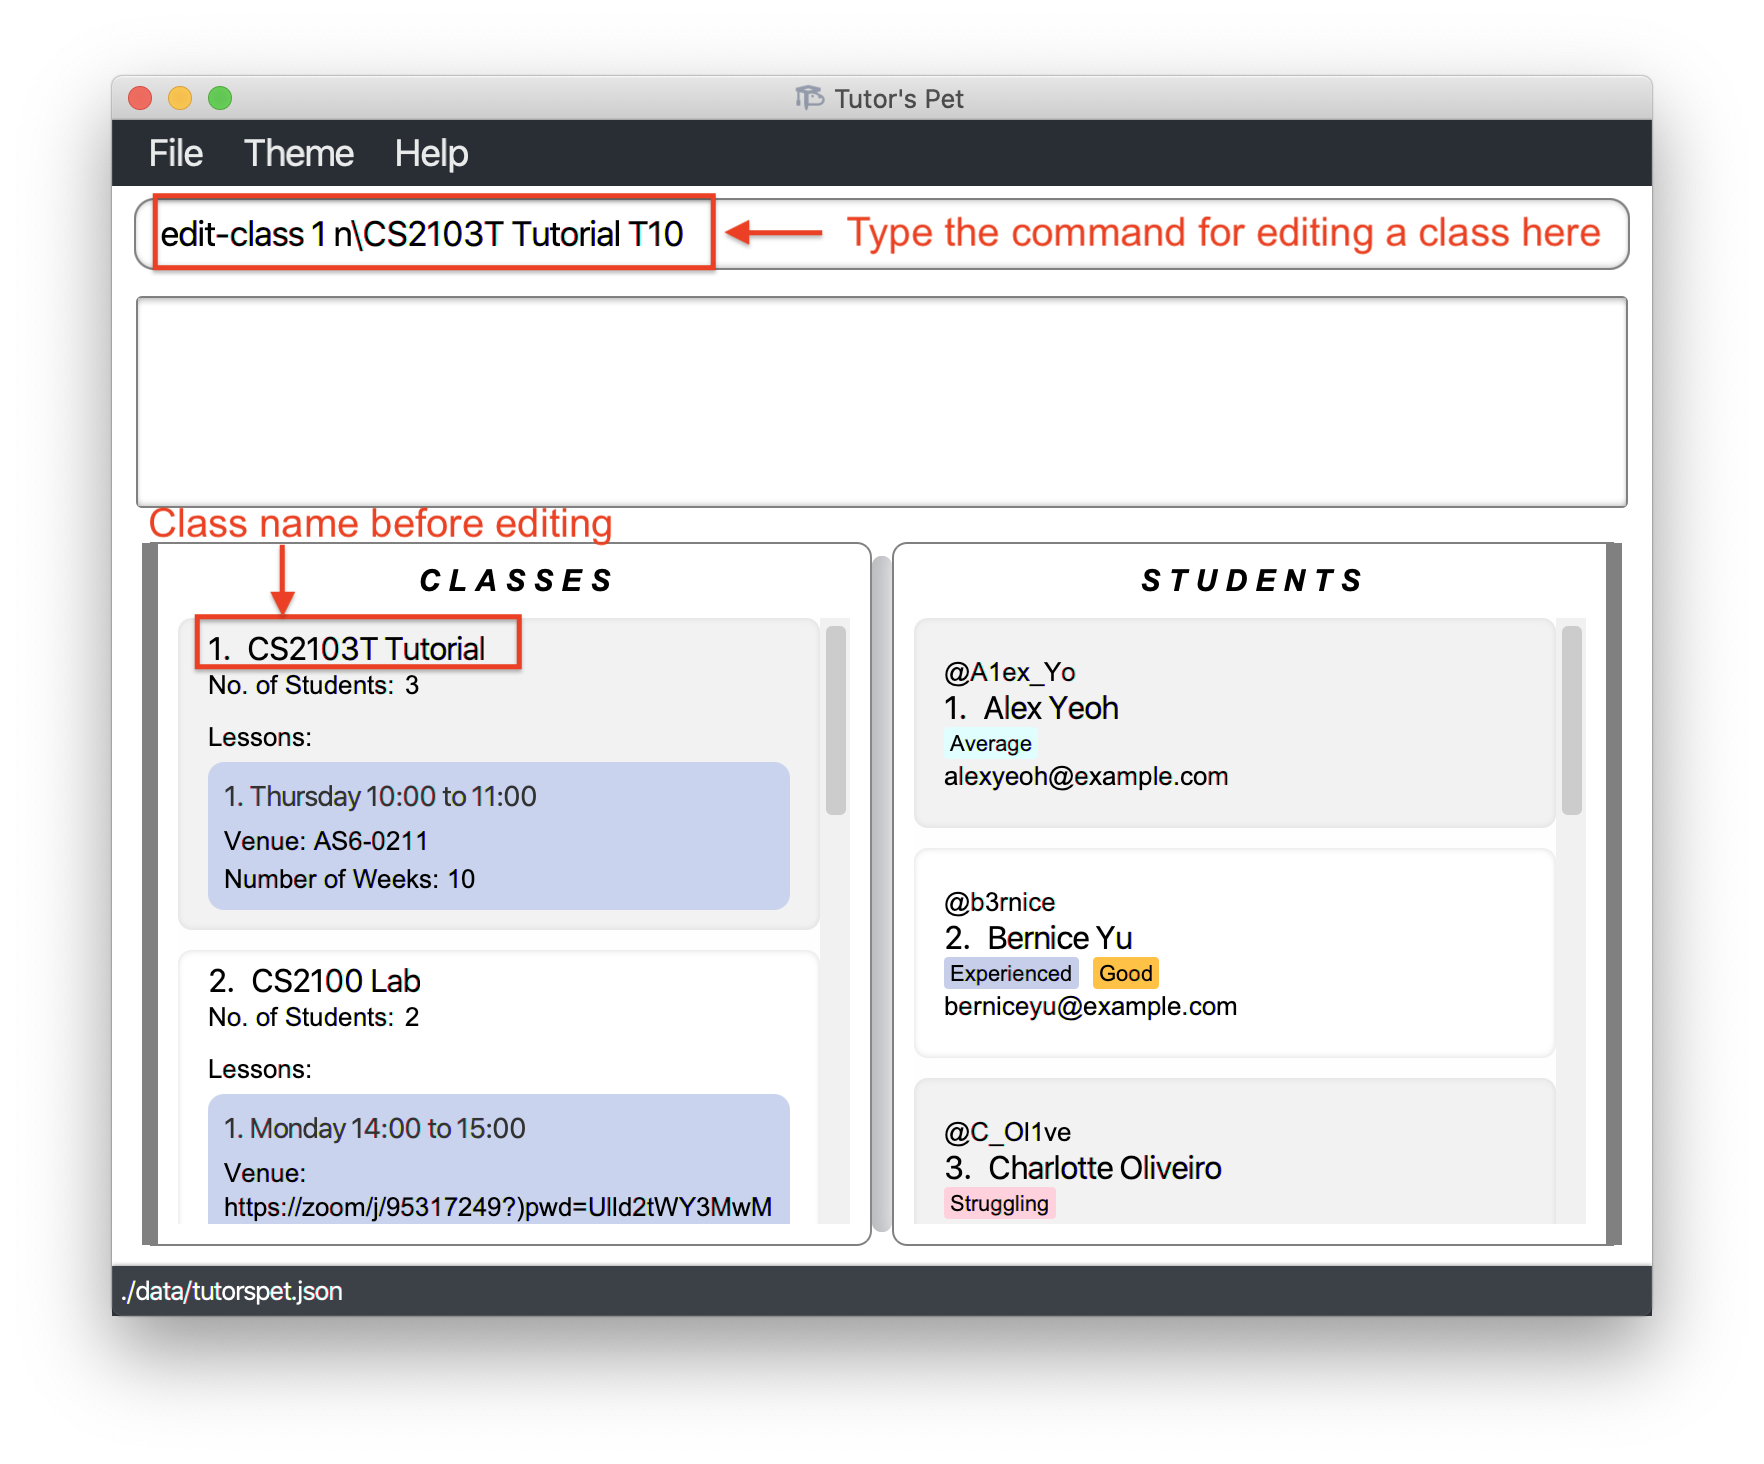
-
The class has been renamed from
CS2103T TutorialtoCS2103T Tutorial 10.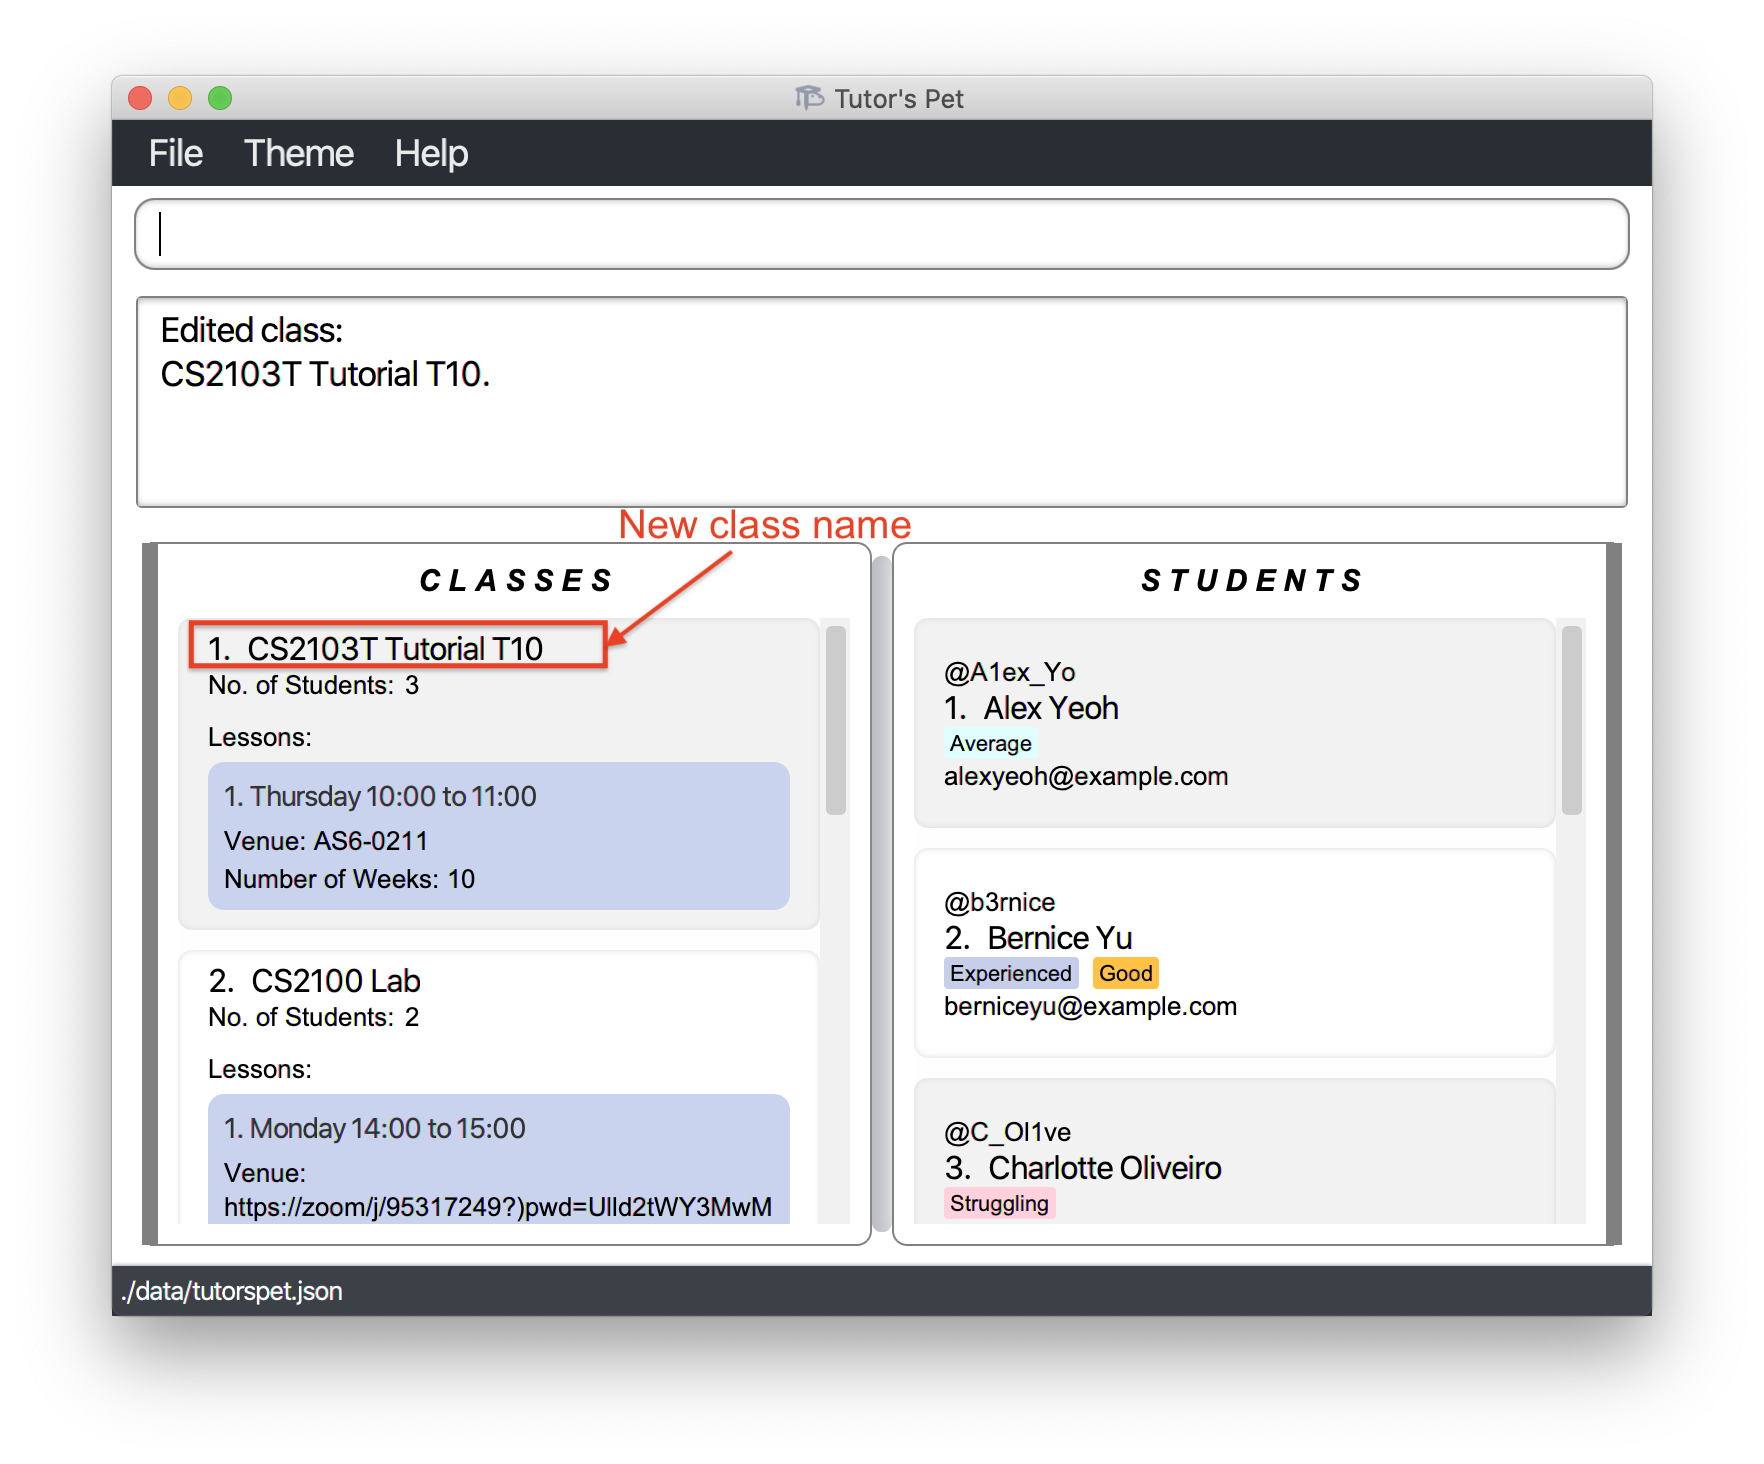
![]() Notes about the command:
Notes about the command:
- A new class name must be provided.
Other examples:
-
find-class CS2030 lab
edit-class 1 n\CS2030 lab L05
Edits the name of the 1st class in the result of the find command.
![]() Tip: Make use of the
Tip: Make use of the find-class command to filter the displayed class list to your
desired class. You can now type in index 1 directly to edit the name of that class.
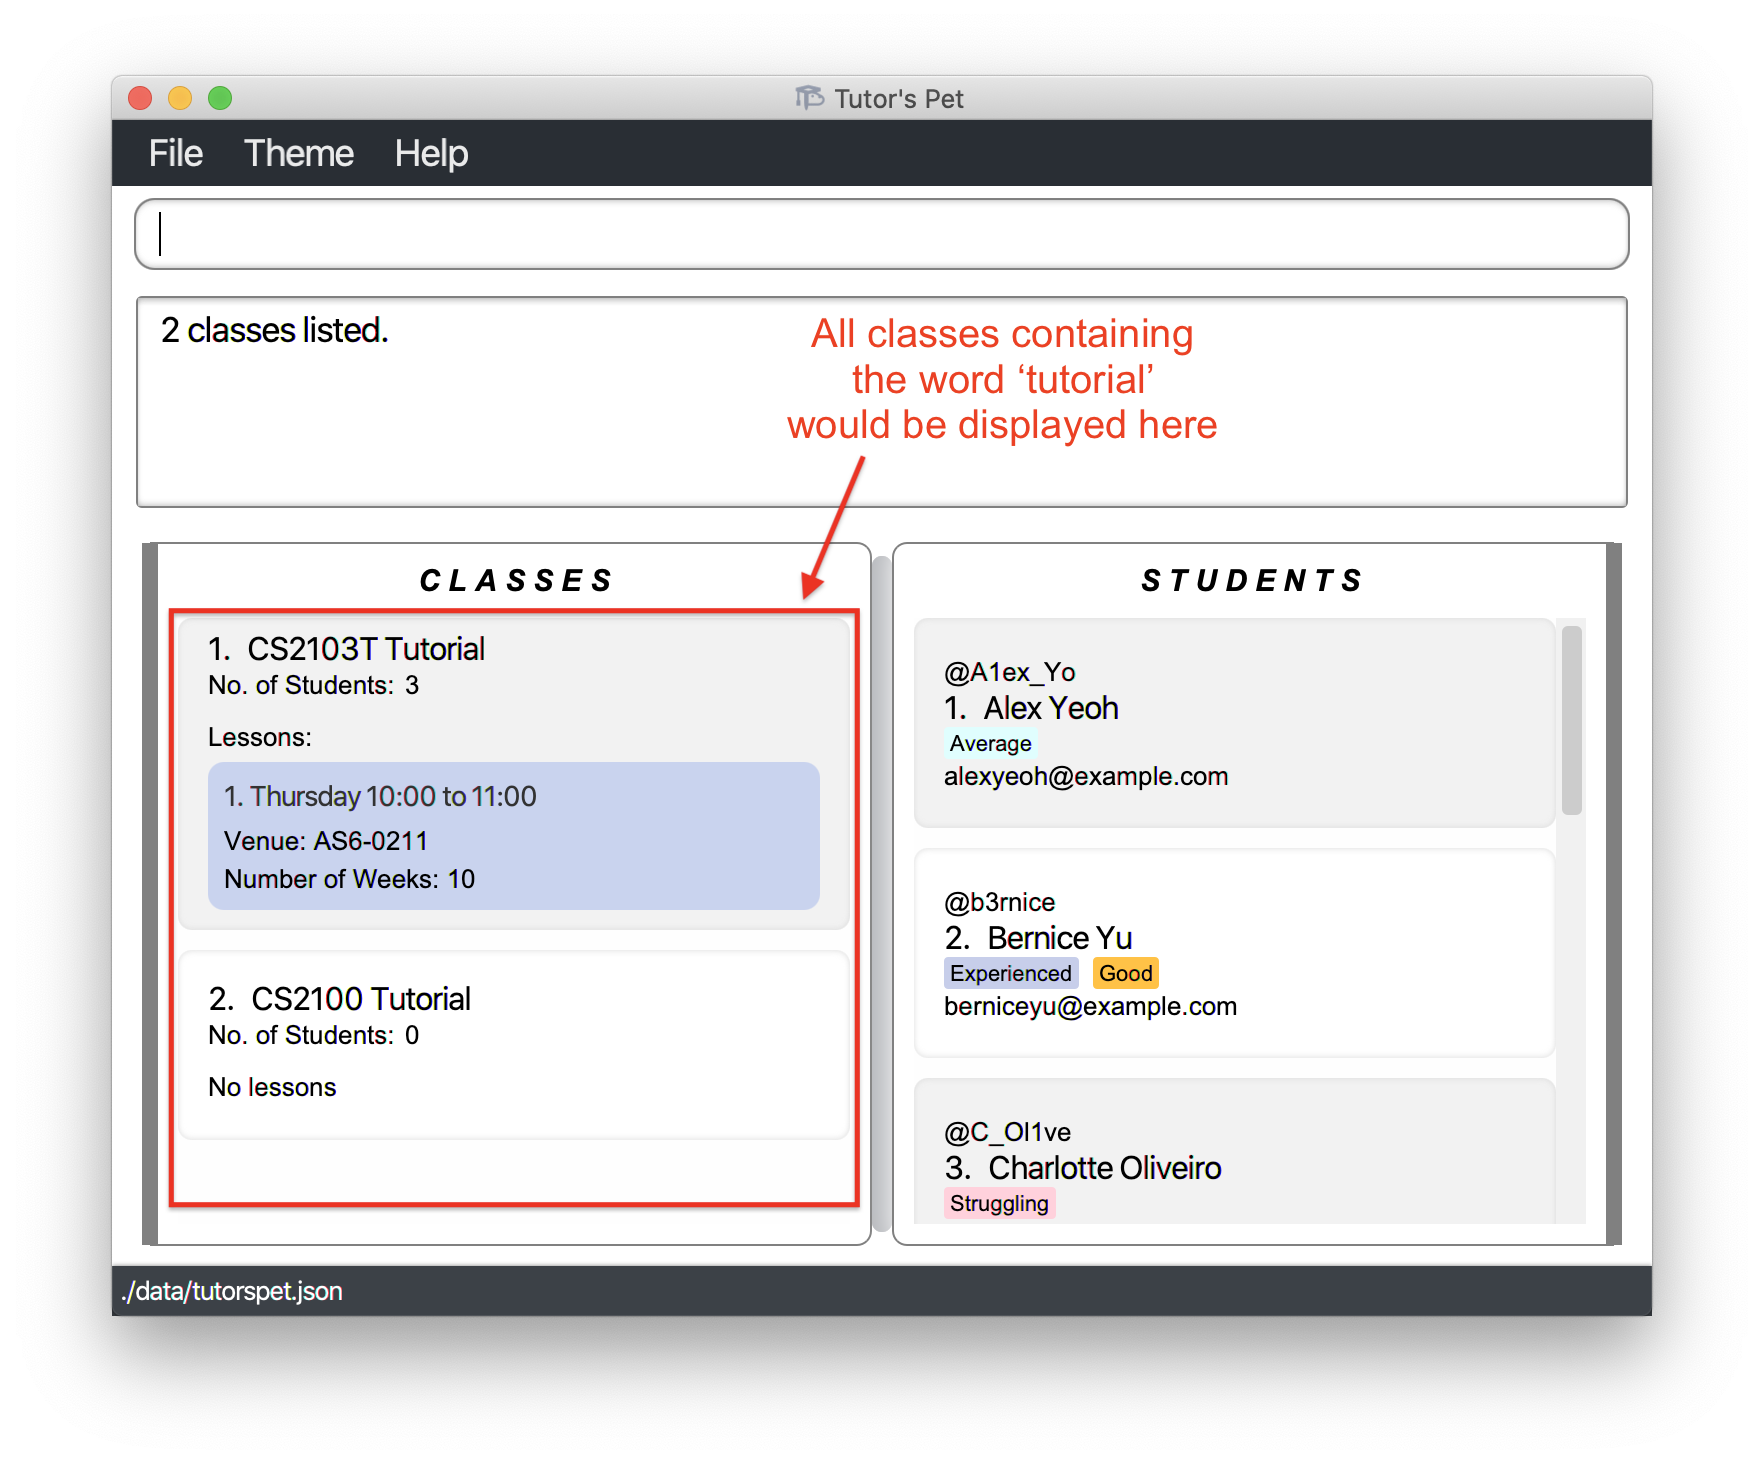
Finding a class by name : find-class
If you would like to find classes that contain any of the given keywords in their name, you can make use of this command.
Format: find-class KEYWORD [MORE_KEYWORDS]
For example:
-
You would like to find out how many
Tutorialclasses you are currently teaching. You type the commandfind-class Tutorialand press Enter.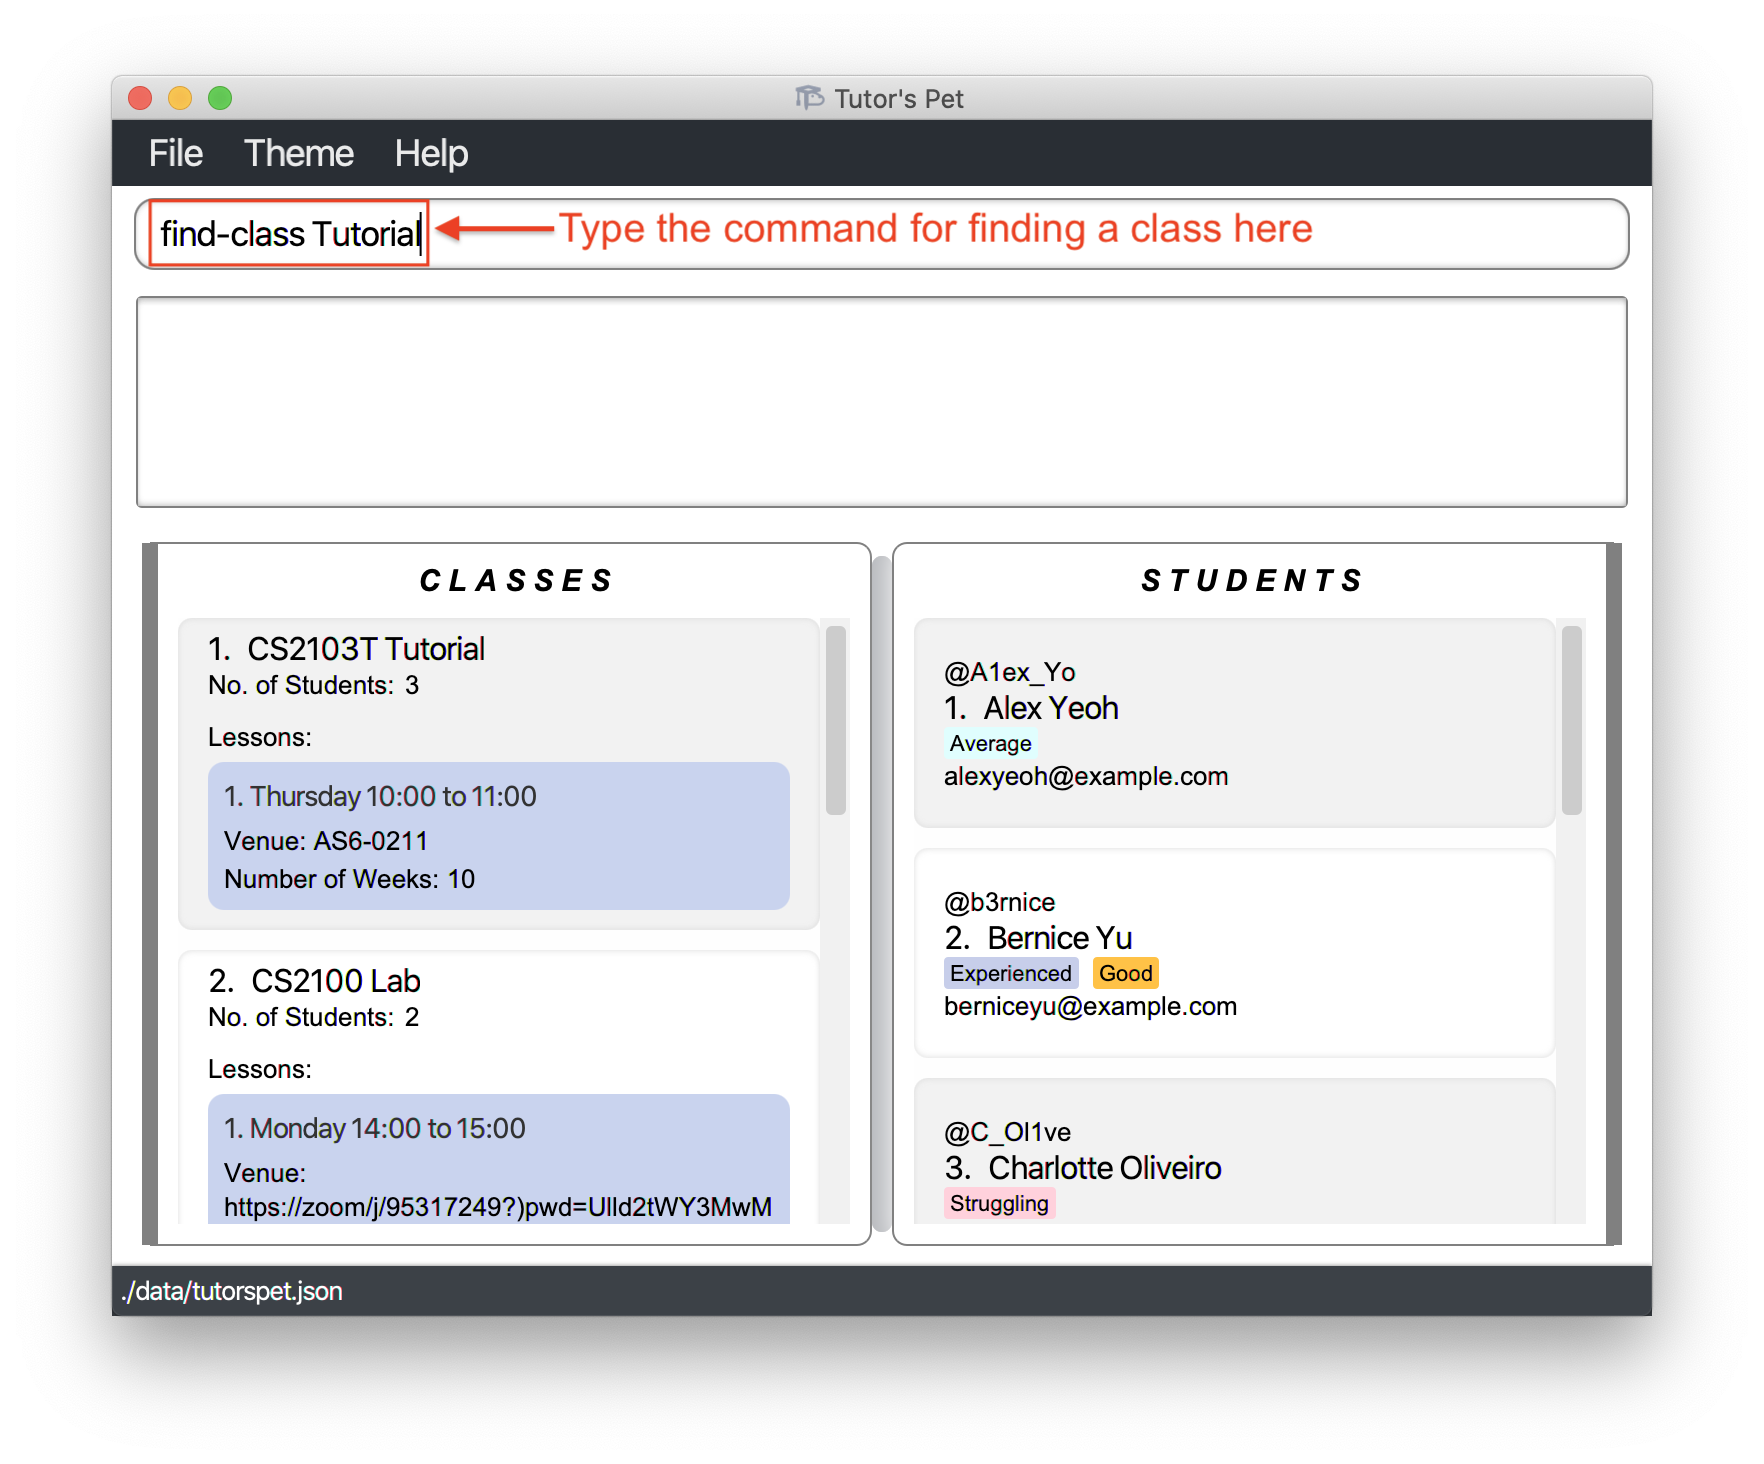
-
You find out that you are only teaching 2 tutorials this semester and hence decide to accept more classes.
Other examples:
-
find-class CS2100
DisplaysCS2100 tutandCS2100 lab. -
find-class tut CS2030
DisplaysCS2103T tutandCS2030 lab.
![]() Notes about the command:
Notes about the command:
-
The search is case-insensitive.
e.gcs2103twill matchCS2103T. -
The order of the keywords does not matter.
e.g.lab CS2100will matchCS2100 lab. -
Only the name is searched.
-
Only full words will be matched.
e.g.CSwill not matchCS2100. -
Classes matching at least one keyword will be returned.
e.g.CS2103T labwill return bothCS2103T tutandCS2100 lab.
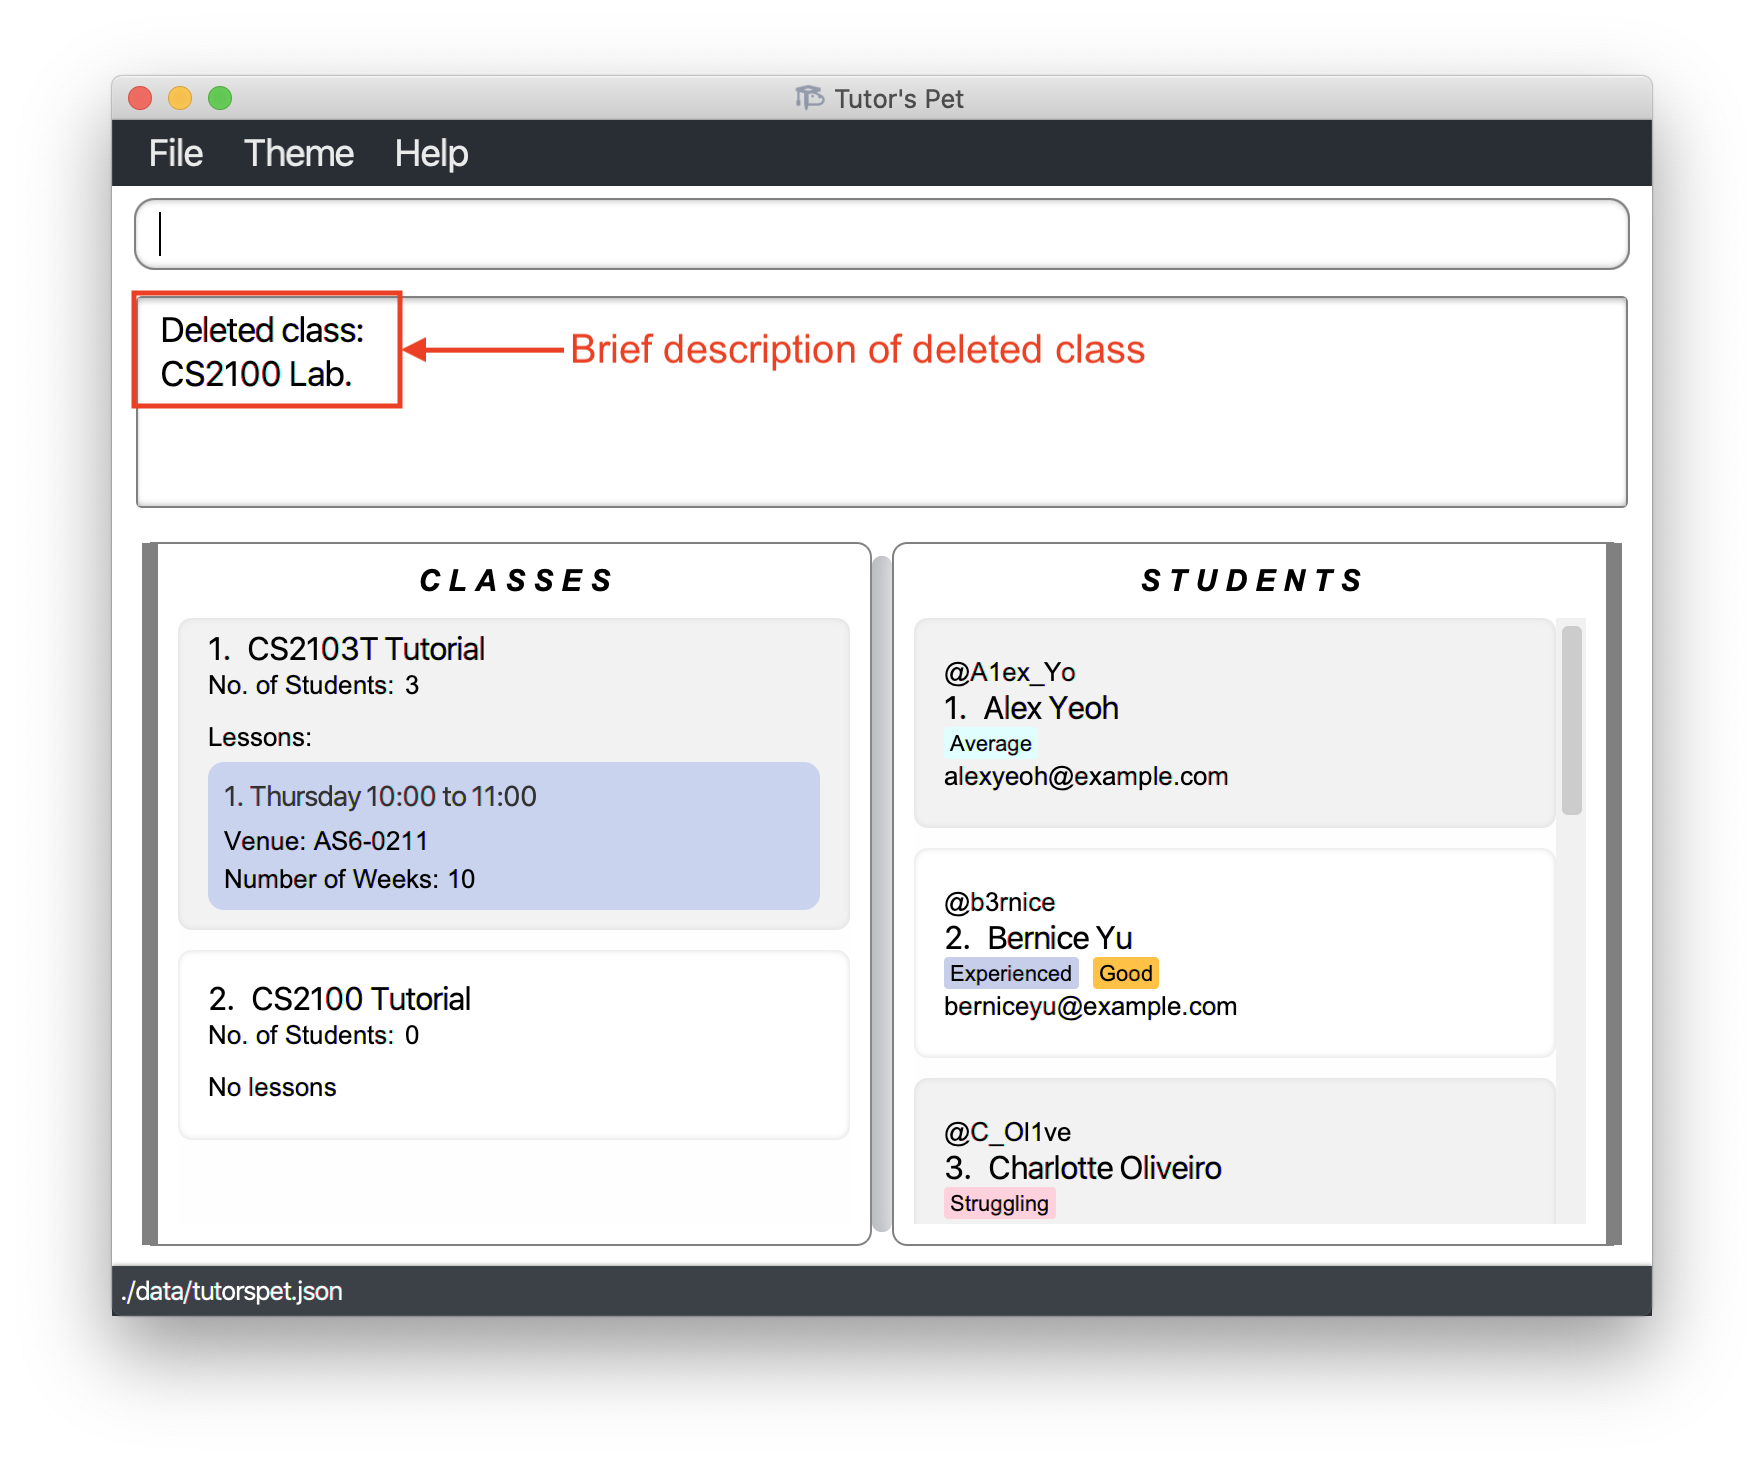
Deleting a class : delete-class
If you would like to delete a class, you can use this command.
Format: delete-class INDEX
- Deletes the class at the specified
INDEX.
For example:
-
You have just received news that one of your classes, CS2100 Lab, has been permanently removed due to low enrollment. Hence, you want to delete the class from your Tutor’s Pet.
-
You type
delete-class 2and press Enter.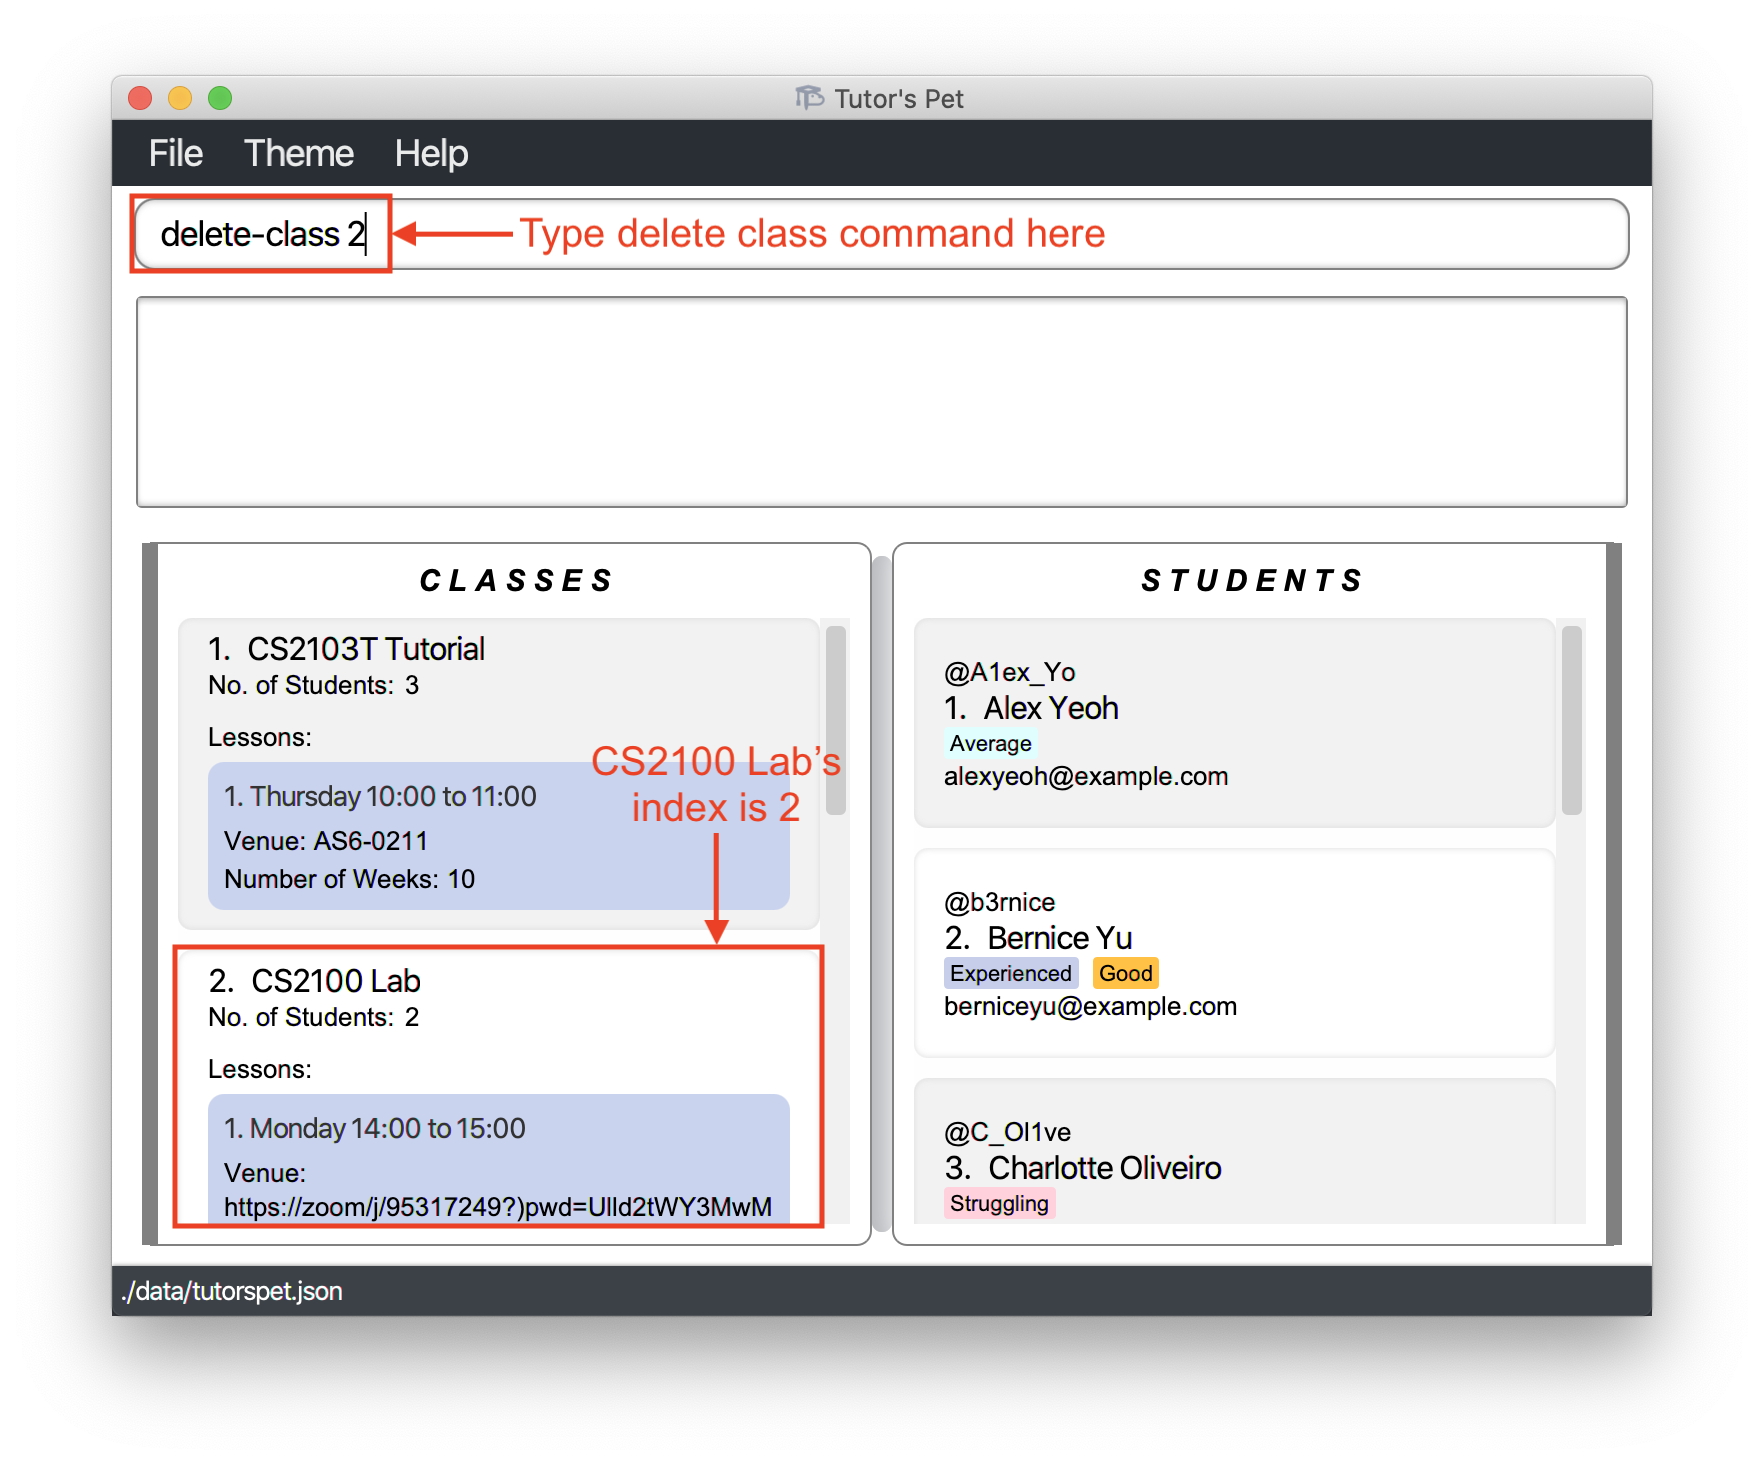
-
The class has been successfully deleted.
Other examples:
-
find-class CS2030 lab
delete-class 1
Deletes the 1st class in the result of thefind-classcommand.
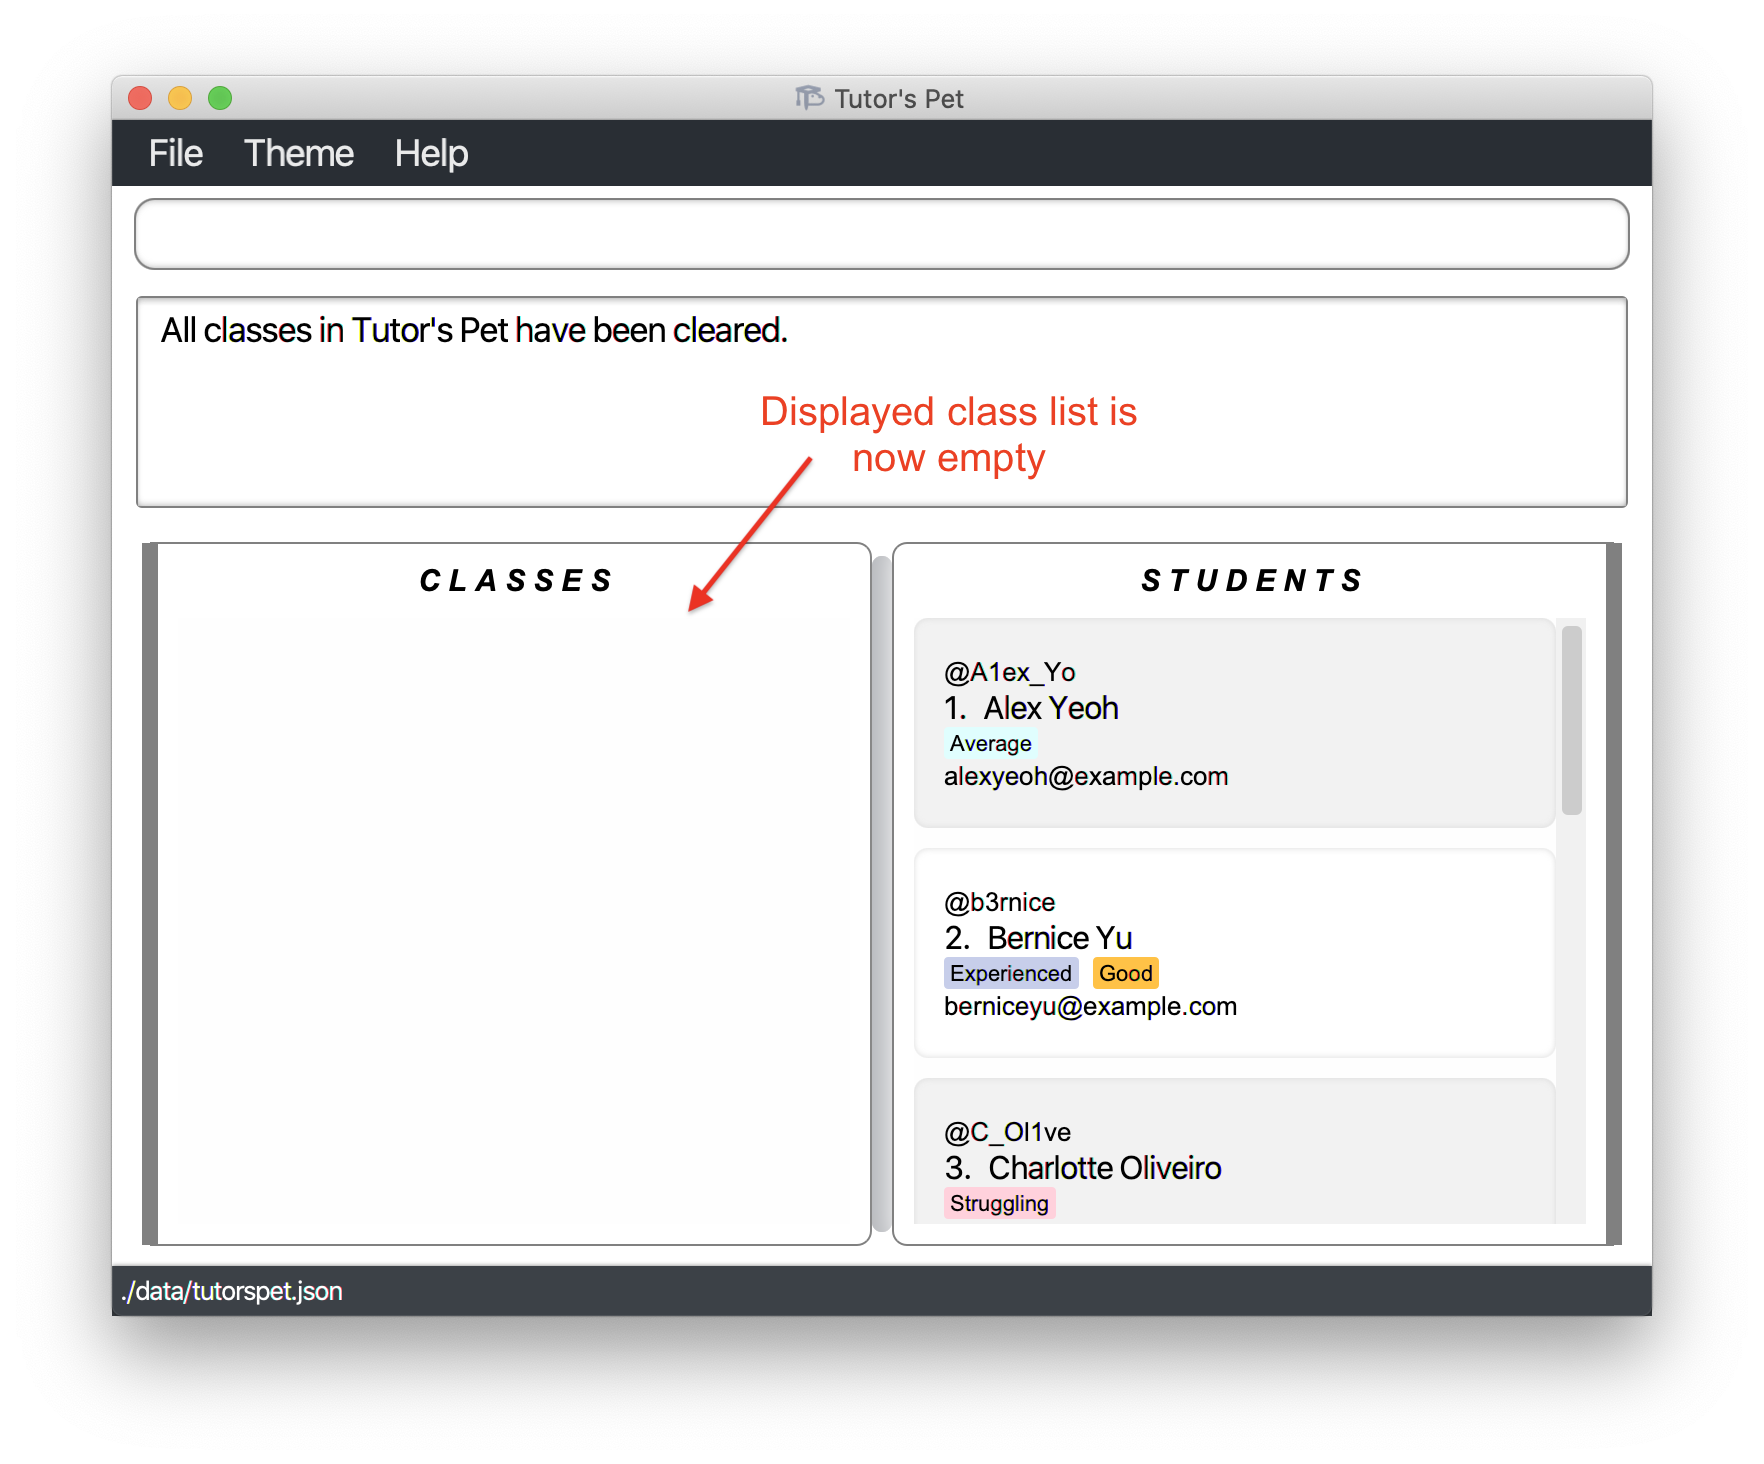
Clearing all classes : clear-class
If you would like to delete all the classes in Tutor’s Pet, you can make use of this command.
Format: clear-class
For example:
-
It is the start of a new semester. You would like to delete all information of all the classes you taught last semester. You type the command
clear-classand press Enter.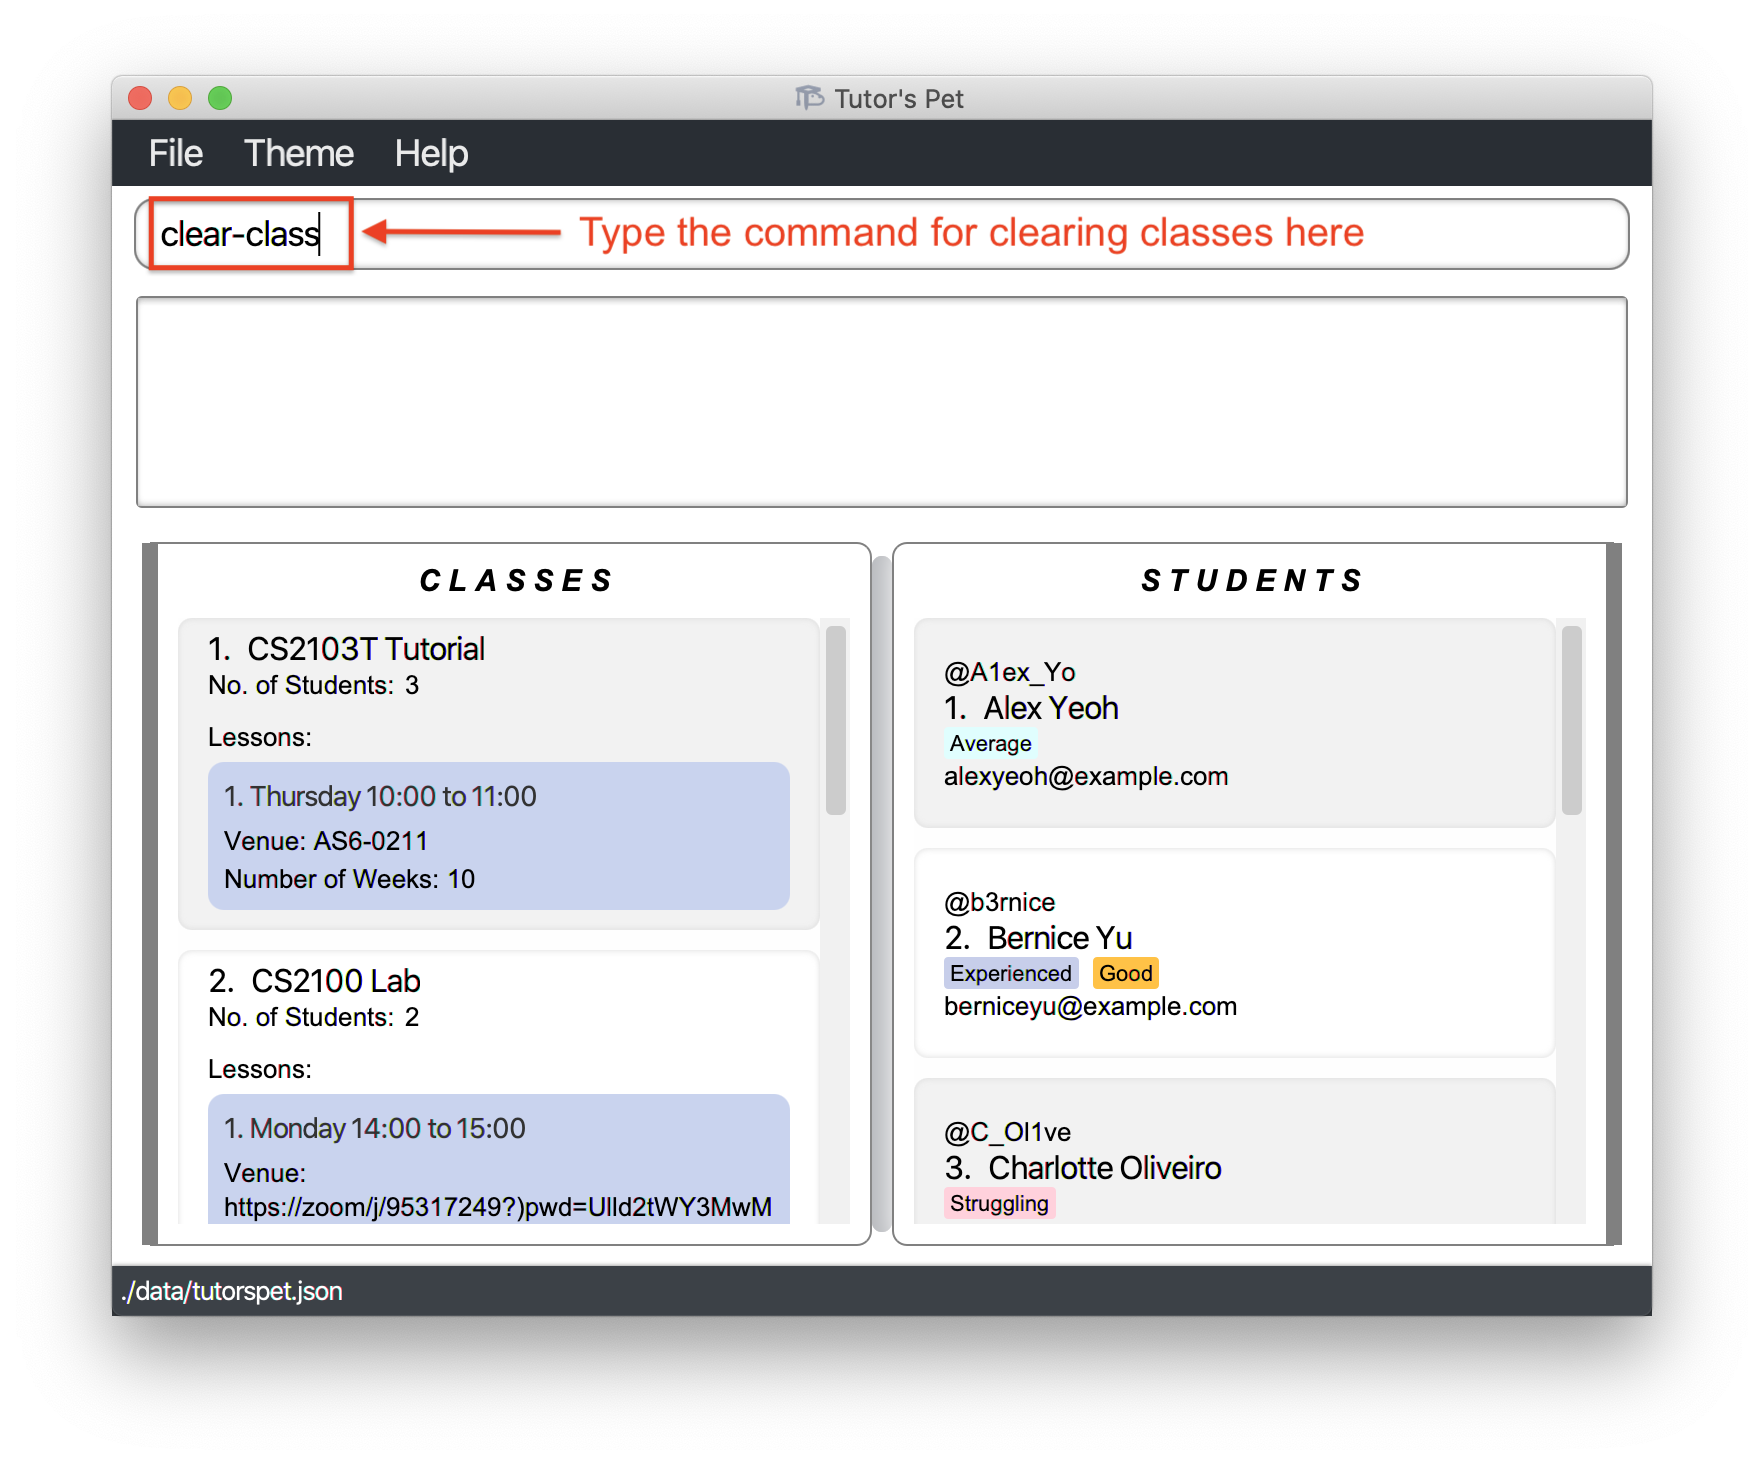
-
All classes have been cleared. You can start managing your new classes.
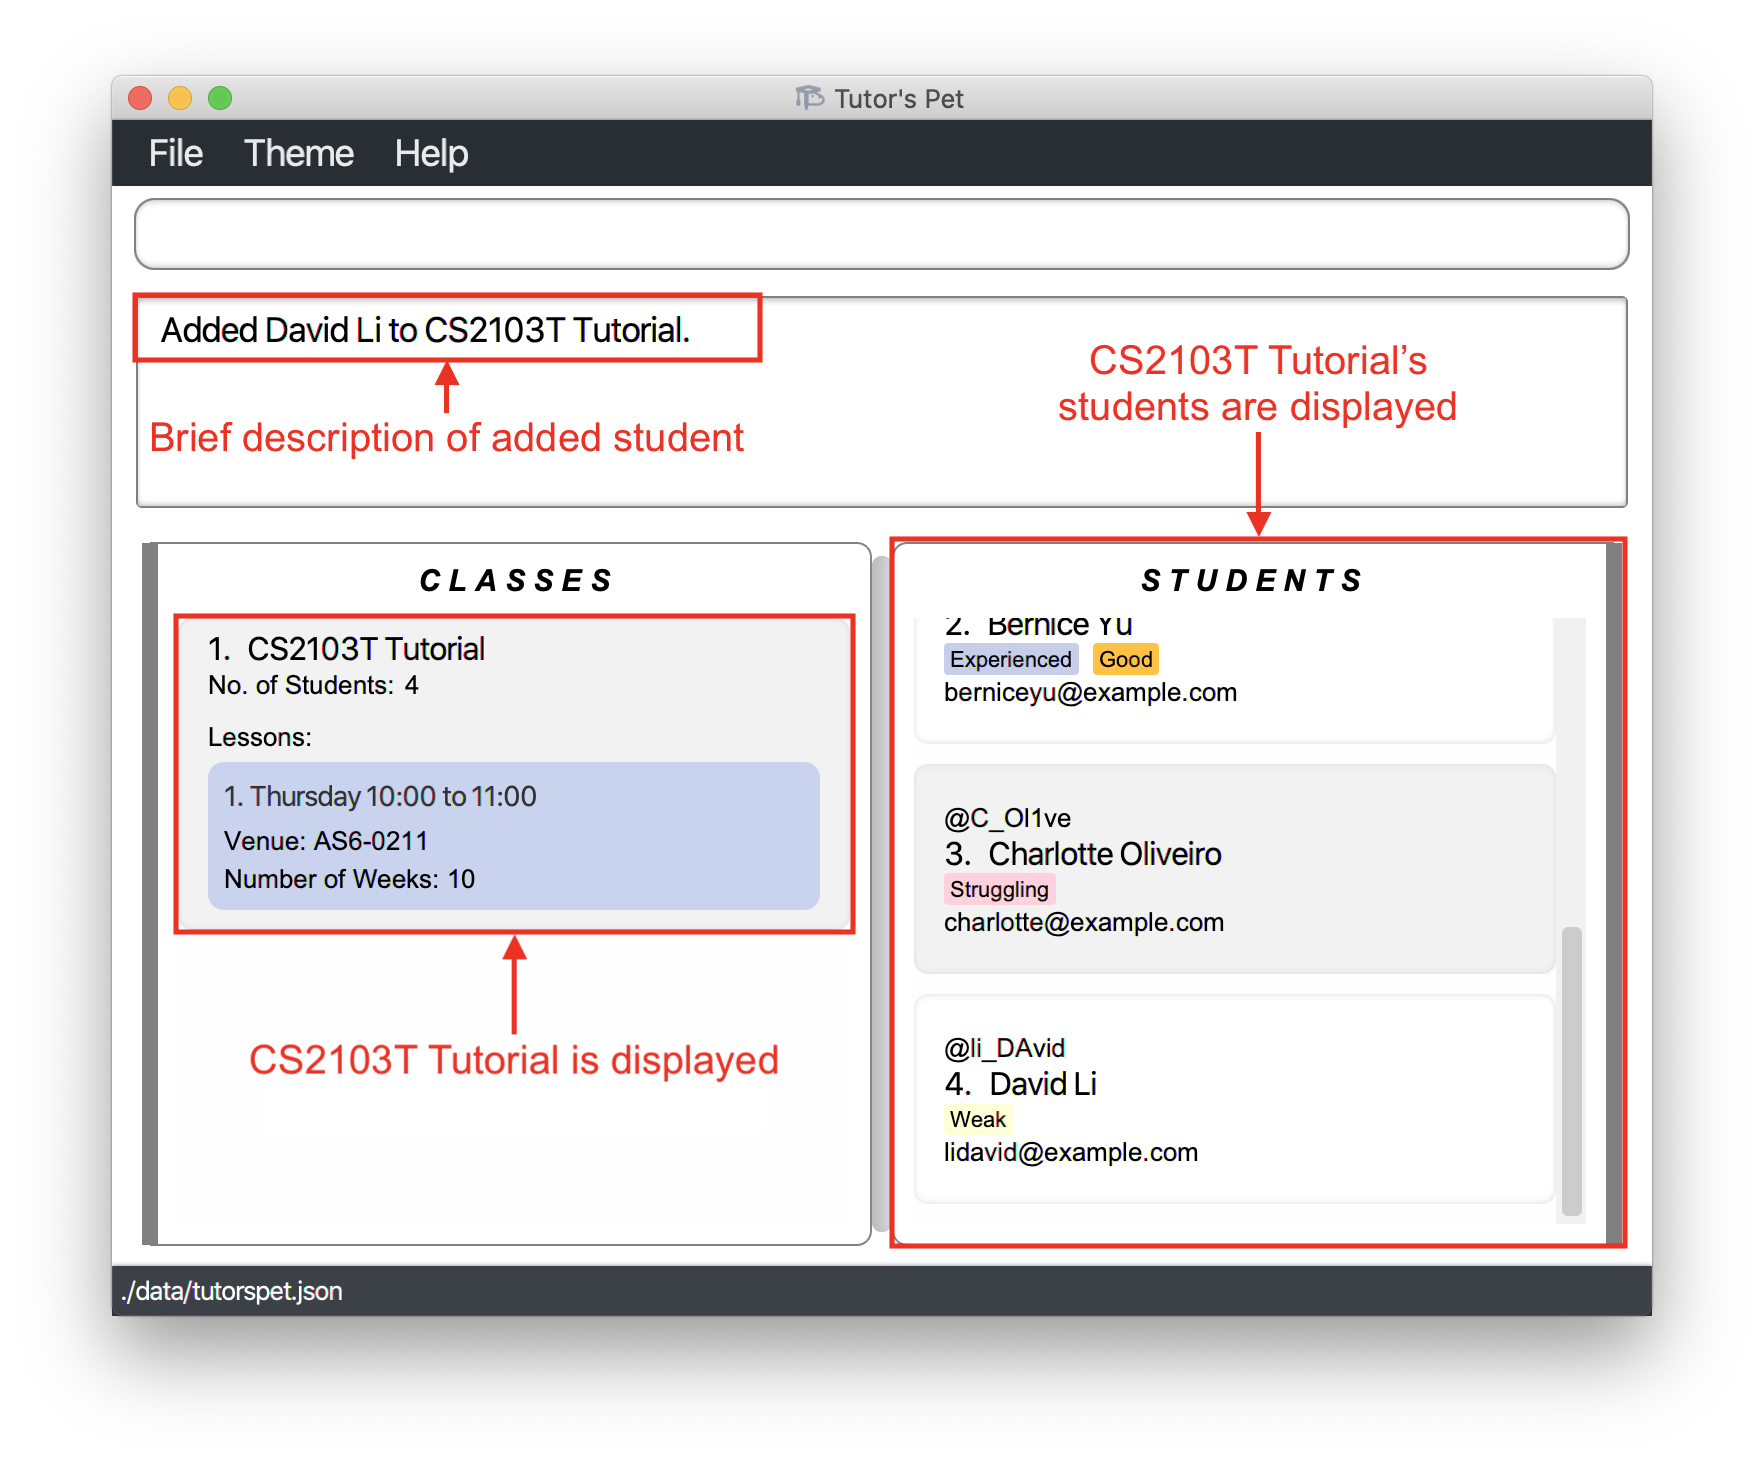
Adding a student to a class : link
You can add students into their classes using this command.
Format: link s\STUDENT_INDEX c\CLASS_INDEX
- Adds the student at the specified
STUDENT_INDEXto the class at the specifiedCLASS_INDEX.
For example:
-
You have a new student, David Li, who has transferred into one of your classes, CS2103T Tutorial. You have already added him to your Tutor’s Pet, and want to add him to the class.
-
You type
link s\4 c\1and press Enter.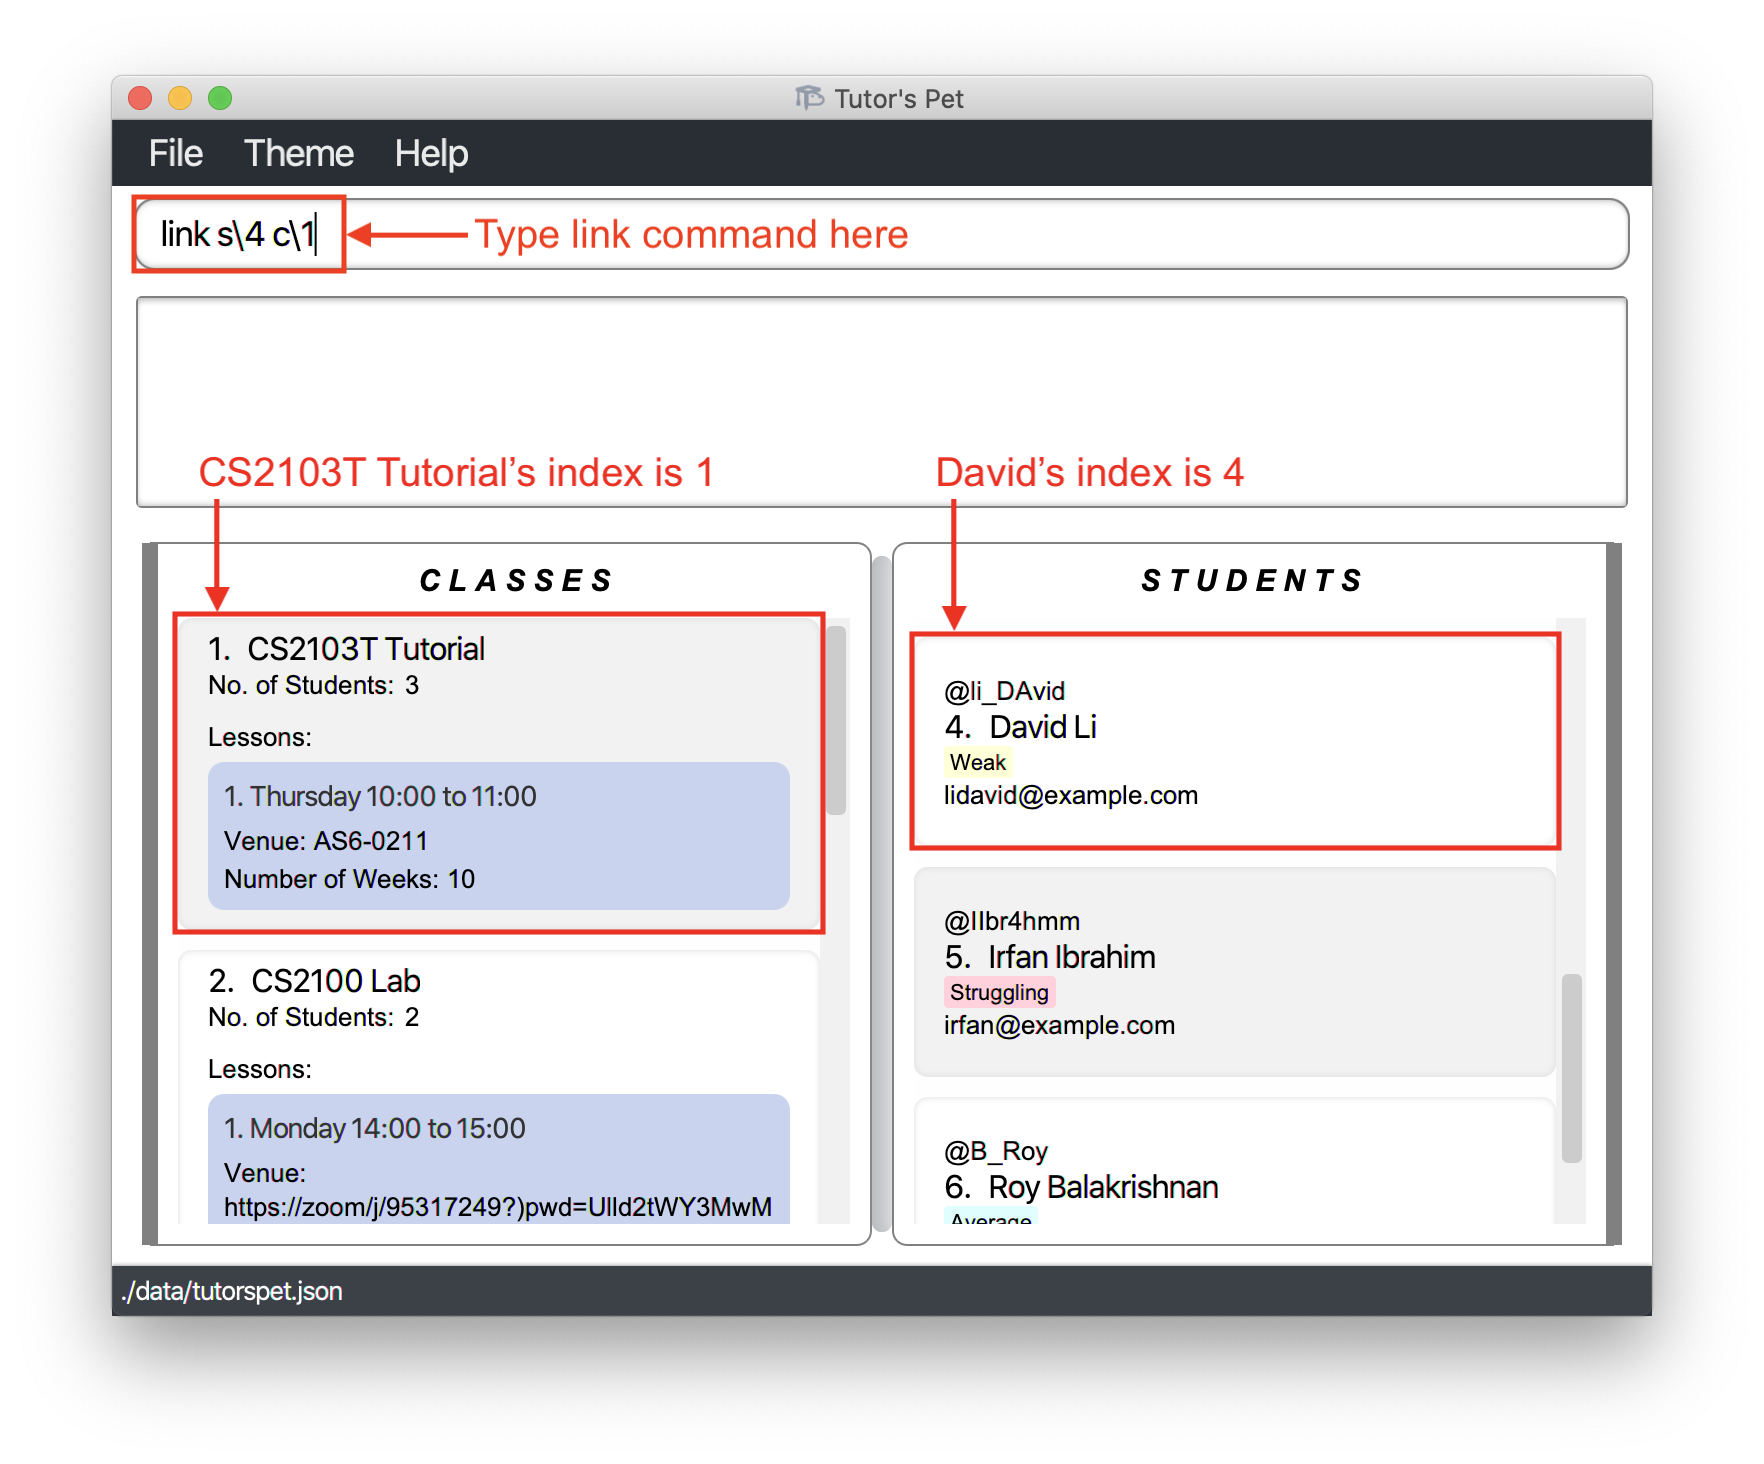
-
Your Tutor’s Pet displays the students in CS2103T Tutorial to confirm that you have successfully added David to the class.
![]() Tip: When adding multiple students to a class, you can press the ↑ key to retrieve previously
entered commands. This reduces the amount you need to type.
Tip: When adding multiple students to a class, you can press the ↑ key to retrieve previously
entered commands. This reduces the amount you need to type.
Other examples:
-
find-student Alex
link s\1 c\2
Adds the 1st result of thefind-studentcommand to the 2nd class in the displayed class list.
Removing a student from a class : unlink
You can remove students from their classes using this command.
Format: unlink s\STUDENT_INDEX c\CLASS_INDEX
- Removes the student at the specified
STUDENT_INDEXfrom the class at the specifiedCLASS_INDEX.
For example:
-
One of your students, Alex Yeoh, has transferred out of your class, CS2103T Tutorial, and you decide to remove him from the class.
-
You type
unlink s\1 c\1and press Enter.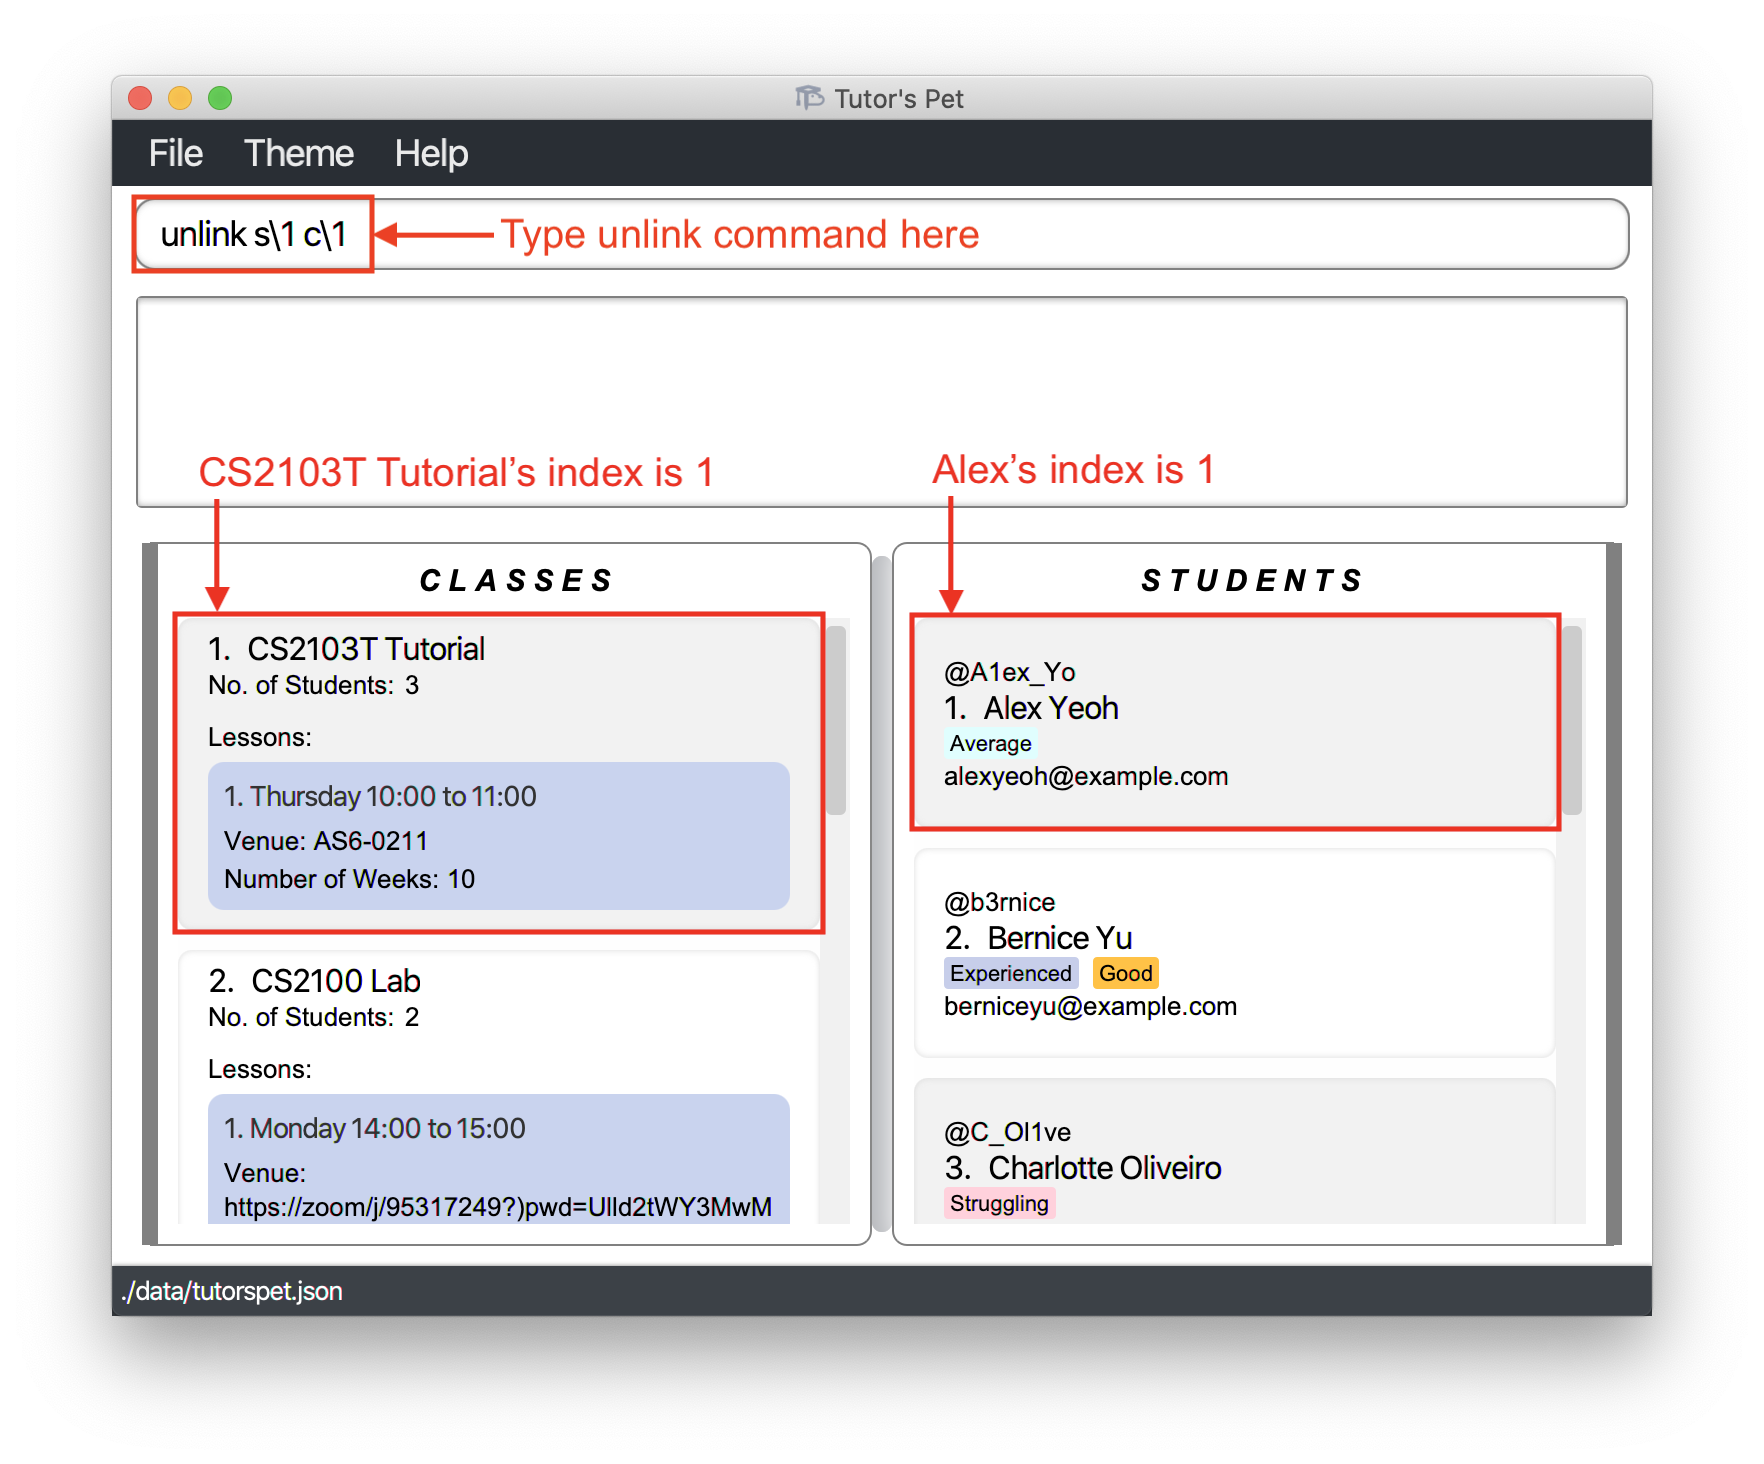
-
Your Tutor’s Pet displays the remaining students in CS2103T Tutorial to confirm that you have successfully removed Alex from the class.
![]() Tip: Make use of the
Tip: Make use of the list-student command to display students
of a particular class. Now it is easier for you to find the student to remove.
![]() Caution: The student’s attendance in the class will be deleted.
Caution: The student’s attendance in the class will be deleted.
Other examples:
-
list-student c\2
unlink s\1 c\1
Lists the students of the 2nd class in the displayed class list, and removes the 1st student of that class.
Managing Lessons
Adding a lesson : add-lesson
If you would like to add a lesson to a class, you can make use of this command.
Format: add-lesson c\CLASS_INDEX d\DAY st\START_TIME et\END_TIME v\VENUE r\NO_OF_TIMES
- Adds a lesson at a specified
CLASS_INDEX+DAY+START_TIME+END_TIME+VENUE+NO_OF_TIMES.
For example:
-
You receive news that you will be teaching
CS2103T TutorialonTuesday 10:00-11:00atCOM2 #02-02from week 1 to 13. -
You type in the command
add-lesson c\1 d\TUESDAY st\10:00 et\11:00 v\COM2 #02-02 r\13and press Enter.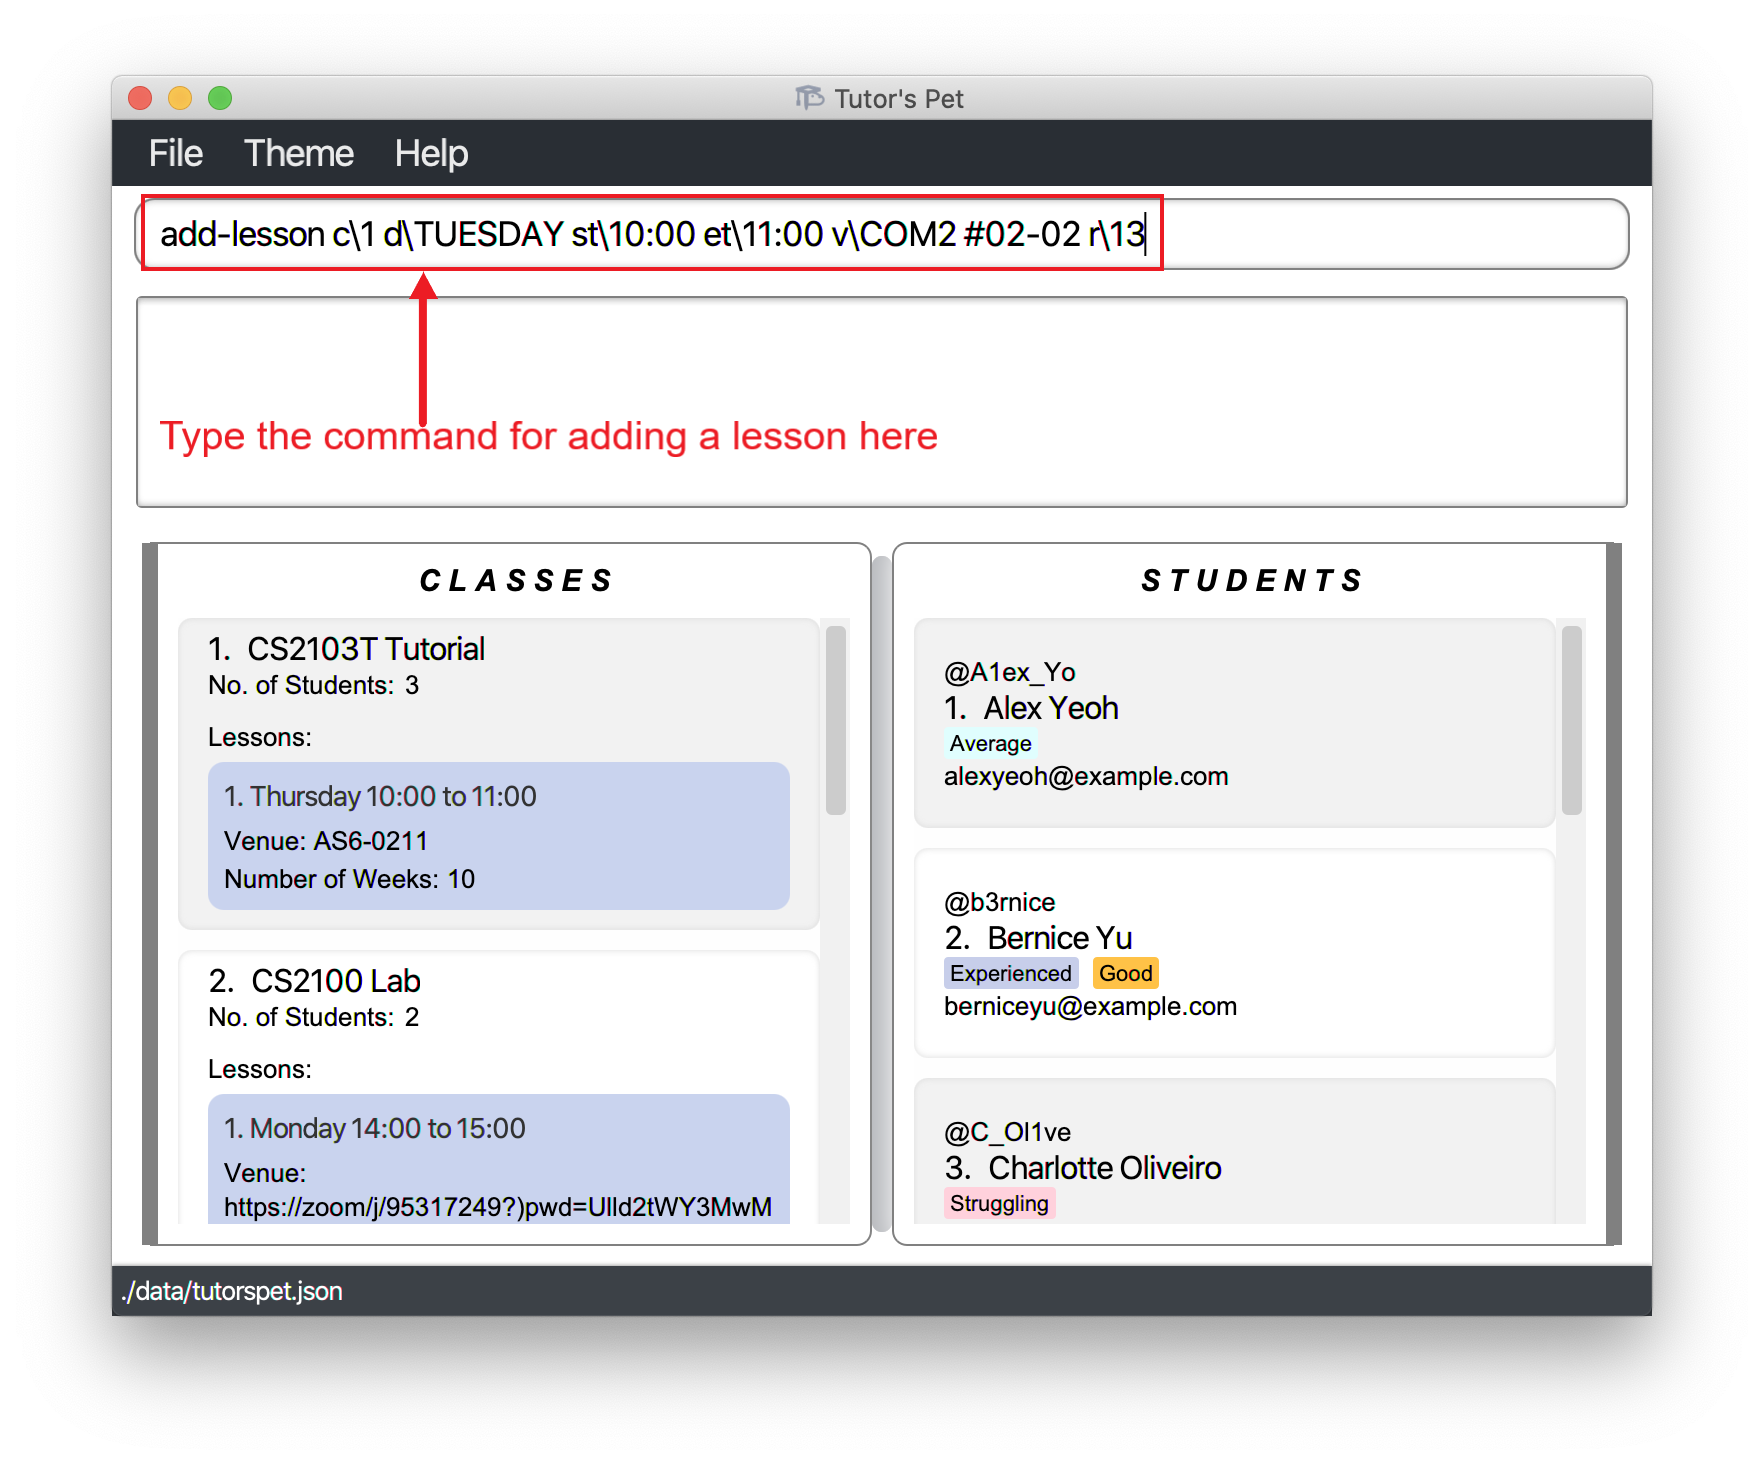
-
You have added a lesson to teach.

![]() Notes about the command:
Notes about the command:
-
You must type out the day in full.
-
You are not allowed to add overnight lessons. For example, a lesson cannot start at
23:59and end at00:01. -
The
Number of Weeksdisplayed refers to the total number of weeks you will be teaching the lesson. It does not follow the week numbers of a semester. For example, if a semester has 13 weeks and your lessons begin in week 3 and end in week 13, you should type in11forNO_OF_TIMES, i.eadd-lesson c\1 d\TUESDAY st\10:00 et\11:00 v\COM2 #02-02 r\11.
Editing a lesson : edit-lesson
If you entered wrong details pertaining to your lesson and would like to change it, you can make use of this command.
Format: edit-lesson c\CLASS_INDEX l\LESSON_INDEX [d\DAY] [st\START_TIME] [et\END_TIME] [v\VENUE]
- Edits the lesson at the specified
CLASS_INDEX+LESSON_INDEX.
For example:
-
You made an error while entering the
CS2103T Tutoriallesson. It should beTuesdayand notThursday. -
You type the command
edit-lesson c\1 l\1 d\Tuesdayand press Enter.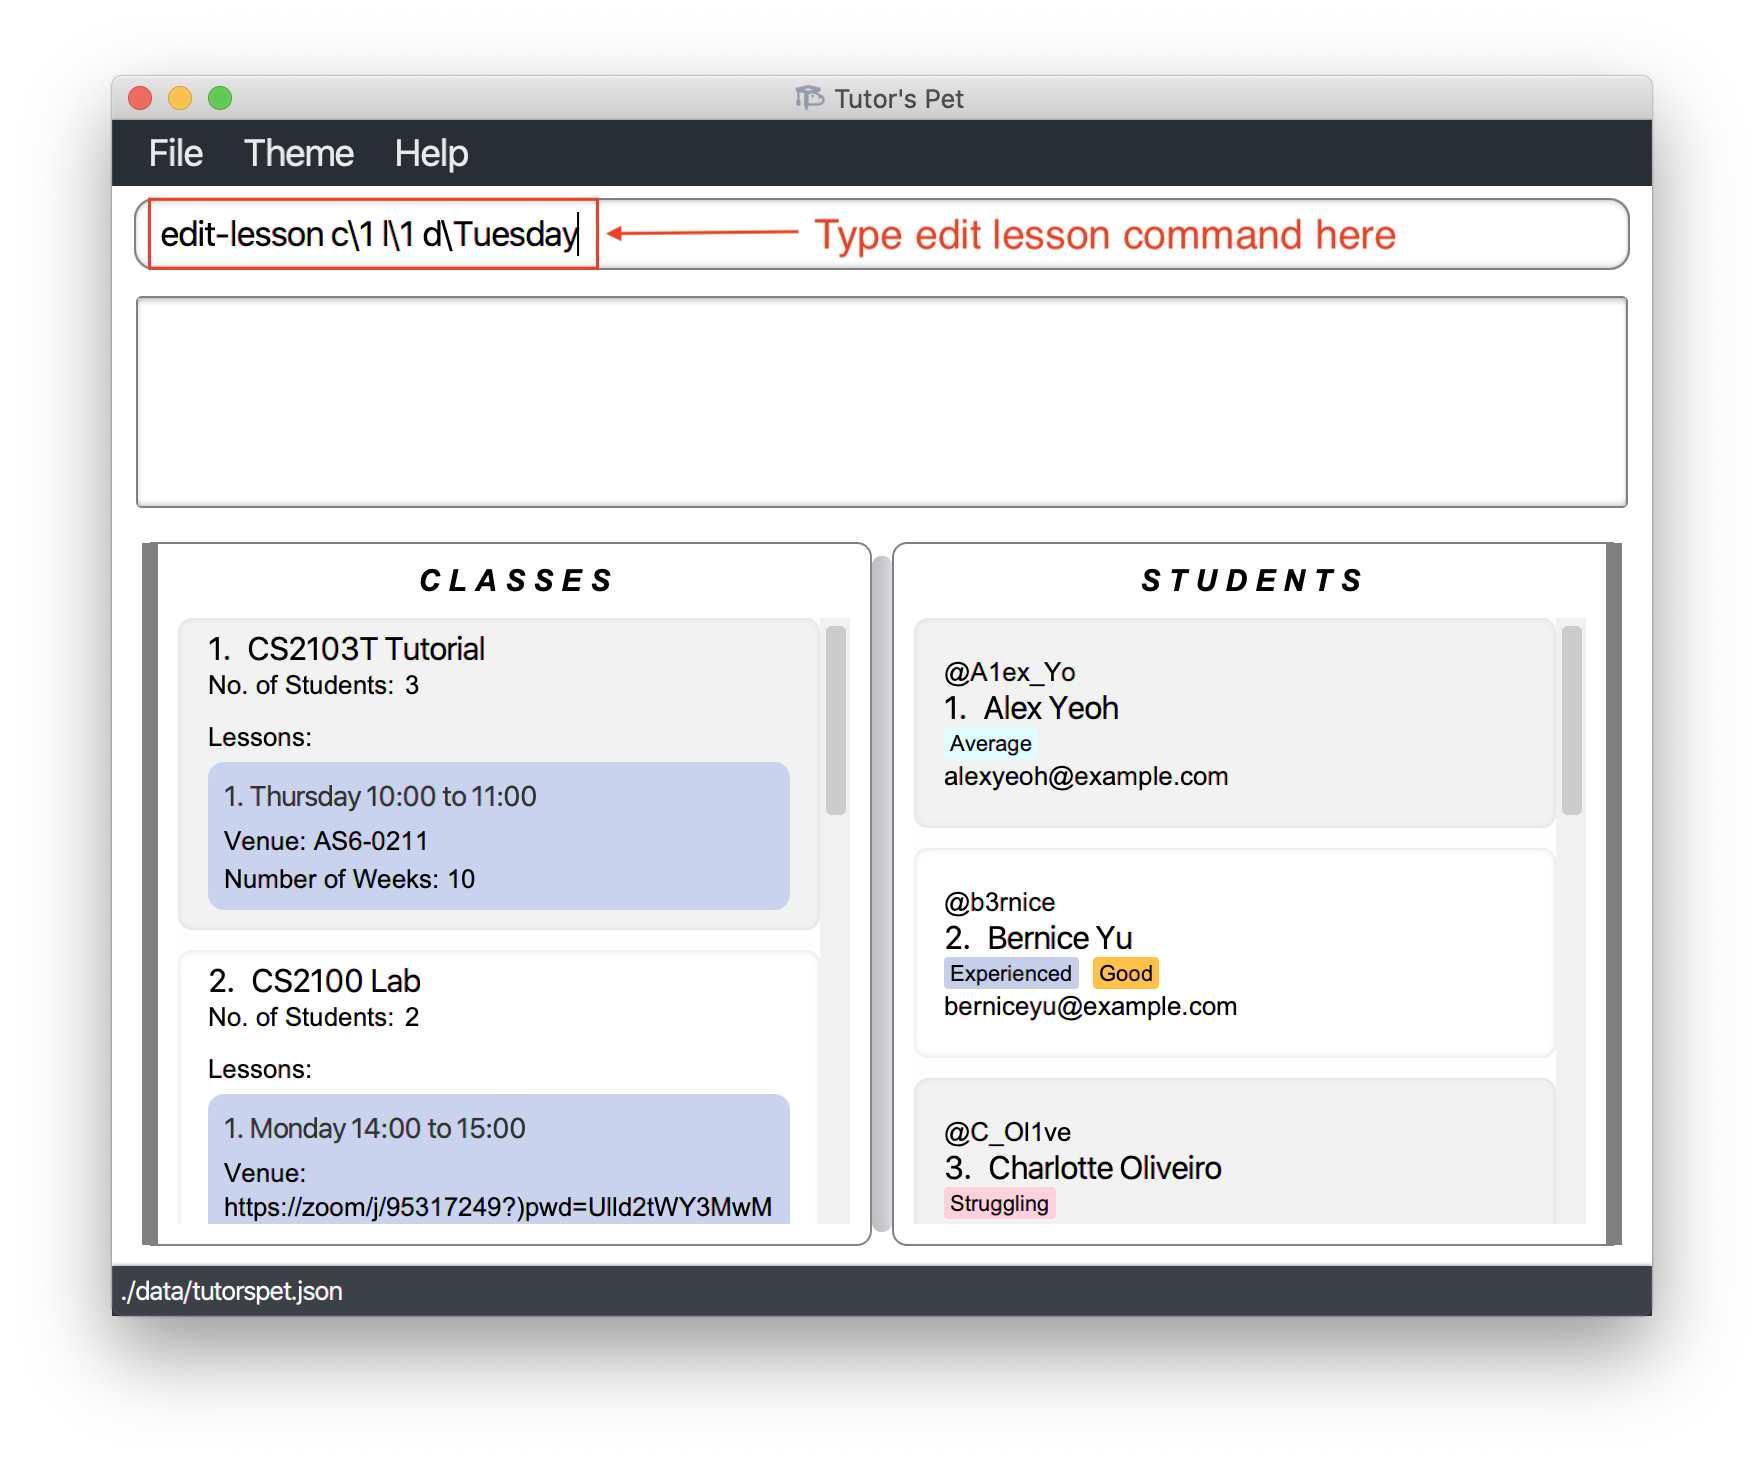
-
The day of the lesson has been changed to
Tuesday.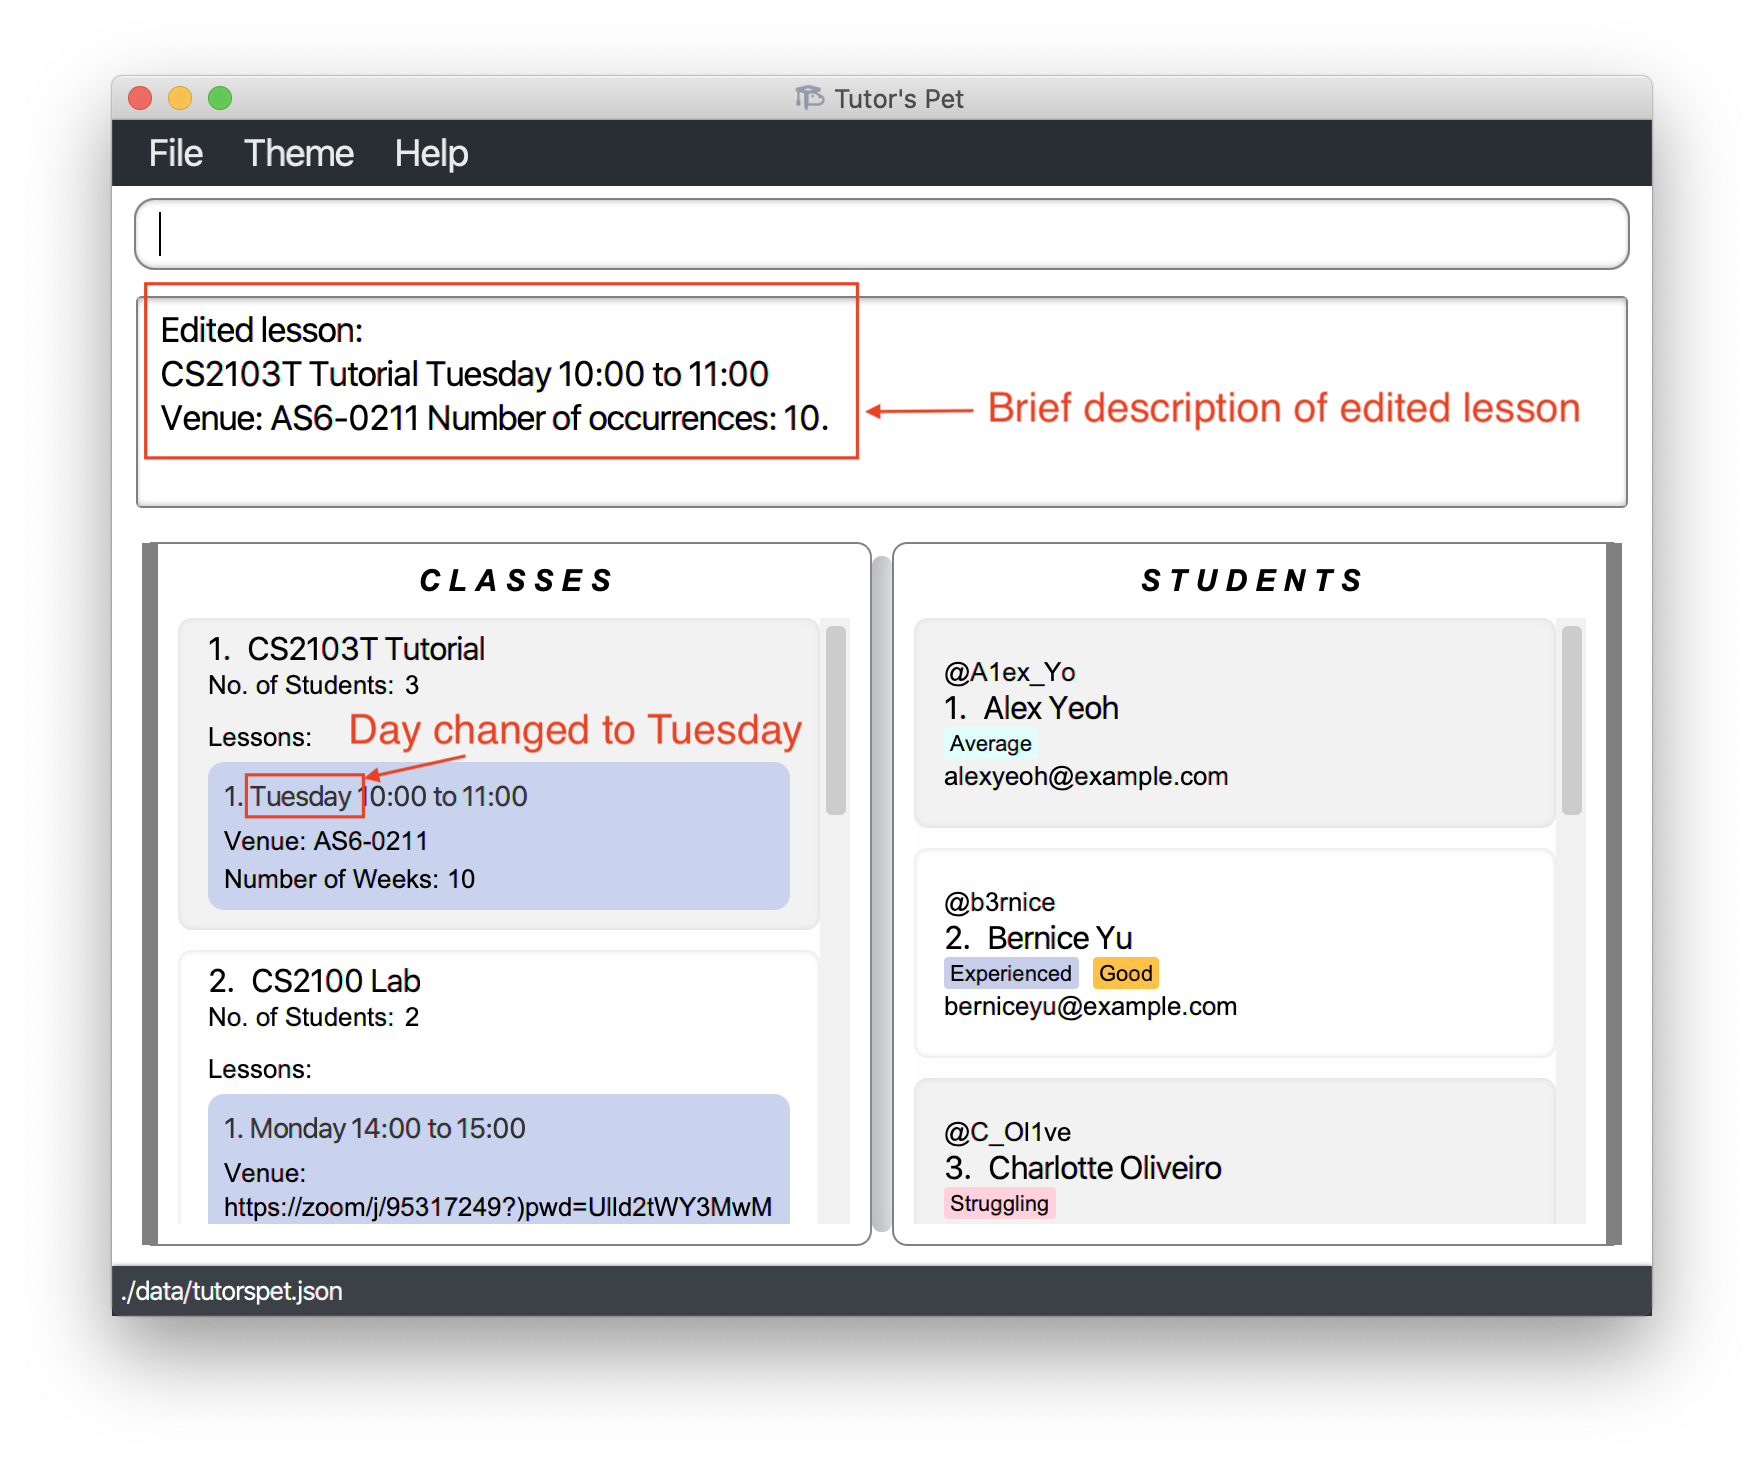
![]() Notes about the command:
Notes about the command:
-
You must type out the day in full.
-
You are not allowed to add overnight lessons. For example, a lesson cannot start at
23:59and end at00:01. -
You must specify at least one field (DAY, START_TIME, END_TIME, VENUE) to be changed.
-
You are not able to change the
Number of Weeks.
Other examples:
-
find-class CS2100 lab
edit-lesson c\1 l\1 d\TUESDAY st\10:00 et\12:00 v\COM2 #02-02
Edits the 1st lesson of the CS2100 lab. The lesson will now be held on Tuesdays, 10:00AM to 12:00PM at COM2 #02-02.
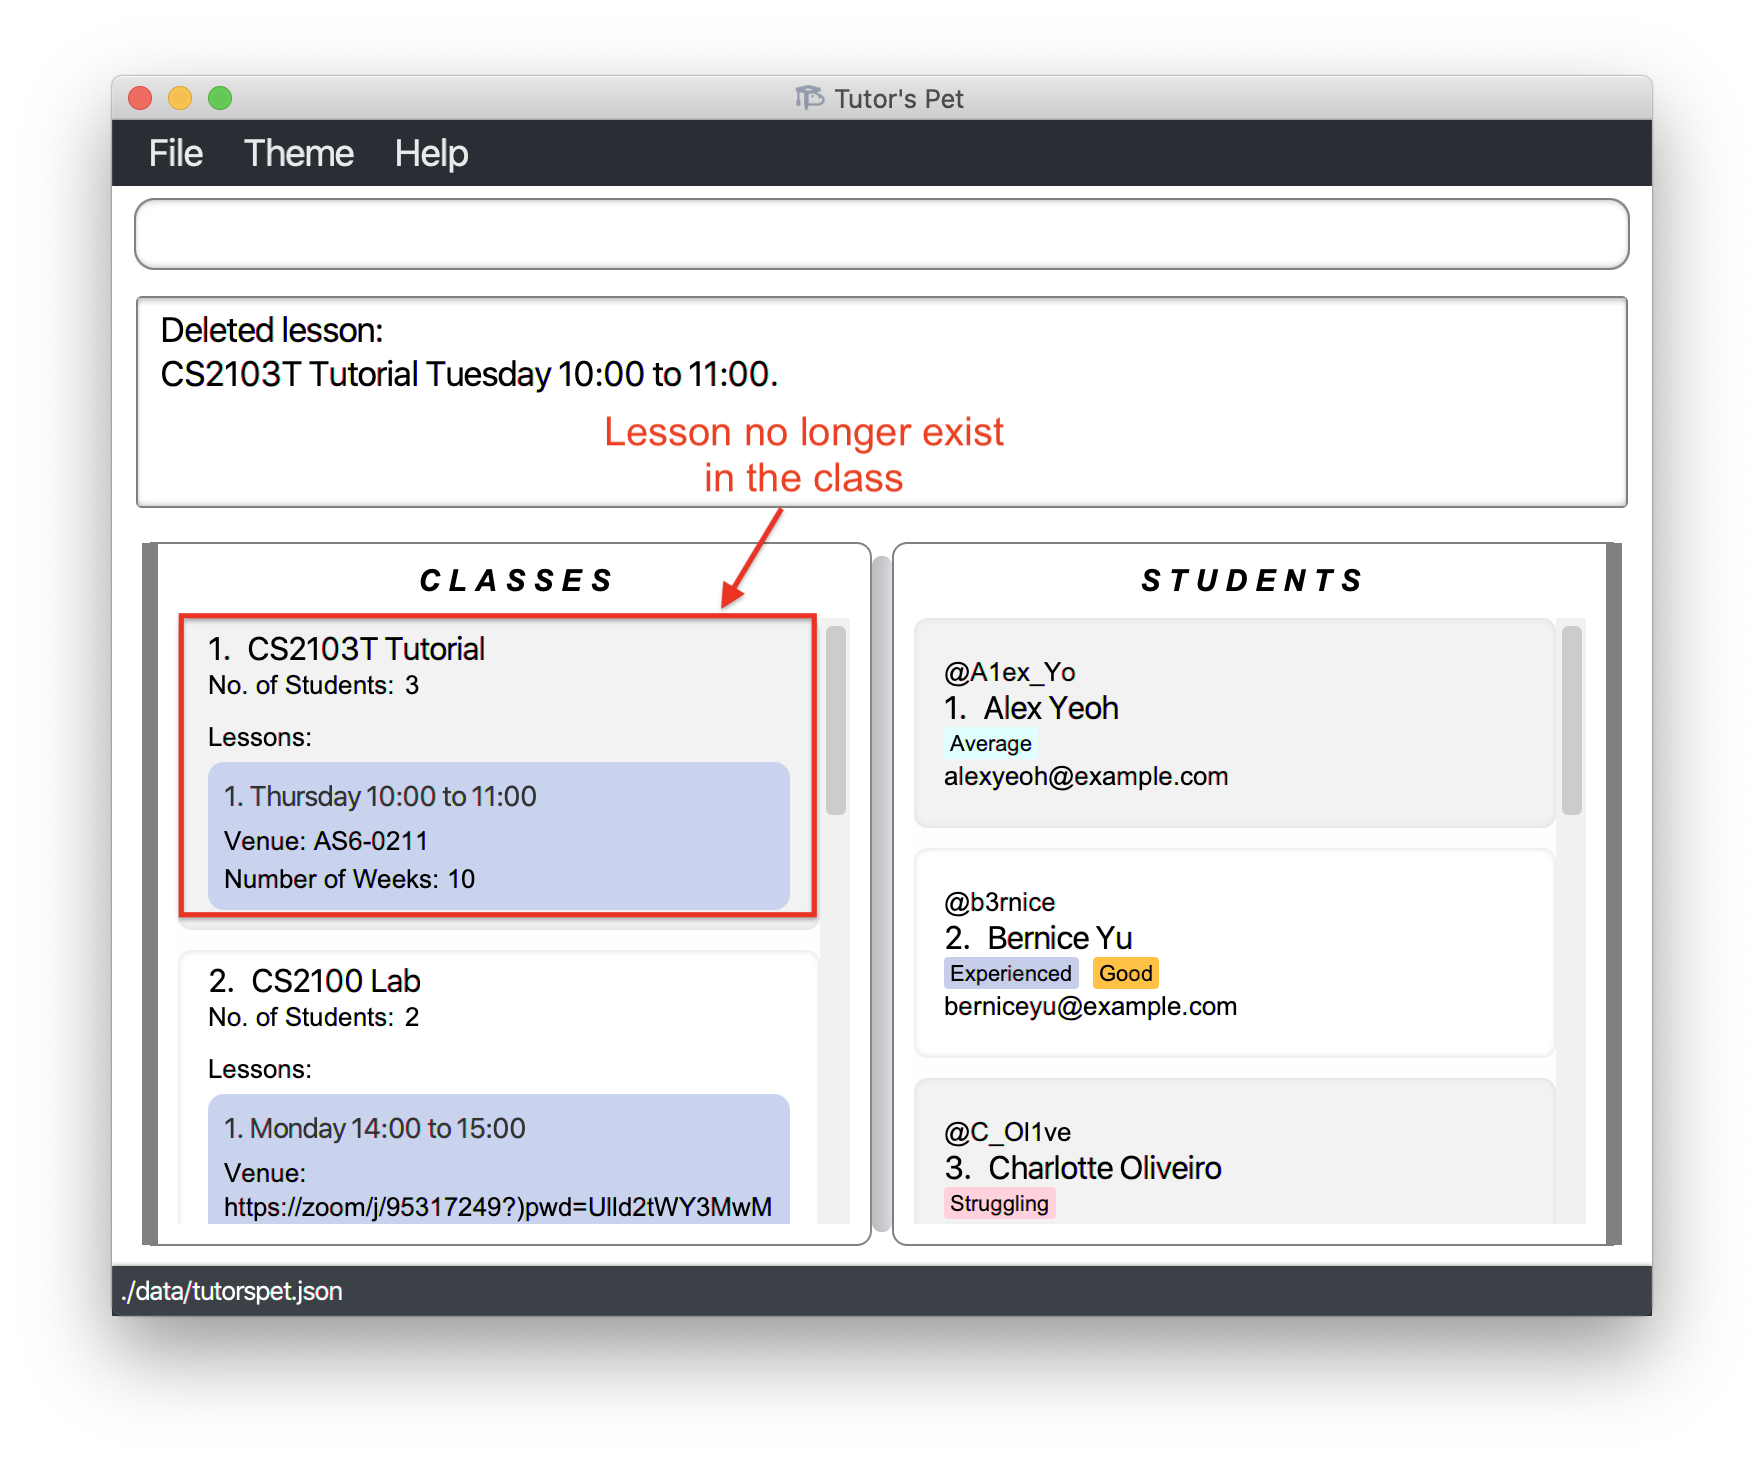
Deleting a lesson : delete-lesson
If you would like to delete a lesson in a class, you can make use of this command.
Format: delete-lesson c\CLASS_INDEX l\LESSON_INDEX
- Deletes the lesson at the specified
CLASS_INDEX+LESSON_INDEX.
For example:
-
You receive news that the
Tuesday 10:00-11:00CS2103T Tutorialwill be cancelled permanently. You decide to remove this lesson from your Tutor’s Pet. -
You type in the command
delete-lesson c\1 l\2and press Enter.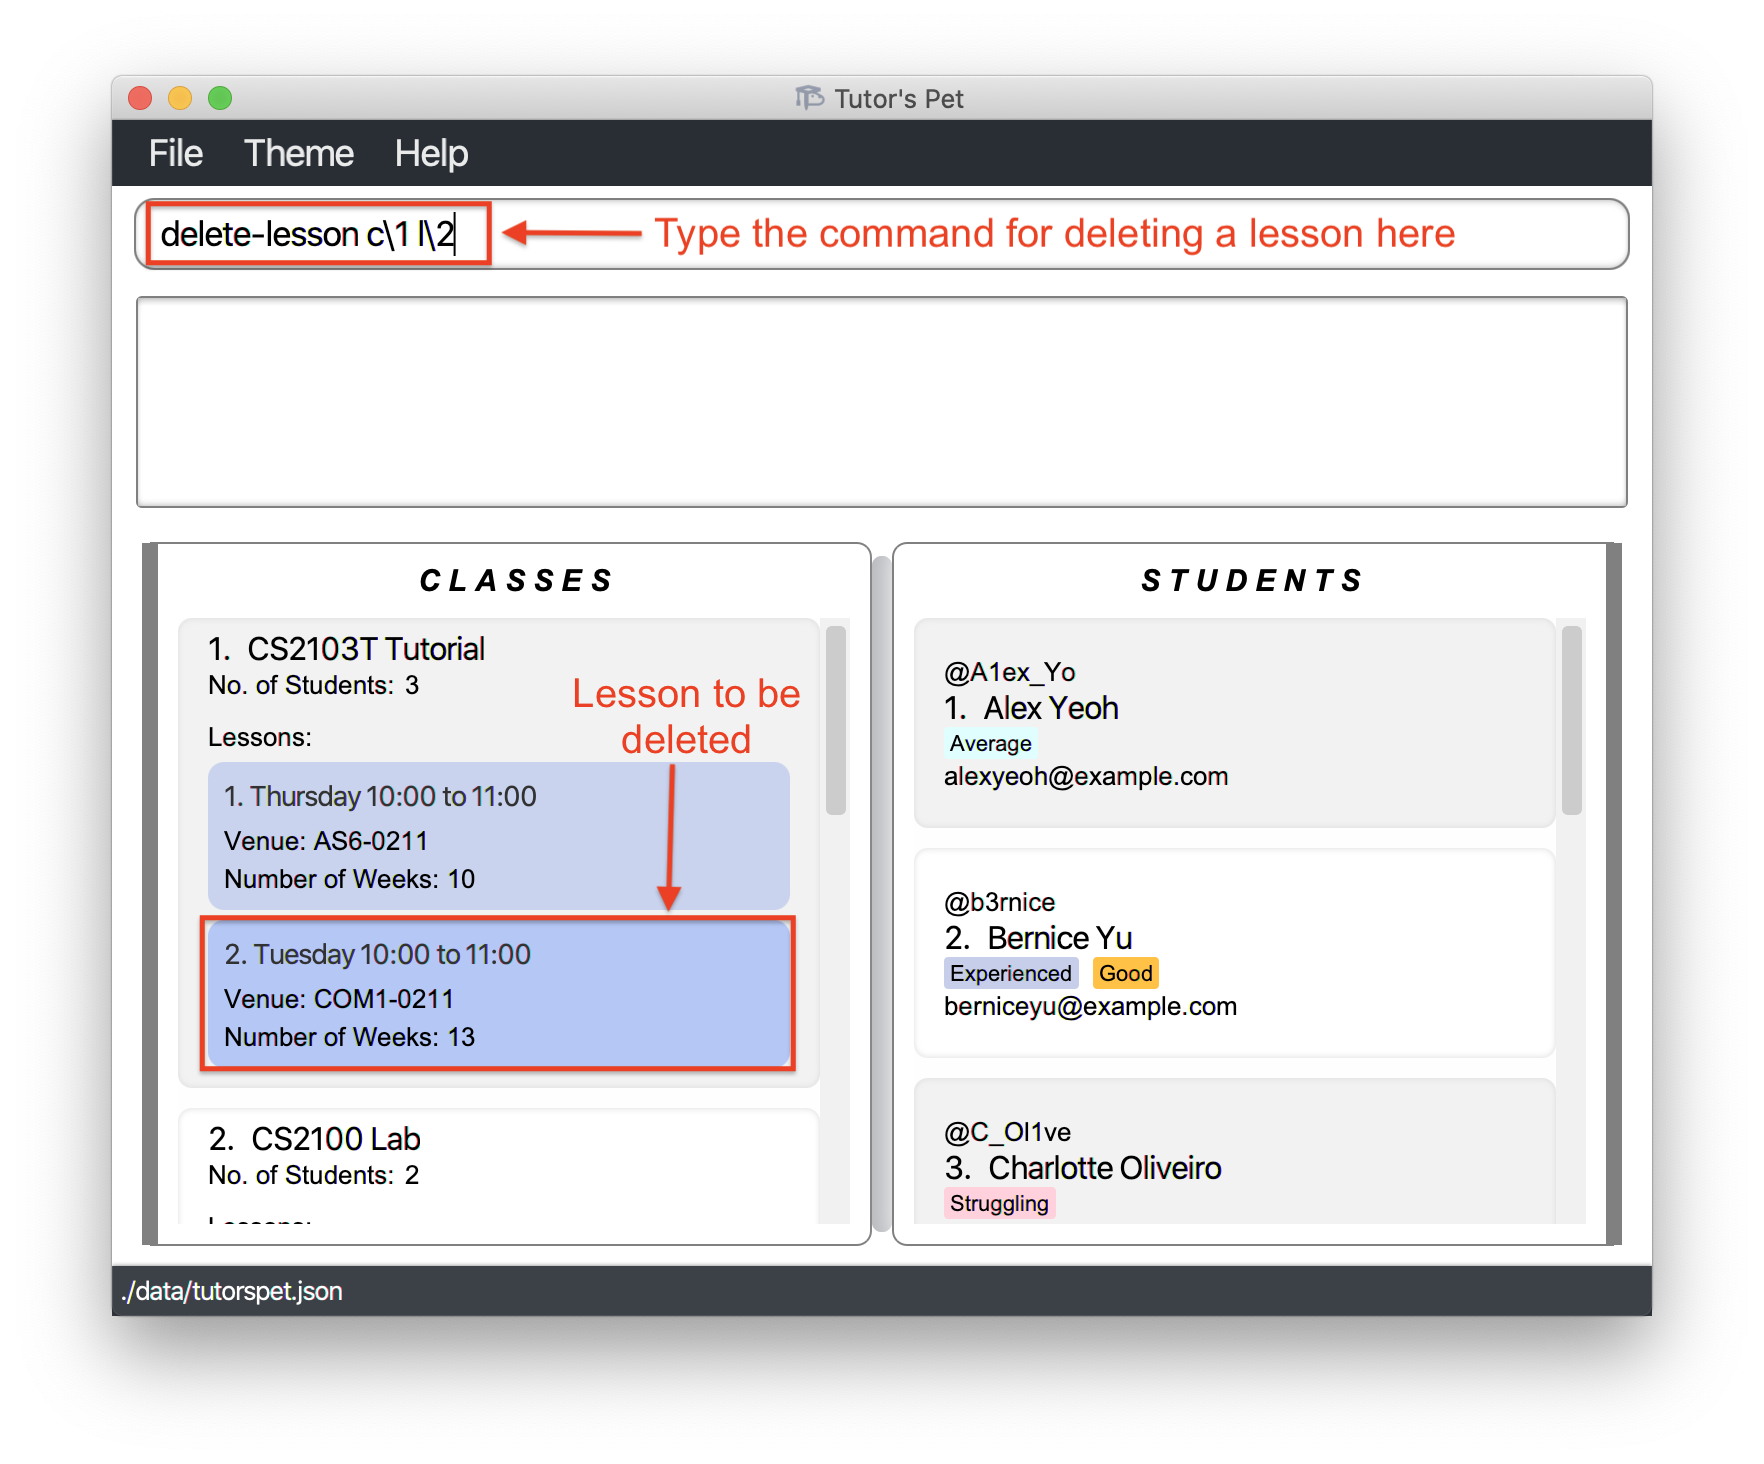
-
You have one less lesson to teach now.
Other examples:
-
find-class CS2030 lab
delete-lesson c\1 l\1
Deletes the 1st lesson of the 1st class in the results of thefind-classcommand.
![]() Tip: If you accidentally delete the wrong lesson, you can retrieve it back immediately using
the
Tip: If you accidentally delete the wrong lesson, you can retrieve it back immediately using
the undo command. However, you cannot undo once you exit the application!
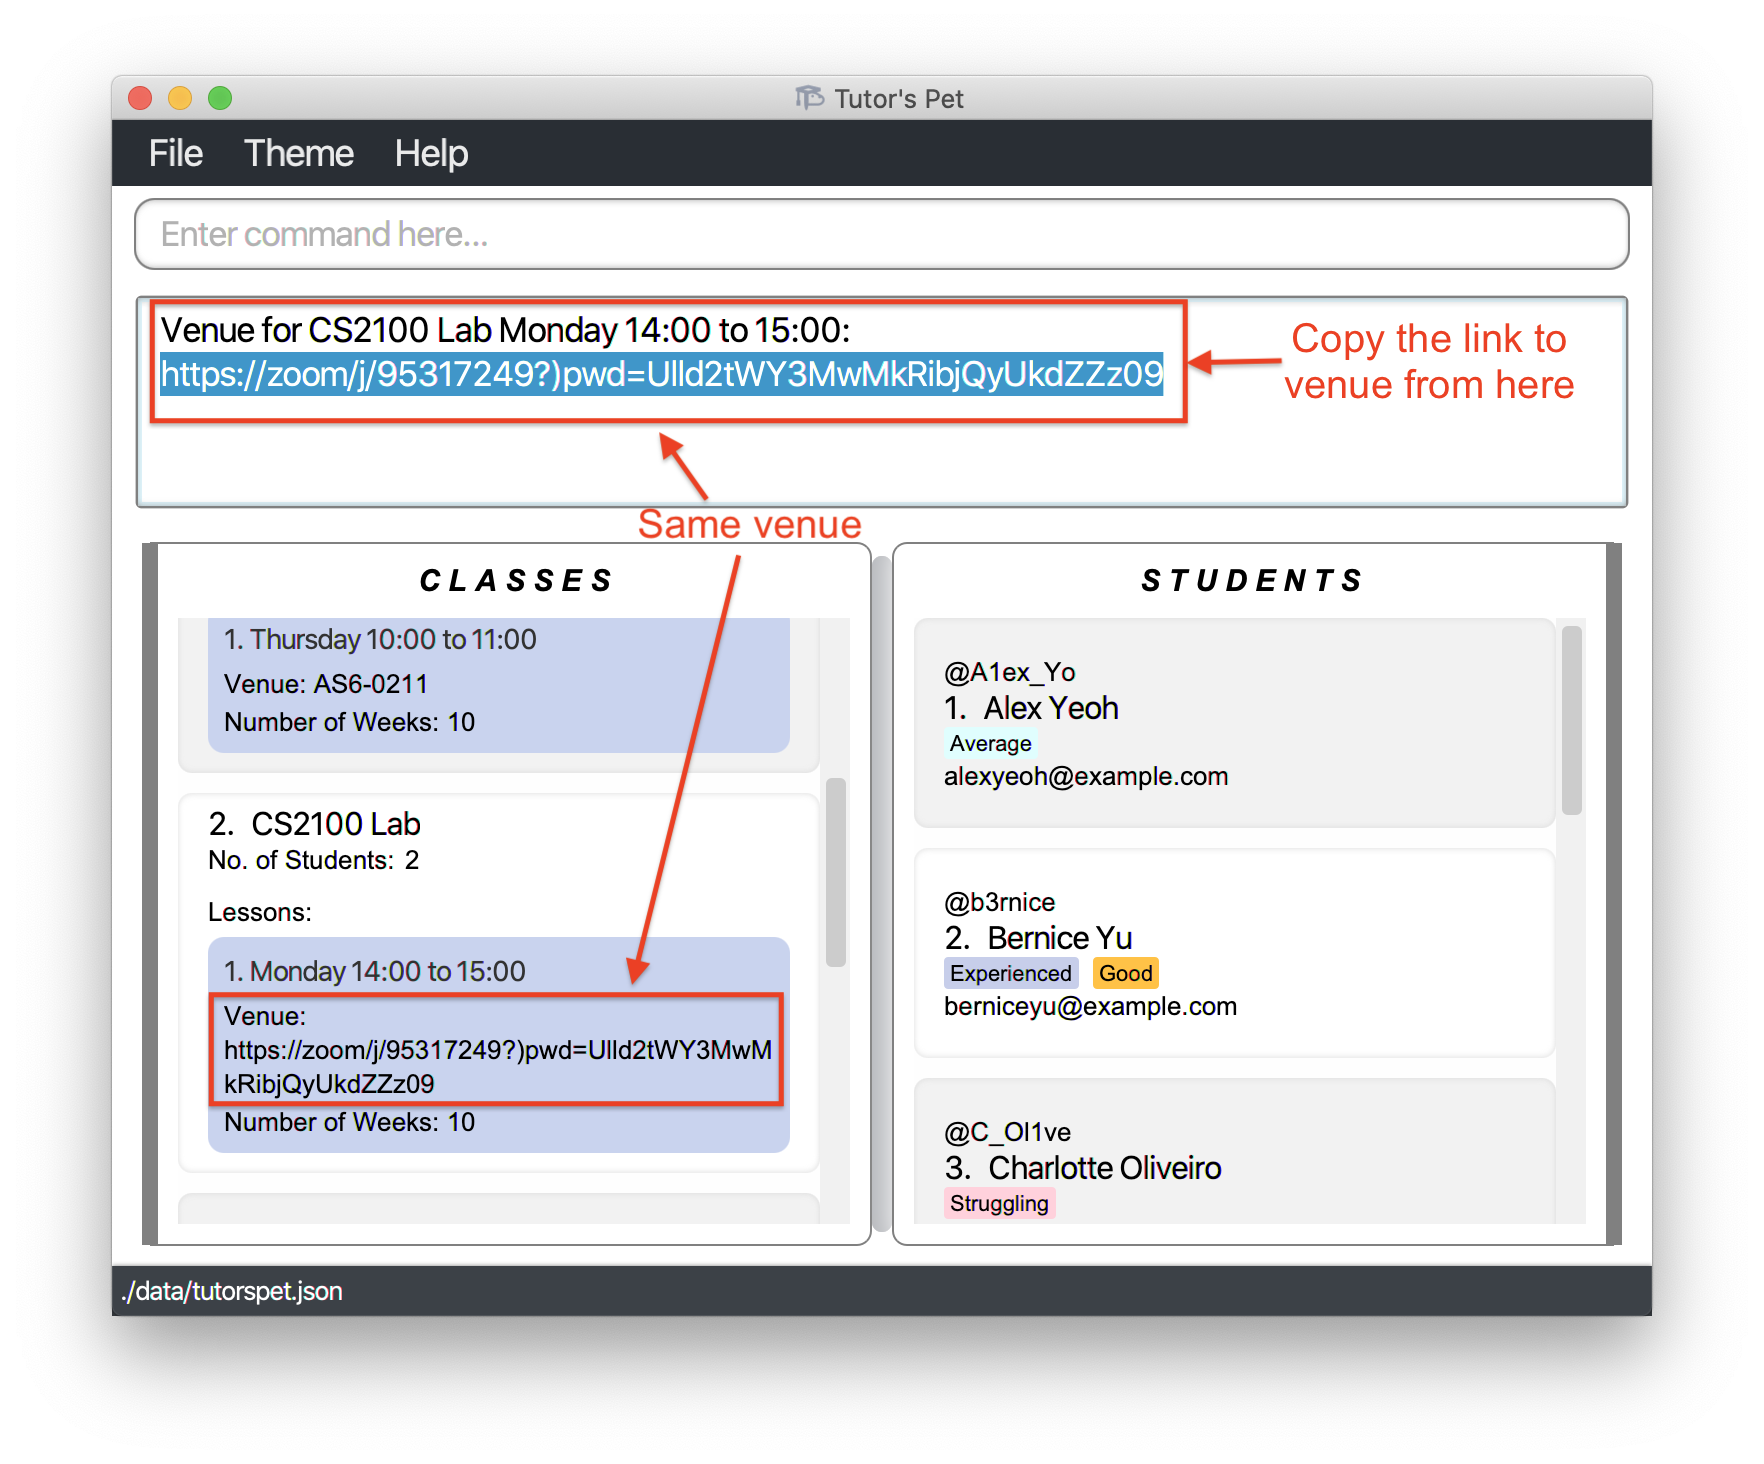
Displaying lesson venue : display-venue
If you would like to find out the venue for a lesson, you can make use of this command.
Format: display-venue c\CLASS_INDEX l\LESSON_INDEX
- Displays the venue of the lesson at the specified
CLASS_INDEX+LESSON_INDEX.
For example:
-
Your online lesson is starting in 10 minutes and it is time to start the session. You wish to find out the link to that session.
-
You type the command
display-venue c\2 l\1and press Enter.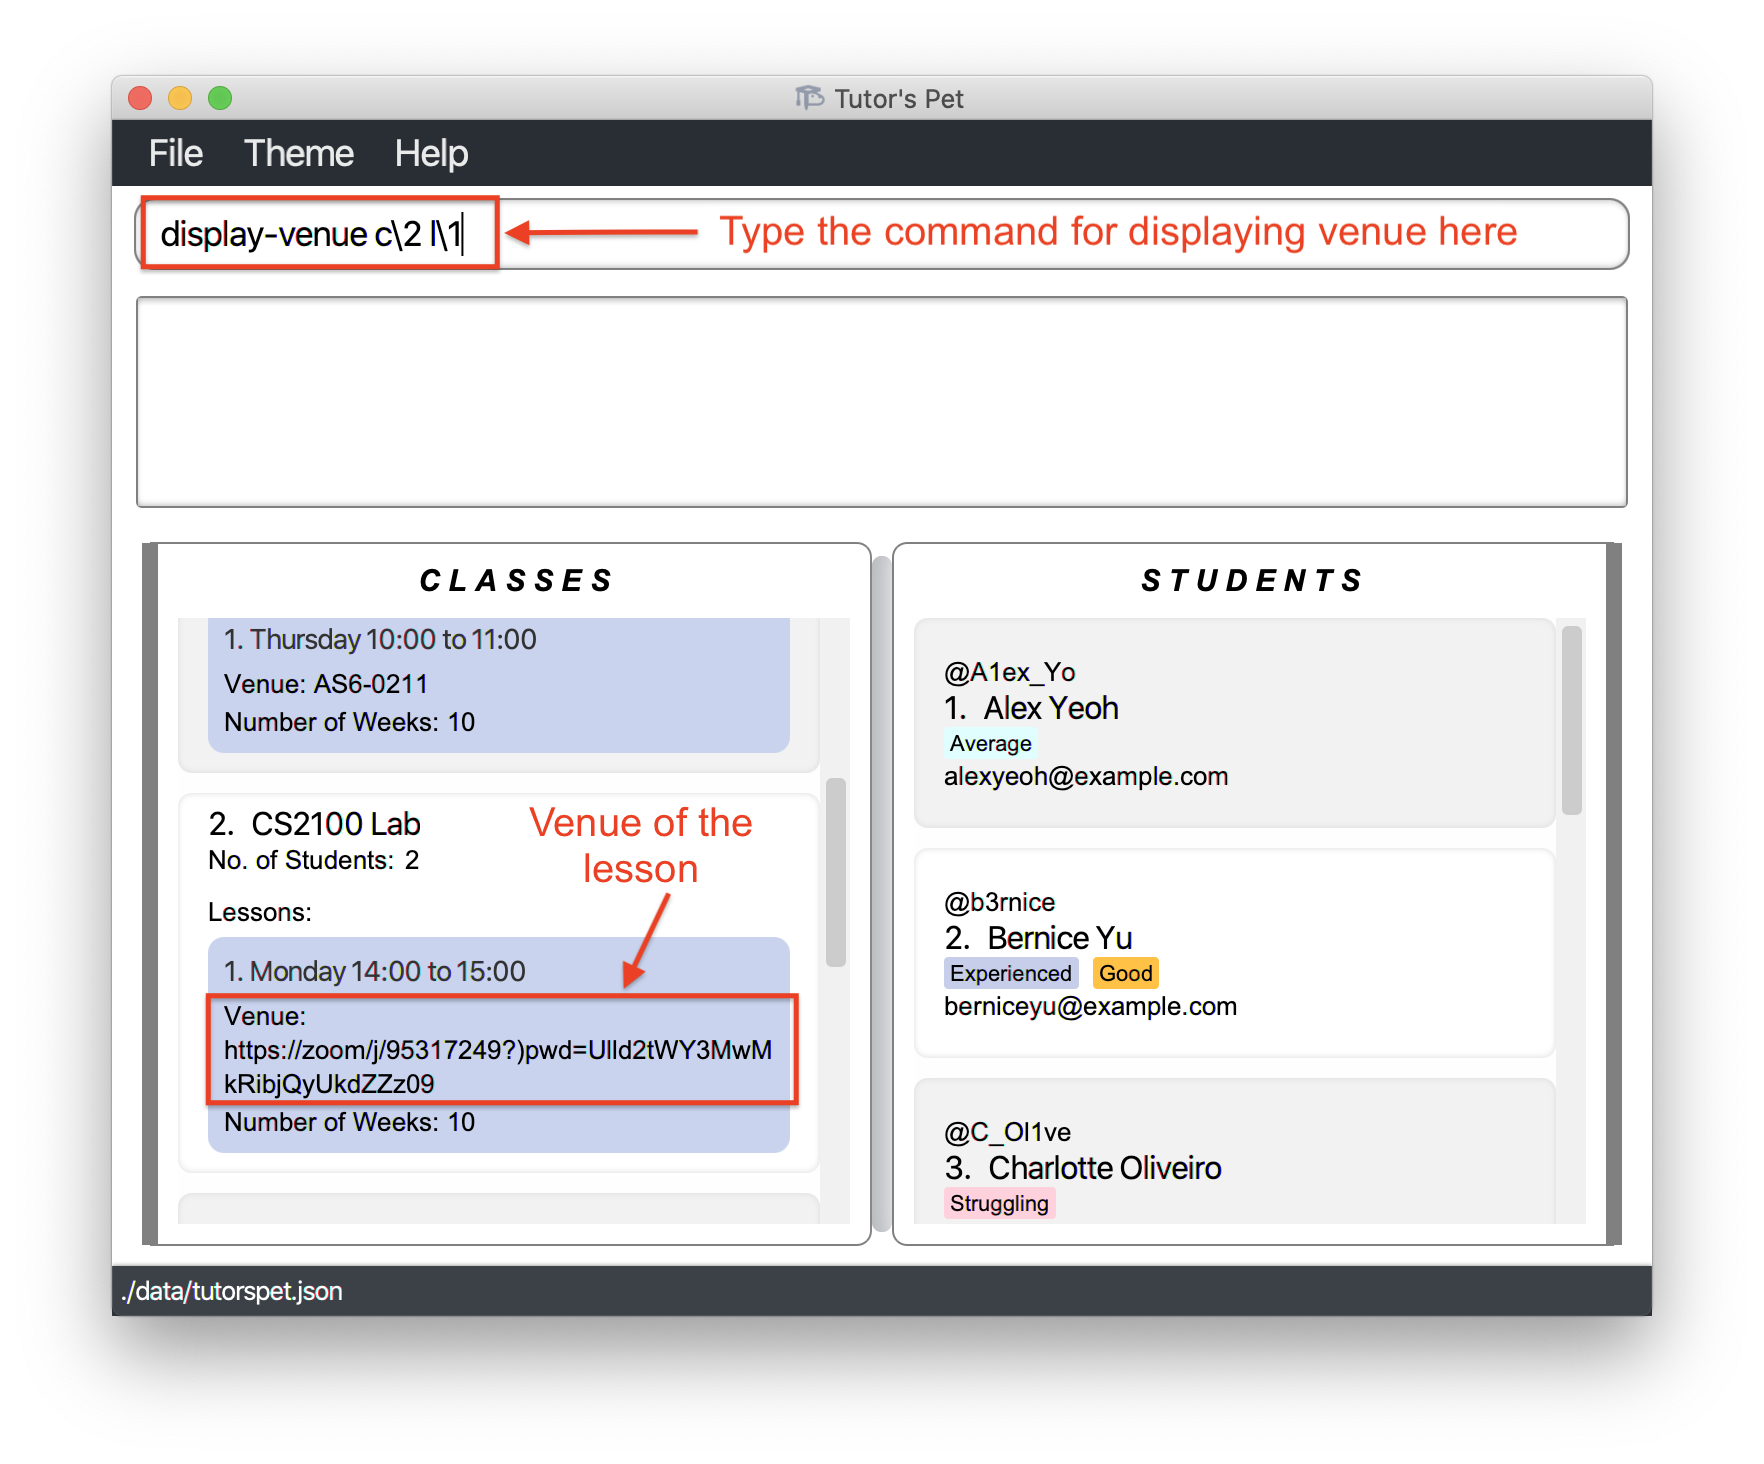
-
You can now proceed to copy the link to that zoom session from the command result box.
Managing Attendance Records
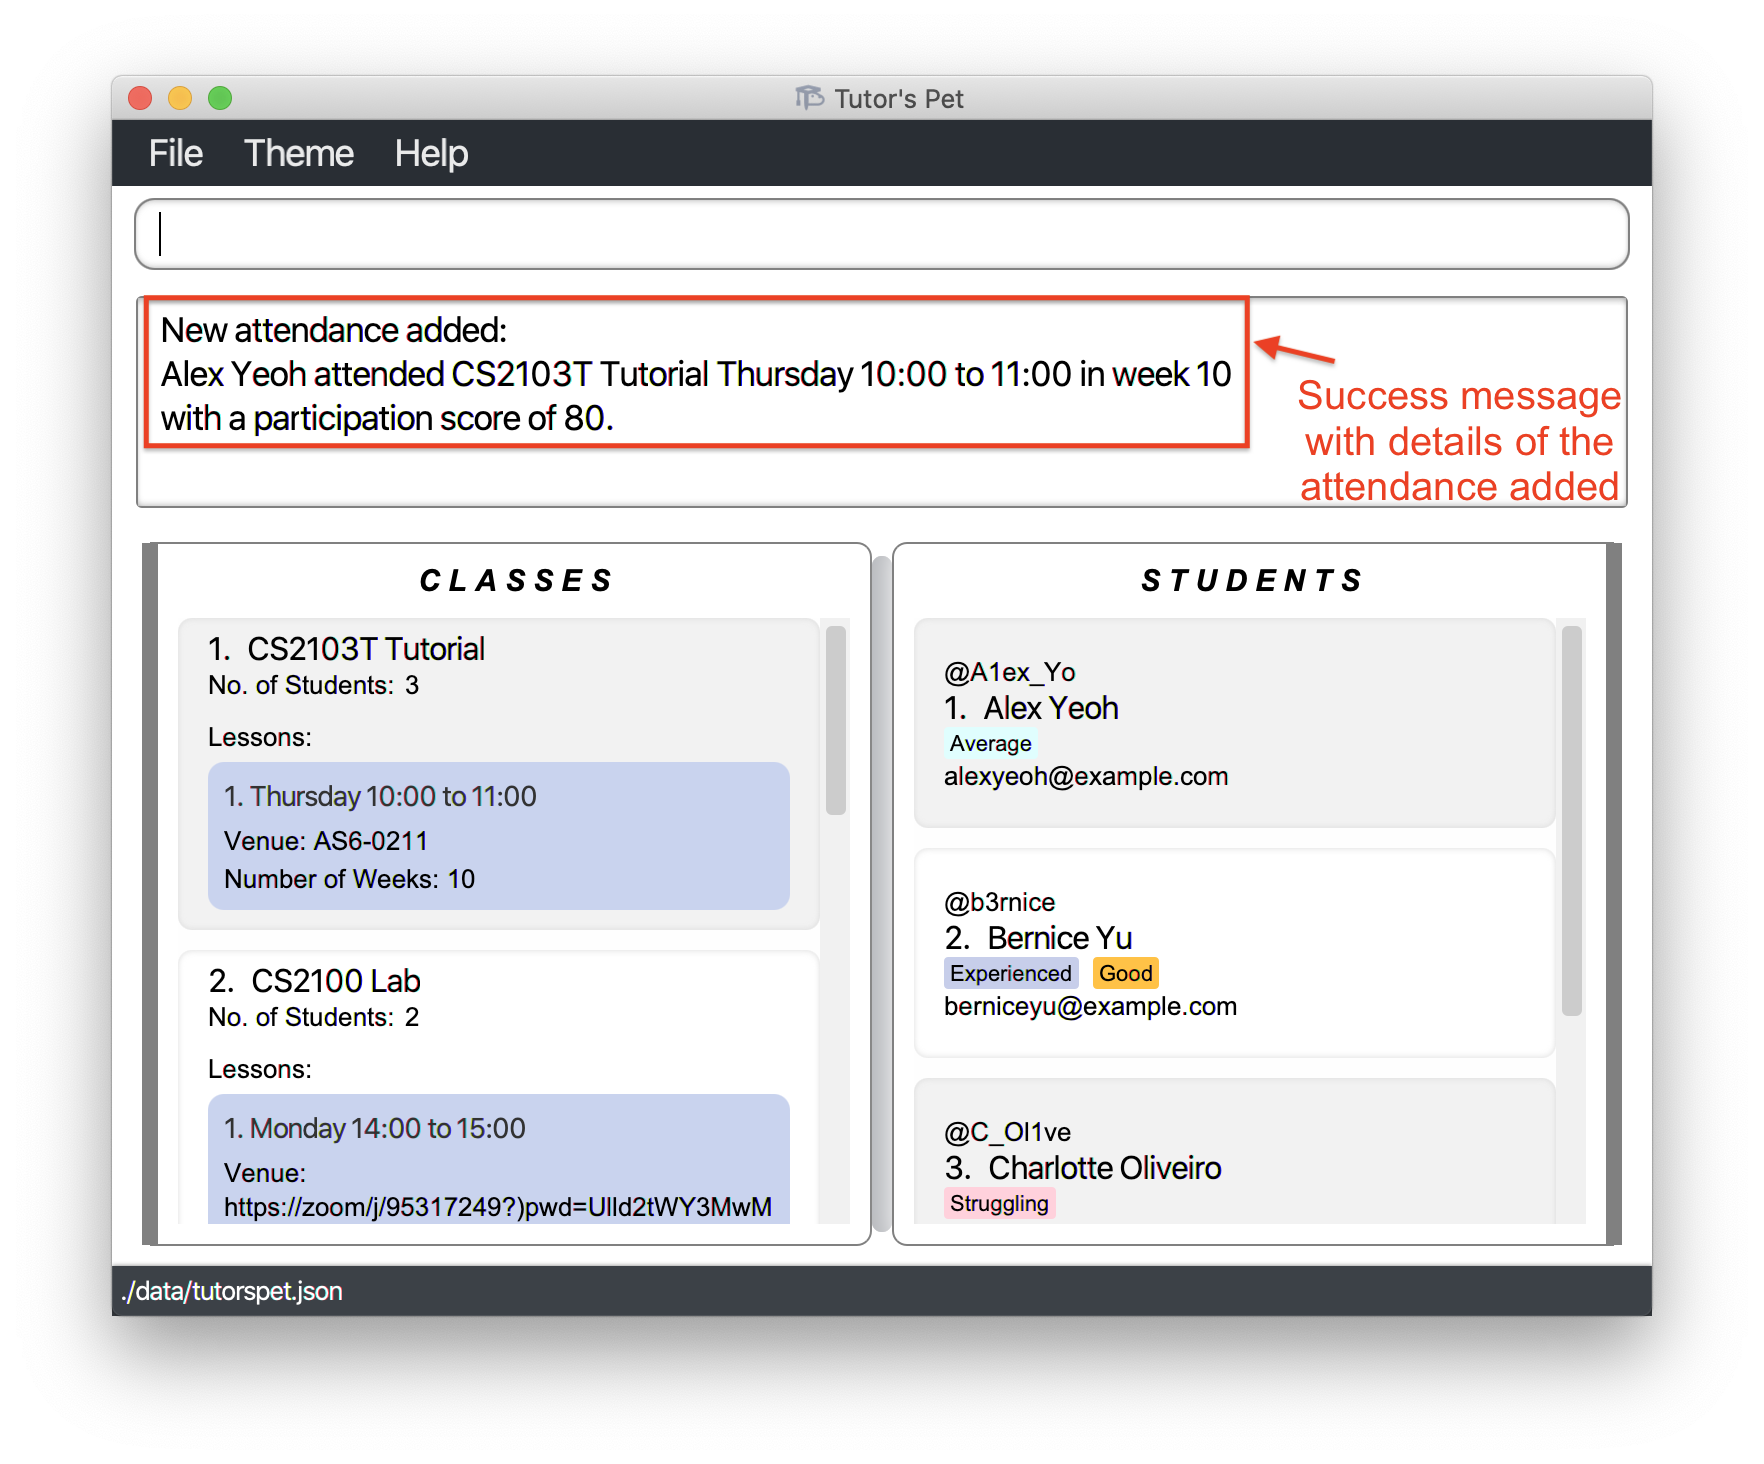
Adding an attendance record : add-attendance
If you would like to record a new attendance for a student, you can make use of this command.
Format: add-attendance c\CLASS_INDEX l\LESSON_INDEX s\STUDENT_INDEX w\WEEK p\PARTICIPATION_SCORE
- Adds the attendance of the student at the specified
STUDENT_INDEXto the specifiedCLASS_INDEX+LESSON_INDEX.
For example:
-
Your
CS2103T Tutoriallesson in week 10 just ended and you would like to give participation scores to the students. You enter the commandlist-student c\1to see the students in yourCS2103T Tutorialclass. -
You decide to start with Alex. Hence, you type in the command
add-attendance c\1 l\1 s\1 w\10 p\80and press Enter.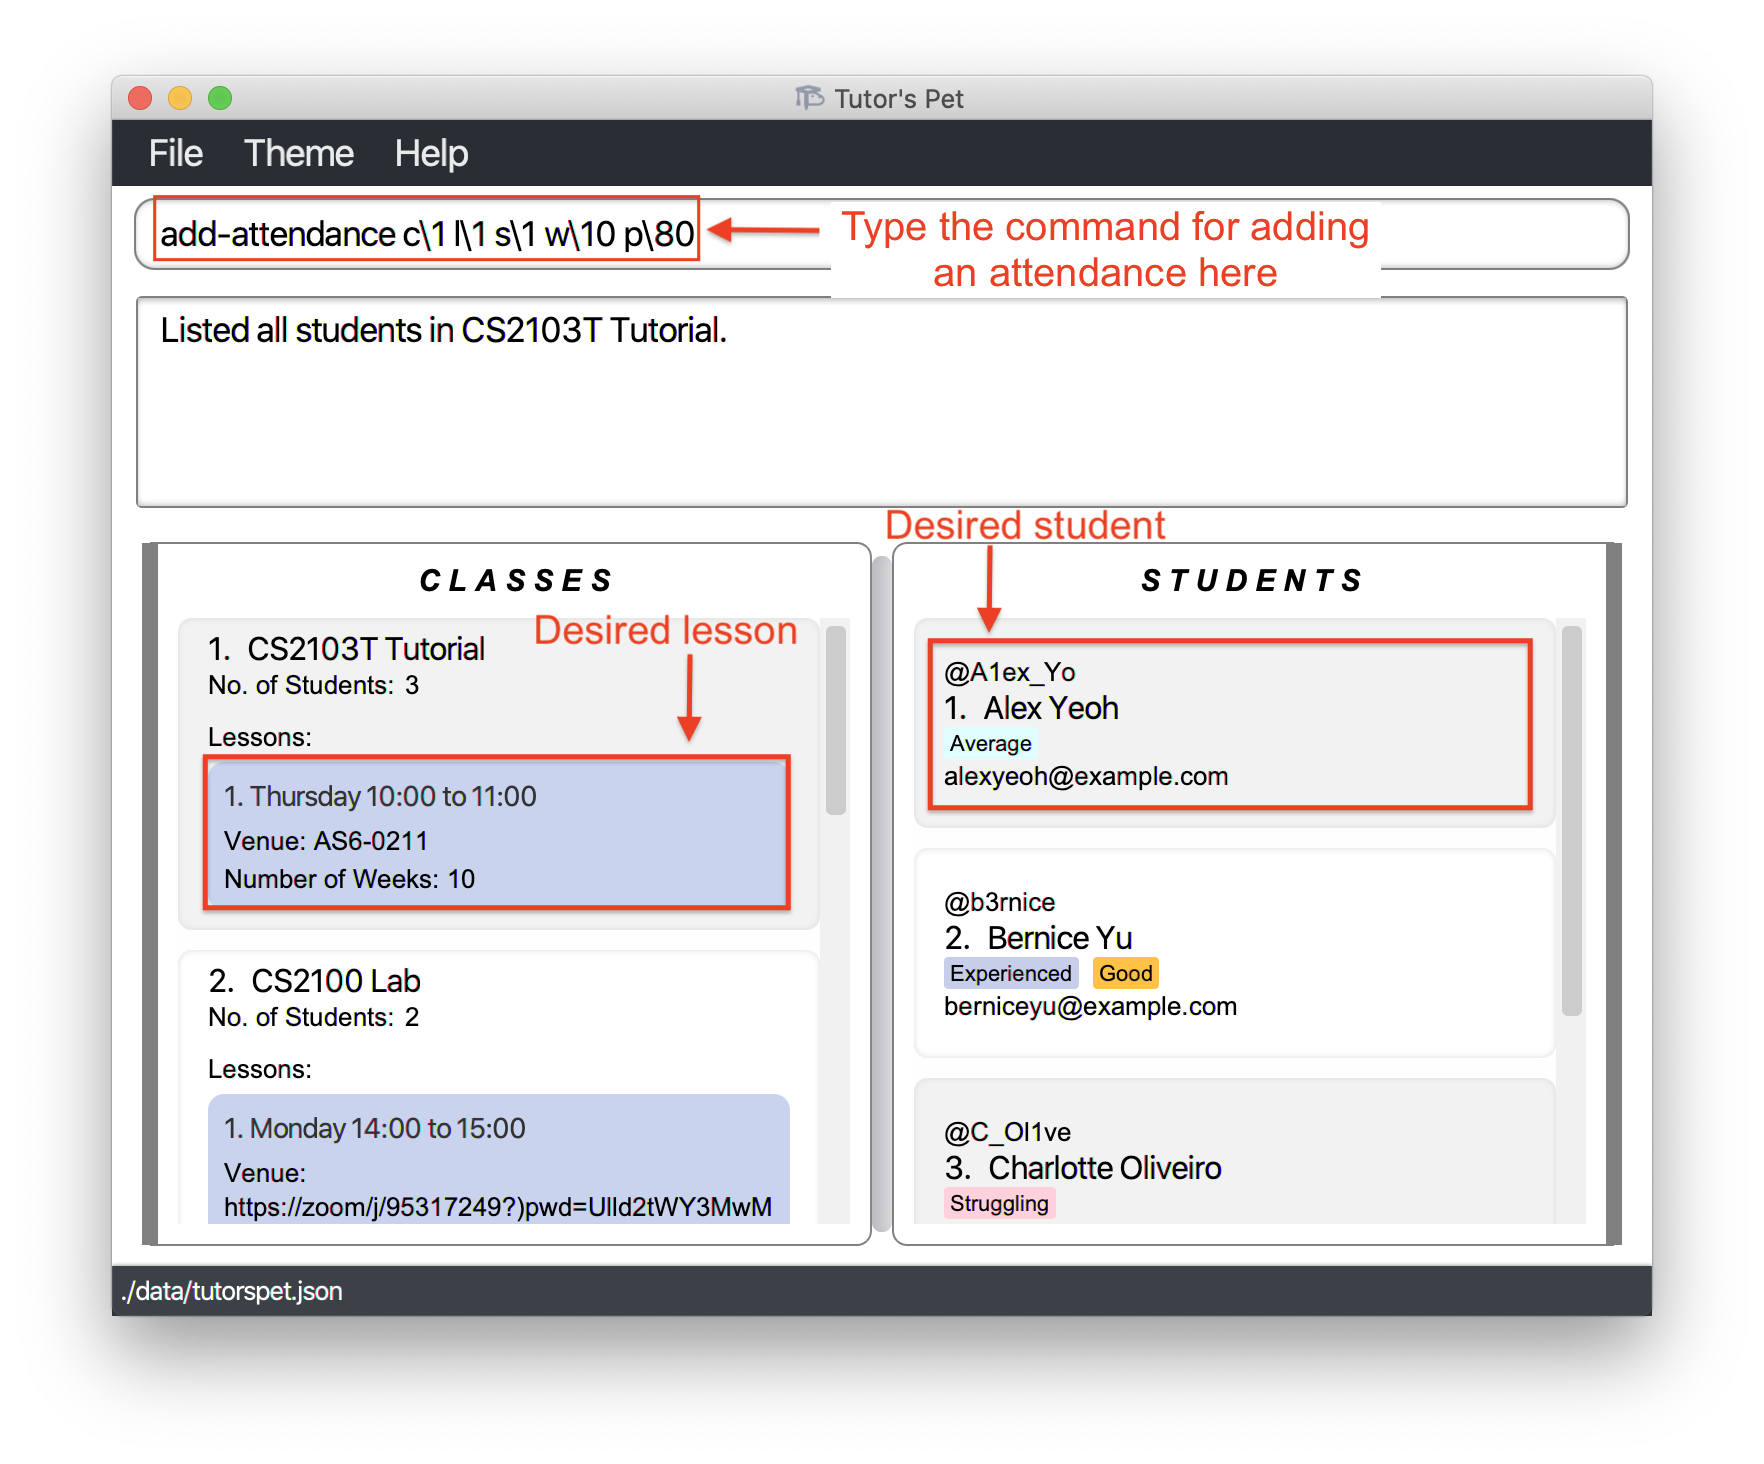
-
You have successfully recorded Alex’s attendance.
Other examples:
-
find-class CS2100 lab
find-student bernice yu
add-attendance c\1 l\1 s\1 w\10 p\70
Adds the attendance of the 1st student to the 1st lesson of the 1st class in the results of thefind-commands.
Attendance recorded is for week 10 and student’s participation score is 70. -
list-student c\1
add-attendance c\1 l\1 s\2 w\5 p\50
Adds the attendance of the 2nd student in the results of thelistcommand to the 1st lesson of the 1st class.
Attendance recorded is for week 5 and student’s participation score is 50.
![]() Notes about the command:
Notes about the command:
-
The
WEEKmust be a positive whole number 1, 2, 3, … -
The
PARTICIPATION_SCOREmust be a non-negative whole number 0, 1, 2, …
![]() Tip: If you are planning to add multiple attendances consecutively, click on the command
box and make use of the recall function by pressing ↑ key. This recall function automatically
inputs your most recent command into the command box, allowing you to type less!
Tip: If you are planning to add multiple attendances consecutively, click on the command
box and make use of the recall function by pressing ↑ key. This recall function automatically
inputs your most recent command into the command box, allowing you to type less!
Editing an attendance record : edit-attendance
You can use this command to edit the attendance and participation score of a student.
Format: edit-attendance c\CLASS_INDEX l\LESSON_INDEX s\STUDENT_INDEX w\WEEK p\PARTICIPATION_SCORE
- Edits the attendance record at the specified
CLASS_INDEX+LESSON_INDEX+STUDENT_INDEX+WEEK.
For example:
-
Alex is a student in your CS2103T class. After your lesson in week 1, you wish to give him a participation score of 45. However, you accidentally gave him 35 instead.
-
You type in the command
edit-attendance c\1 l\1 s\1 w\1 p\45and press Enter.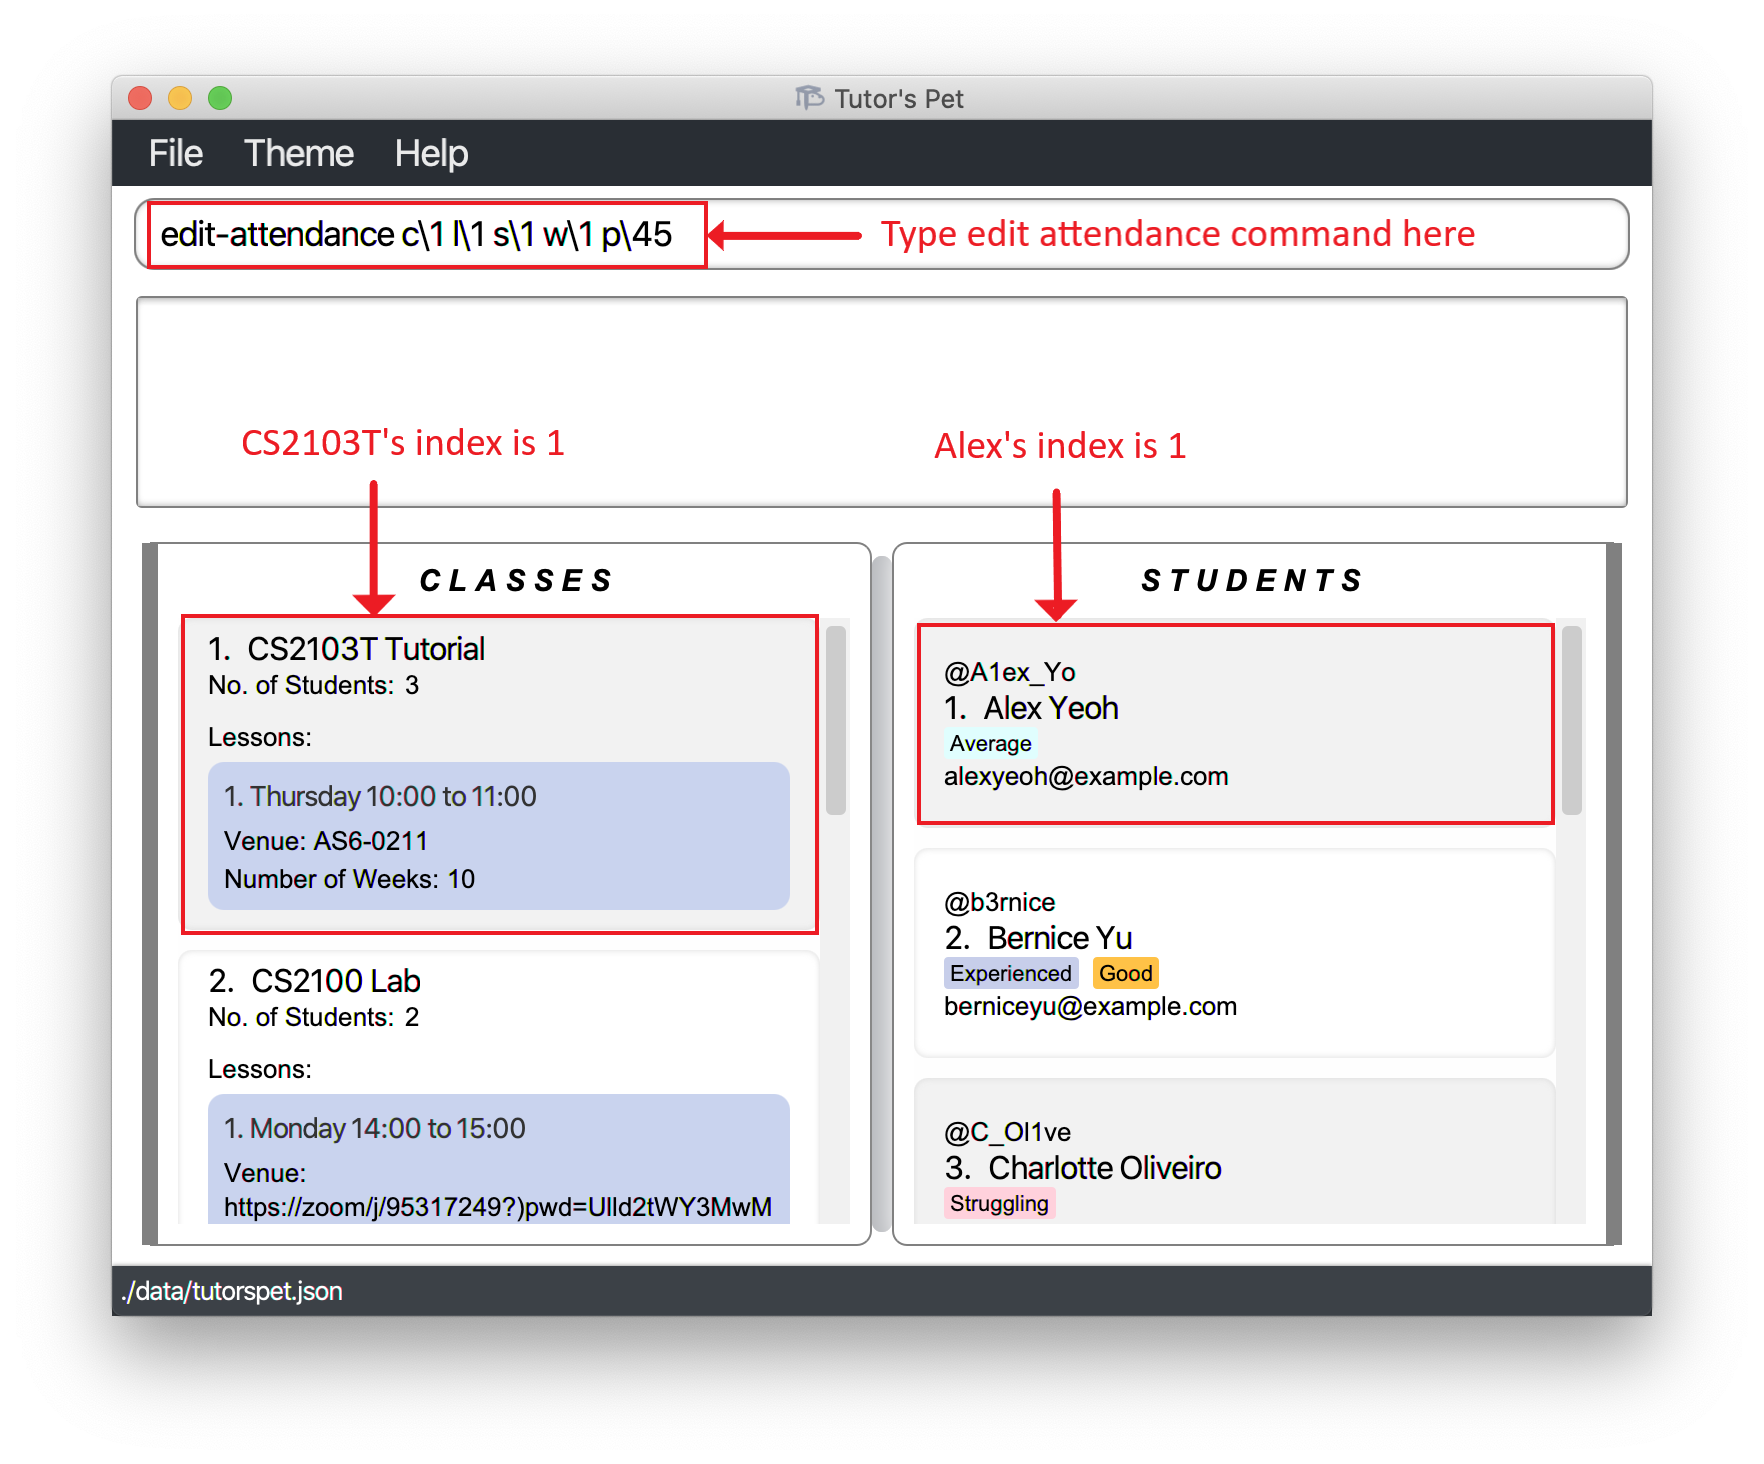
-
Now, you have successfully edited Alex’s participation score from 35 to 45 points.

Other examples:
-
edit-attendance c\1 l\1 s\1 w\1 p\10
Edits the 1st week’s participation score of the 1st student of the 1st lesson of the 1st class to 10 points.
![]() Notes about the command:
Notes about the command:
-
The
WEEKmust be a positive whole number 1, 2, 3, … -
The
PARTICIPATION_SCOREmust be a non-negative whole number 0, 1, 2, …
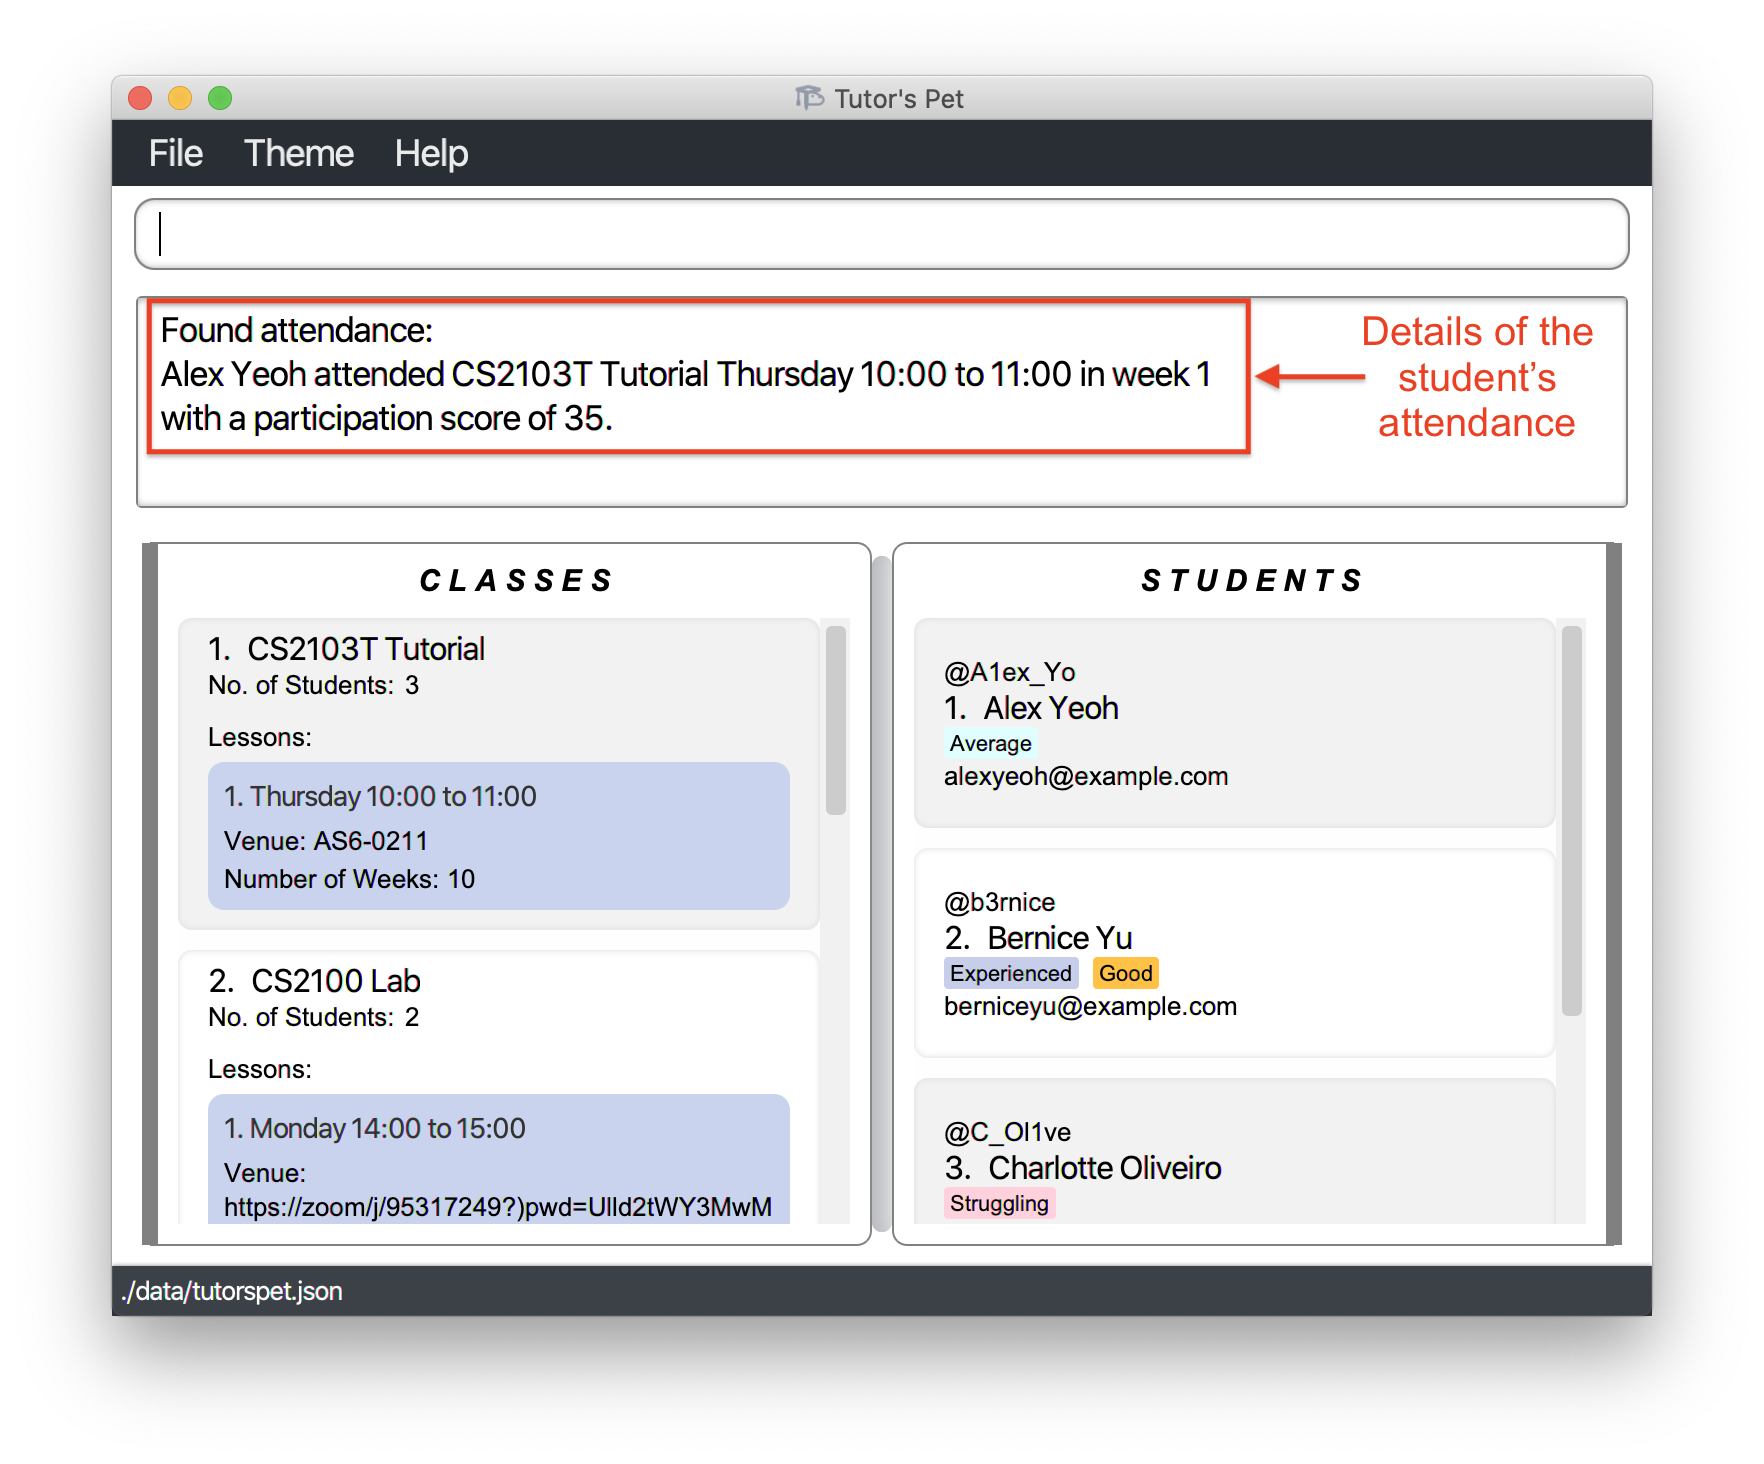
Finding an attendance record: find-attendance
If you need to find out a student’s attendance for a specific week, you can make use of this command.
Format: find-attendance c\CLASS_INDEX l\LESSON_INDEX s\STUDENT_INDEX w\WEEK
- Finds the attendance record at the specified
CLASS_INDEX+LESSON_INDEX+STUDENT_INDEX+WEEK.
For example:
-
It is the end of the semester and you wish to submit your students’ attendance.
-
You type the command
list-student c\1to see the students in yourCS2103T Tutorialclass. -
Next, you would like to find out if Alex attended the lesson in week 1.
-
You type in
find-attendance c\1 l\1 s\1 w\1and press Enter.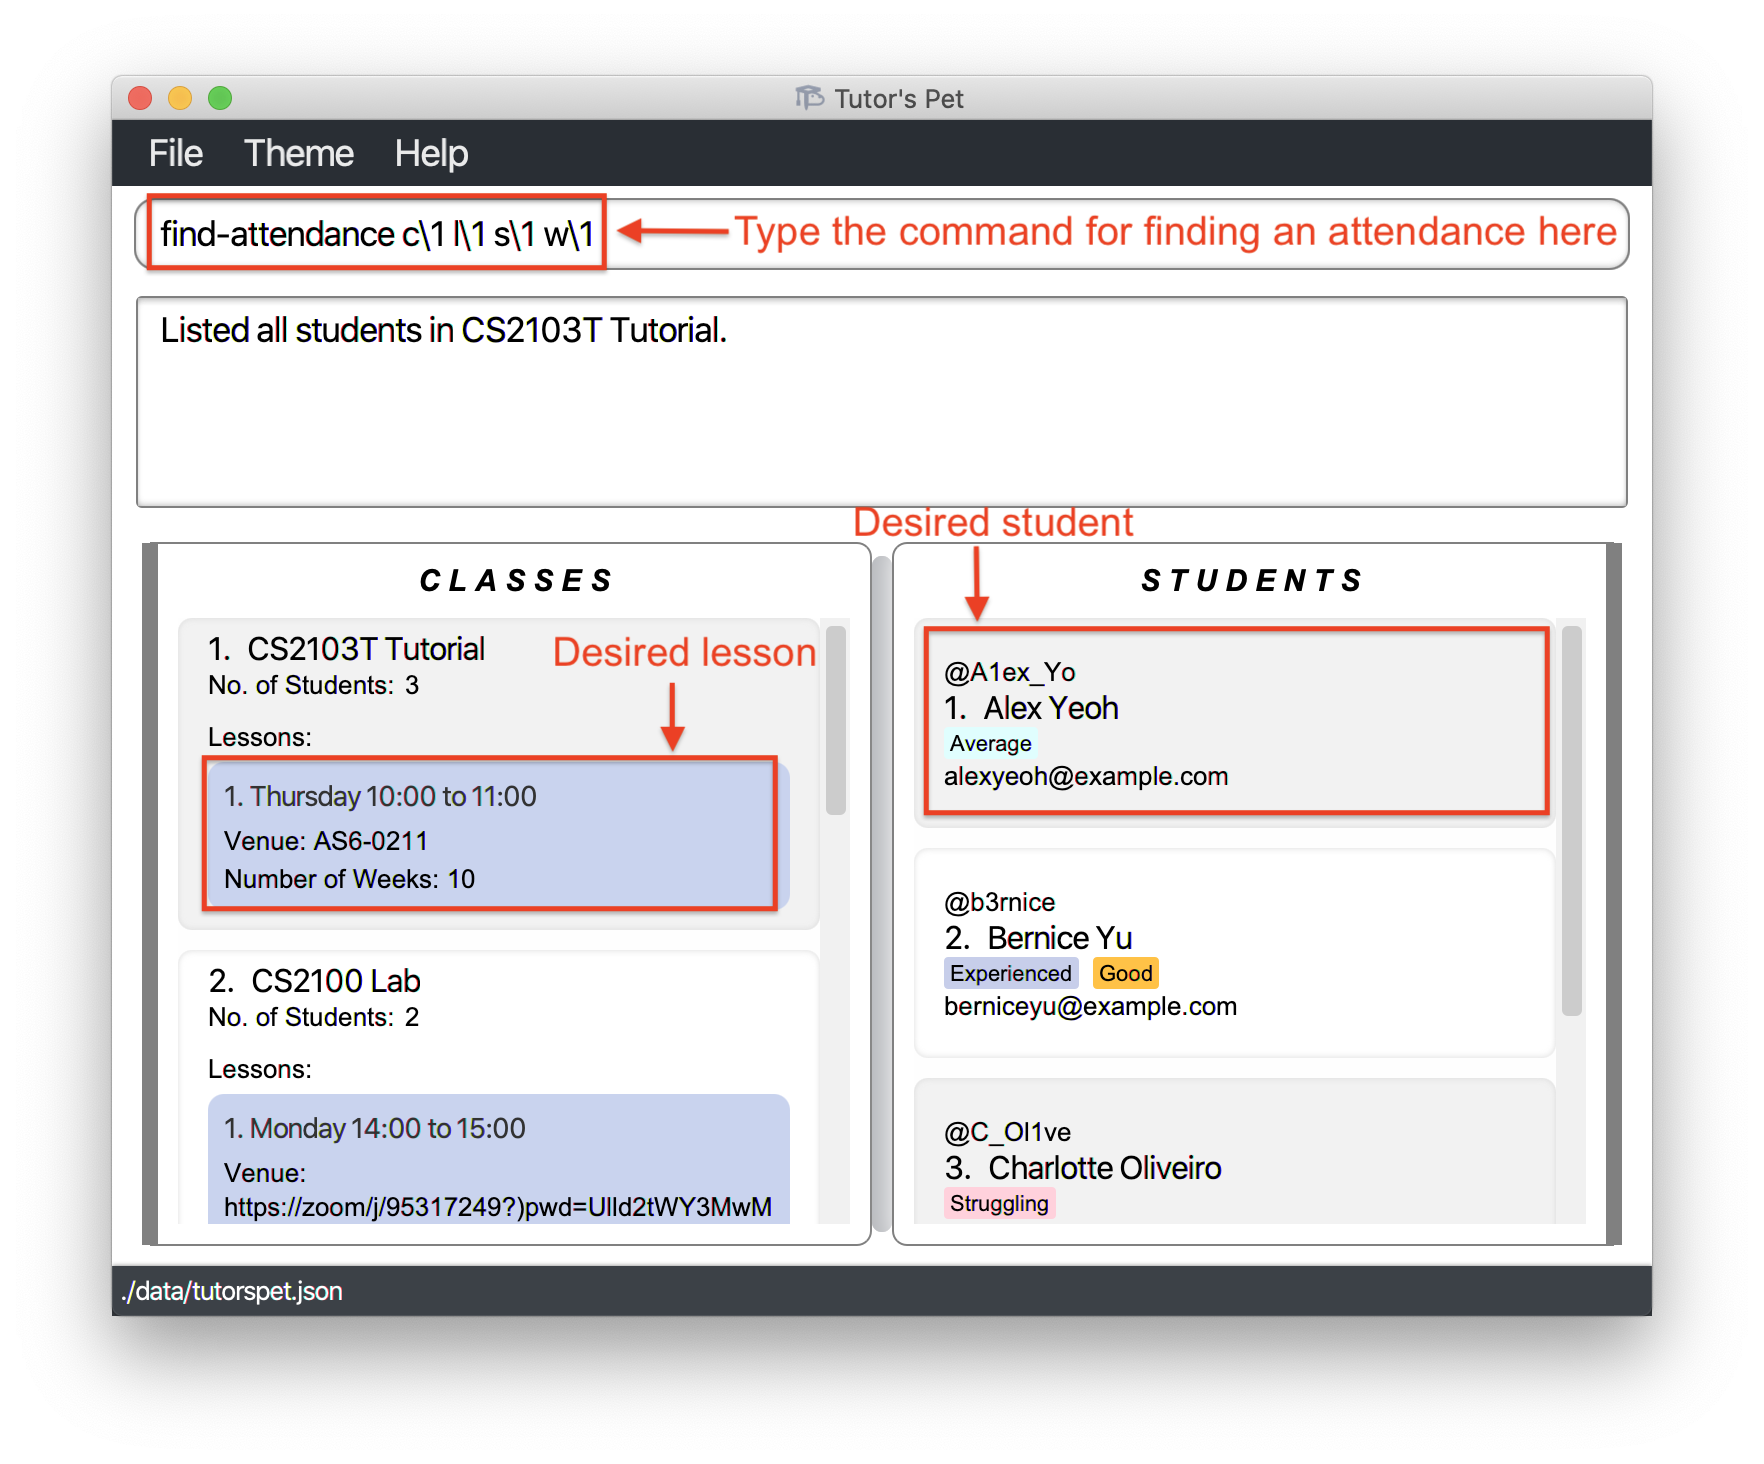
-
Now, you can find out if Alex attended the first lesson and his participation score in week 1.
Other examples:
-
find-class CS2100 lab
find-student bernice yu
find-attendance c\1 l\1 s\1 w\10
Shows the attendance of the 1st student in the 1st lesson of the 1st class in the results of the find command.
Attendance shown is for week 10. -
list-student c\1
find-attendance c\1 l\1 s\2 w\5
Shows the attendance of the 2nd student in the 1st lesson of the 1st class in the results of the list command.
Attendance shown is for week 5.
![]() Notes about the command:
Notes about the command:
- The
WEEKmust be a positive whole number 1, 2, 3, …
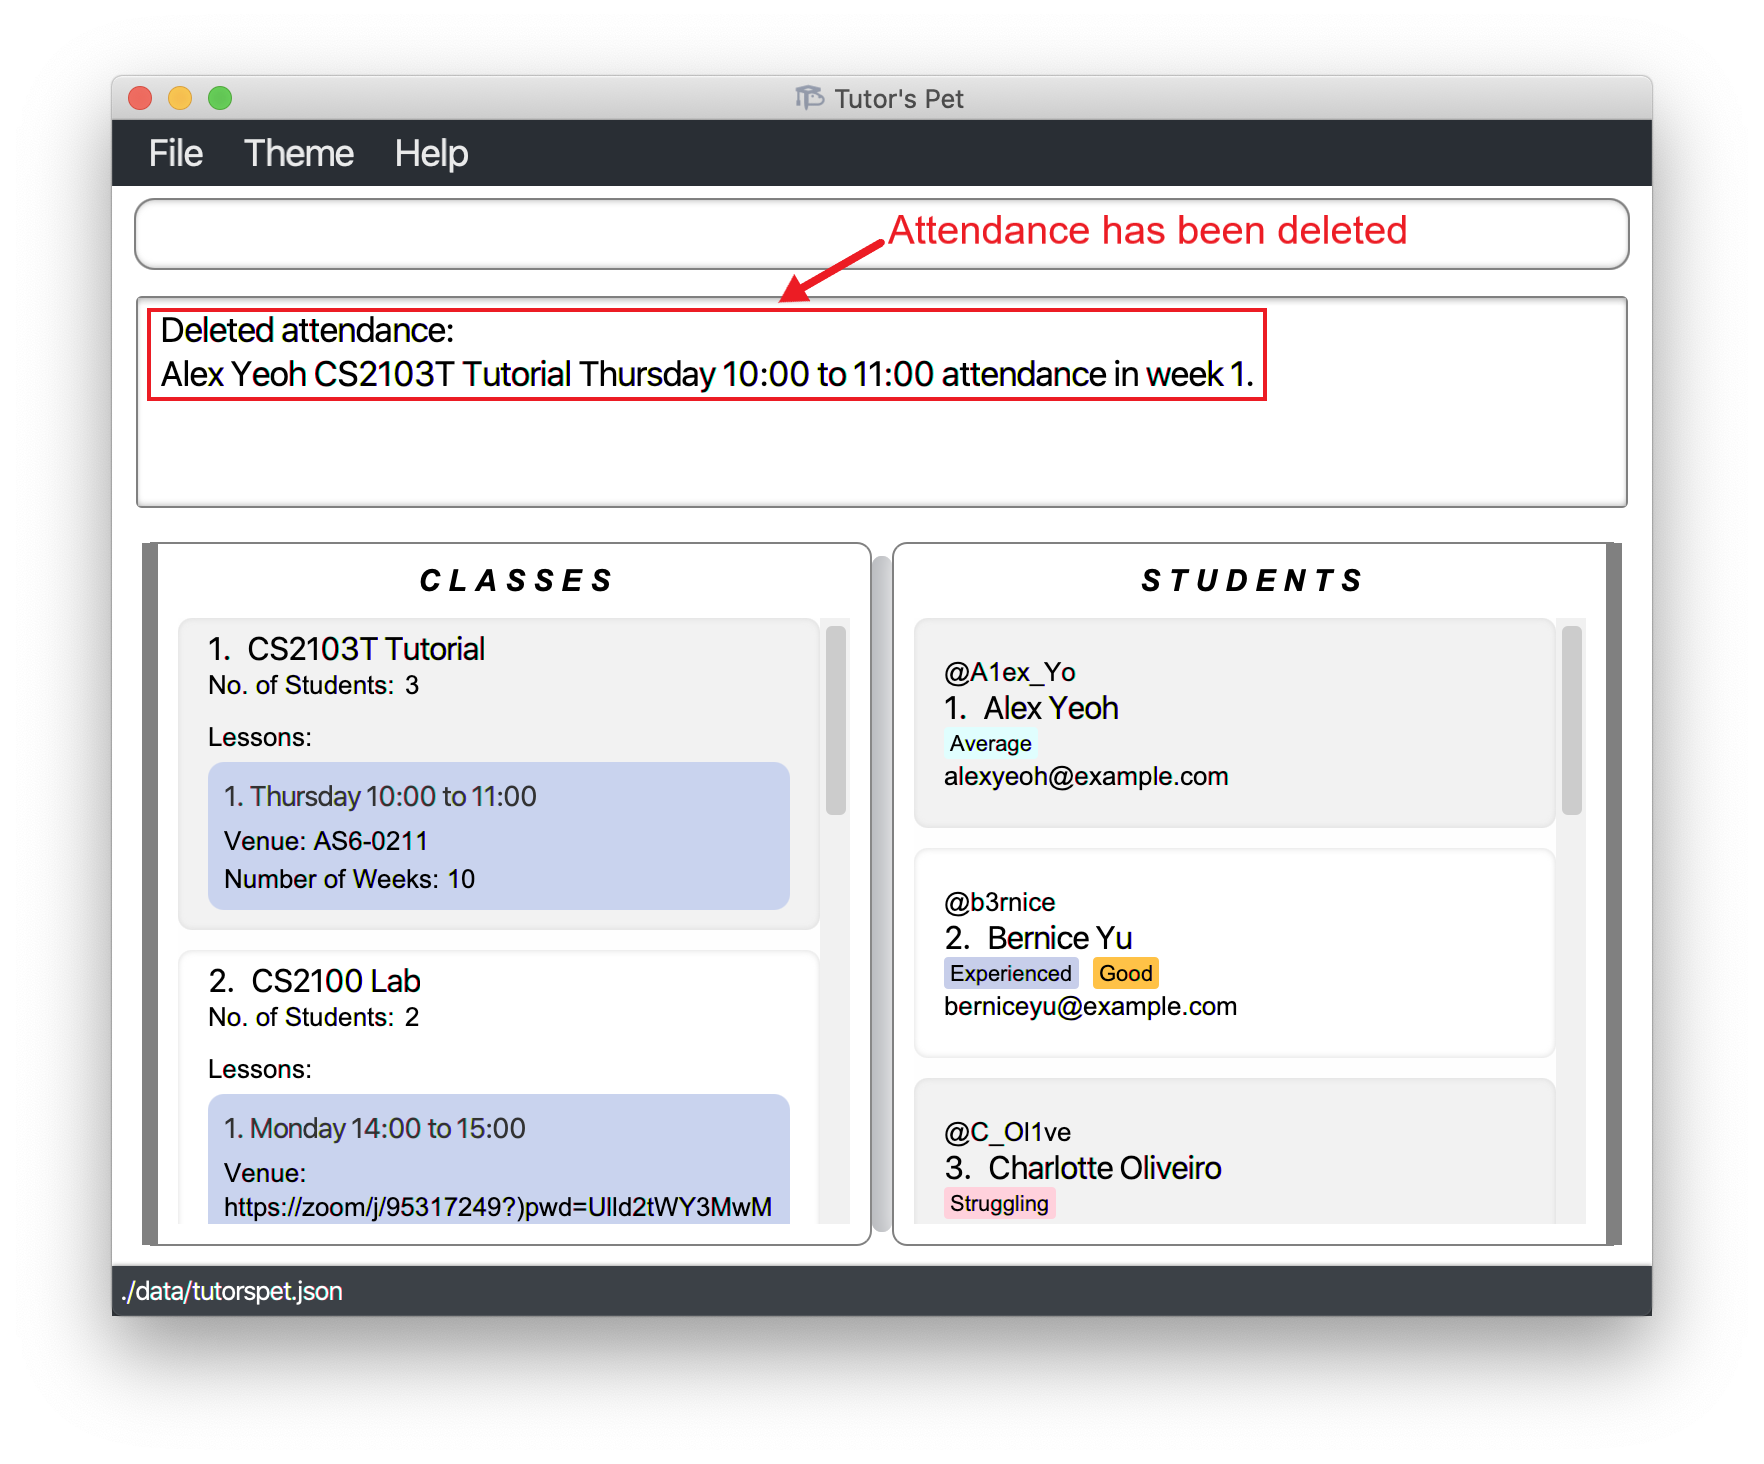
Deleting an attendance record : delete-attendance
If you would like to delete a specific student’s attendance from a lesson, you can make use of this command.
Format: delete-attendance c\CLASS_INDEX l\LESSON_INDEX s\STUDENT_INDEX w\WEEK
- Deletes the attendance record at the specified
CLASS_INDEX+LESSON_INDEX+STUDENT_INDEX+WEEK.
For example:
-
You would like to delete Alex’s attendance for the Thursday 10:00AM to 11:00AM lesson of CS2103T Tutorial in Week 1.
-
You type in the command
delete-attendance c\1 l\1 s\1 w\1and press Enter.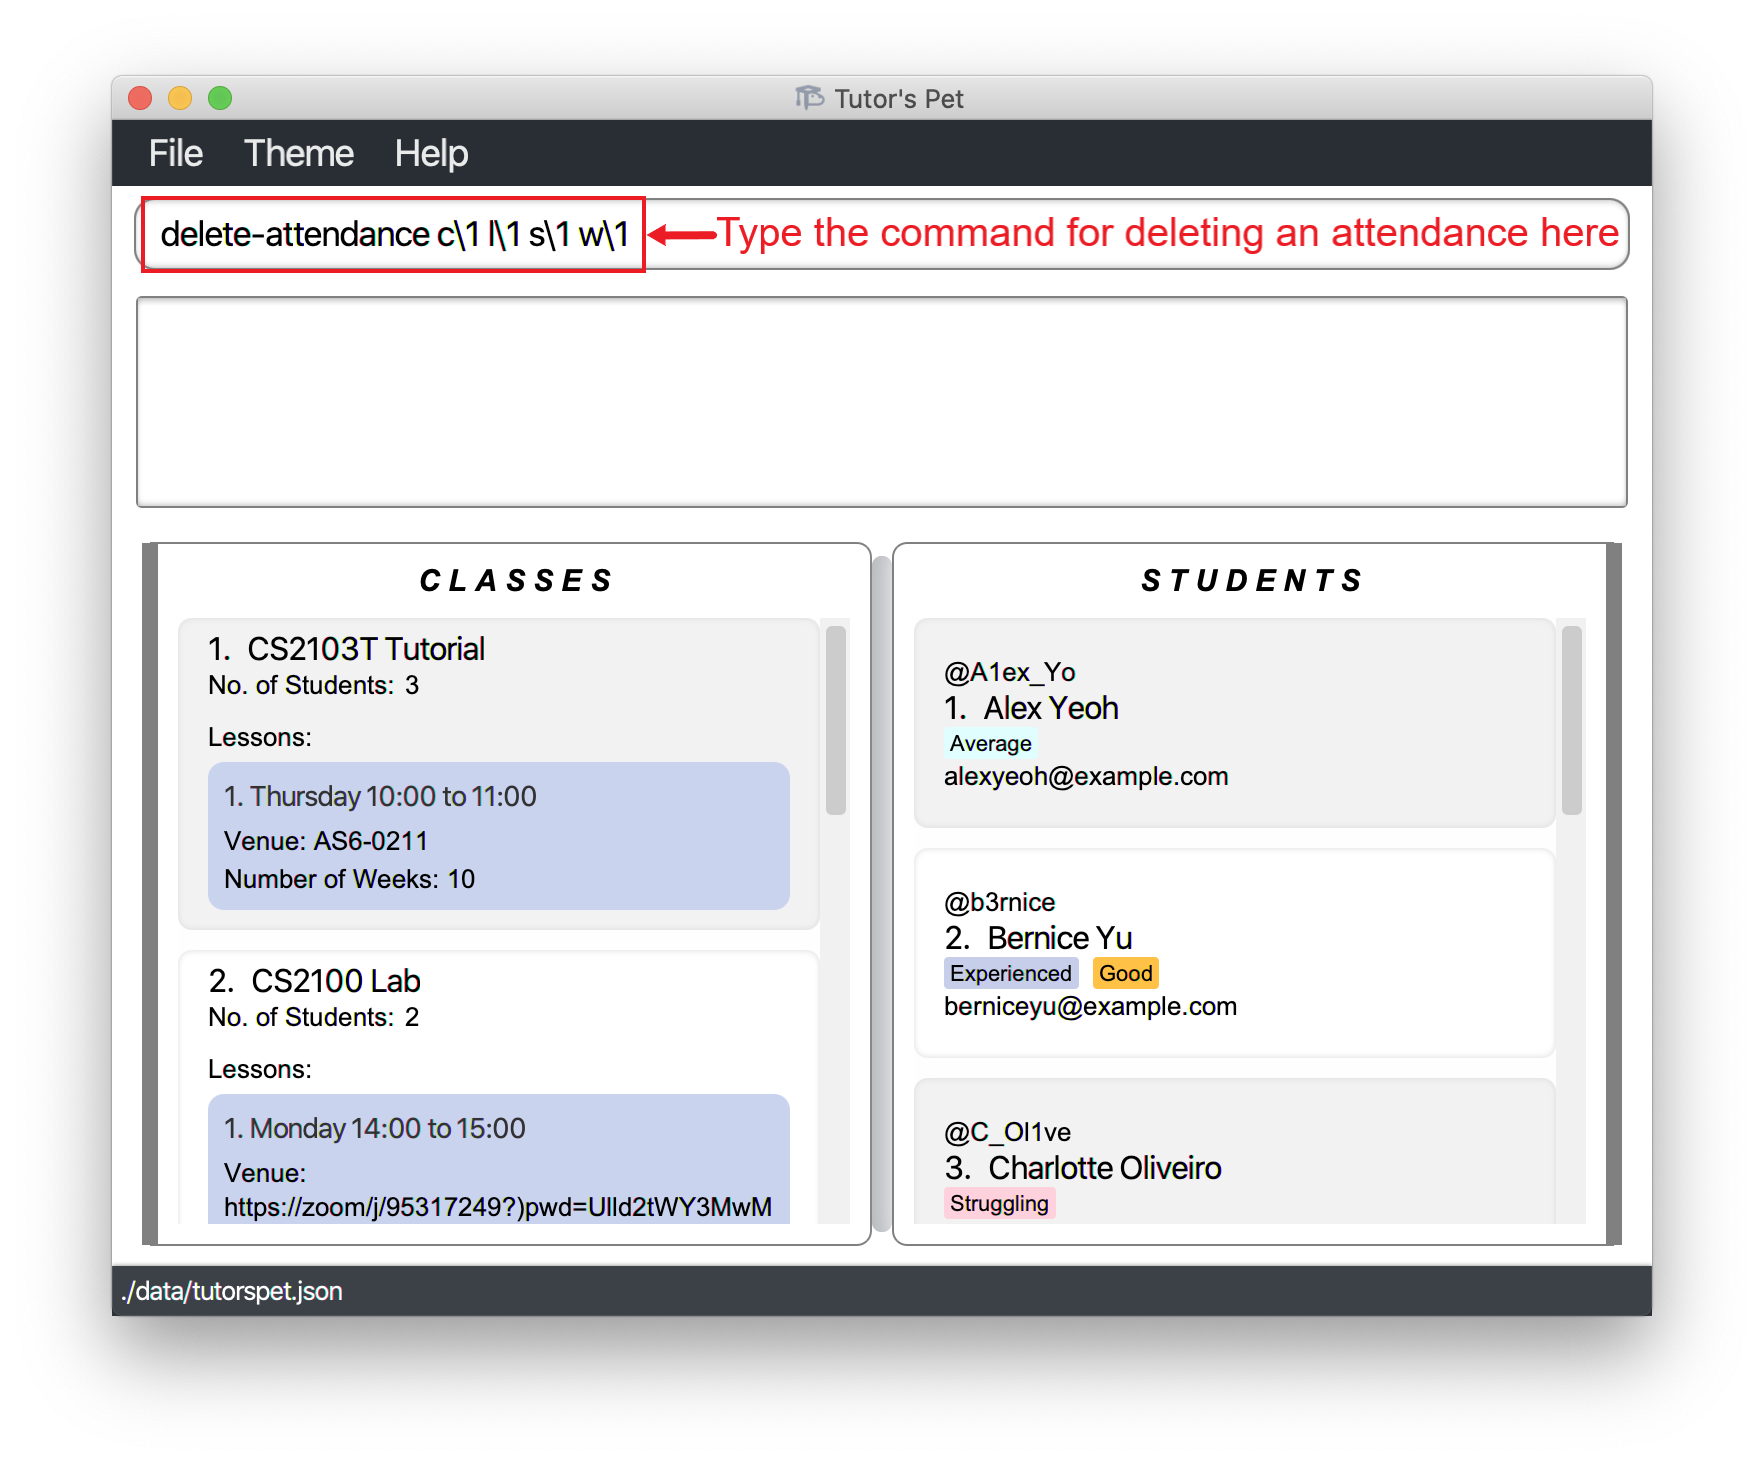
-
Alex’s attendance for week 1 has been deleted.
Displaying attendance statistics : stats
If you would like to find out how your student is performing in class, you can make use of this command.
Format: stats c\CLASS_INDEX s\STUDENT_INDEX
- Gives a summary of the student’s attendance at the specified
CLASS_INDEX+STUDENT_INDEX.
For example:
-
It is the end of the semester and time for you to grade your students’ overall class participation.
-
You type in the command
list-student c\1to see the students in yourCS2103T Tutorialclass. -
Next, you would like to find out if Alex has been participating actively throughout the semester.
-
You type in the command
stats c\1 s\1and press Enter.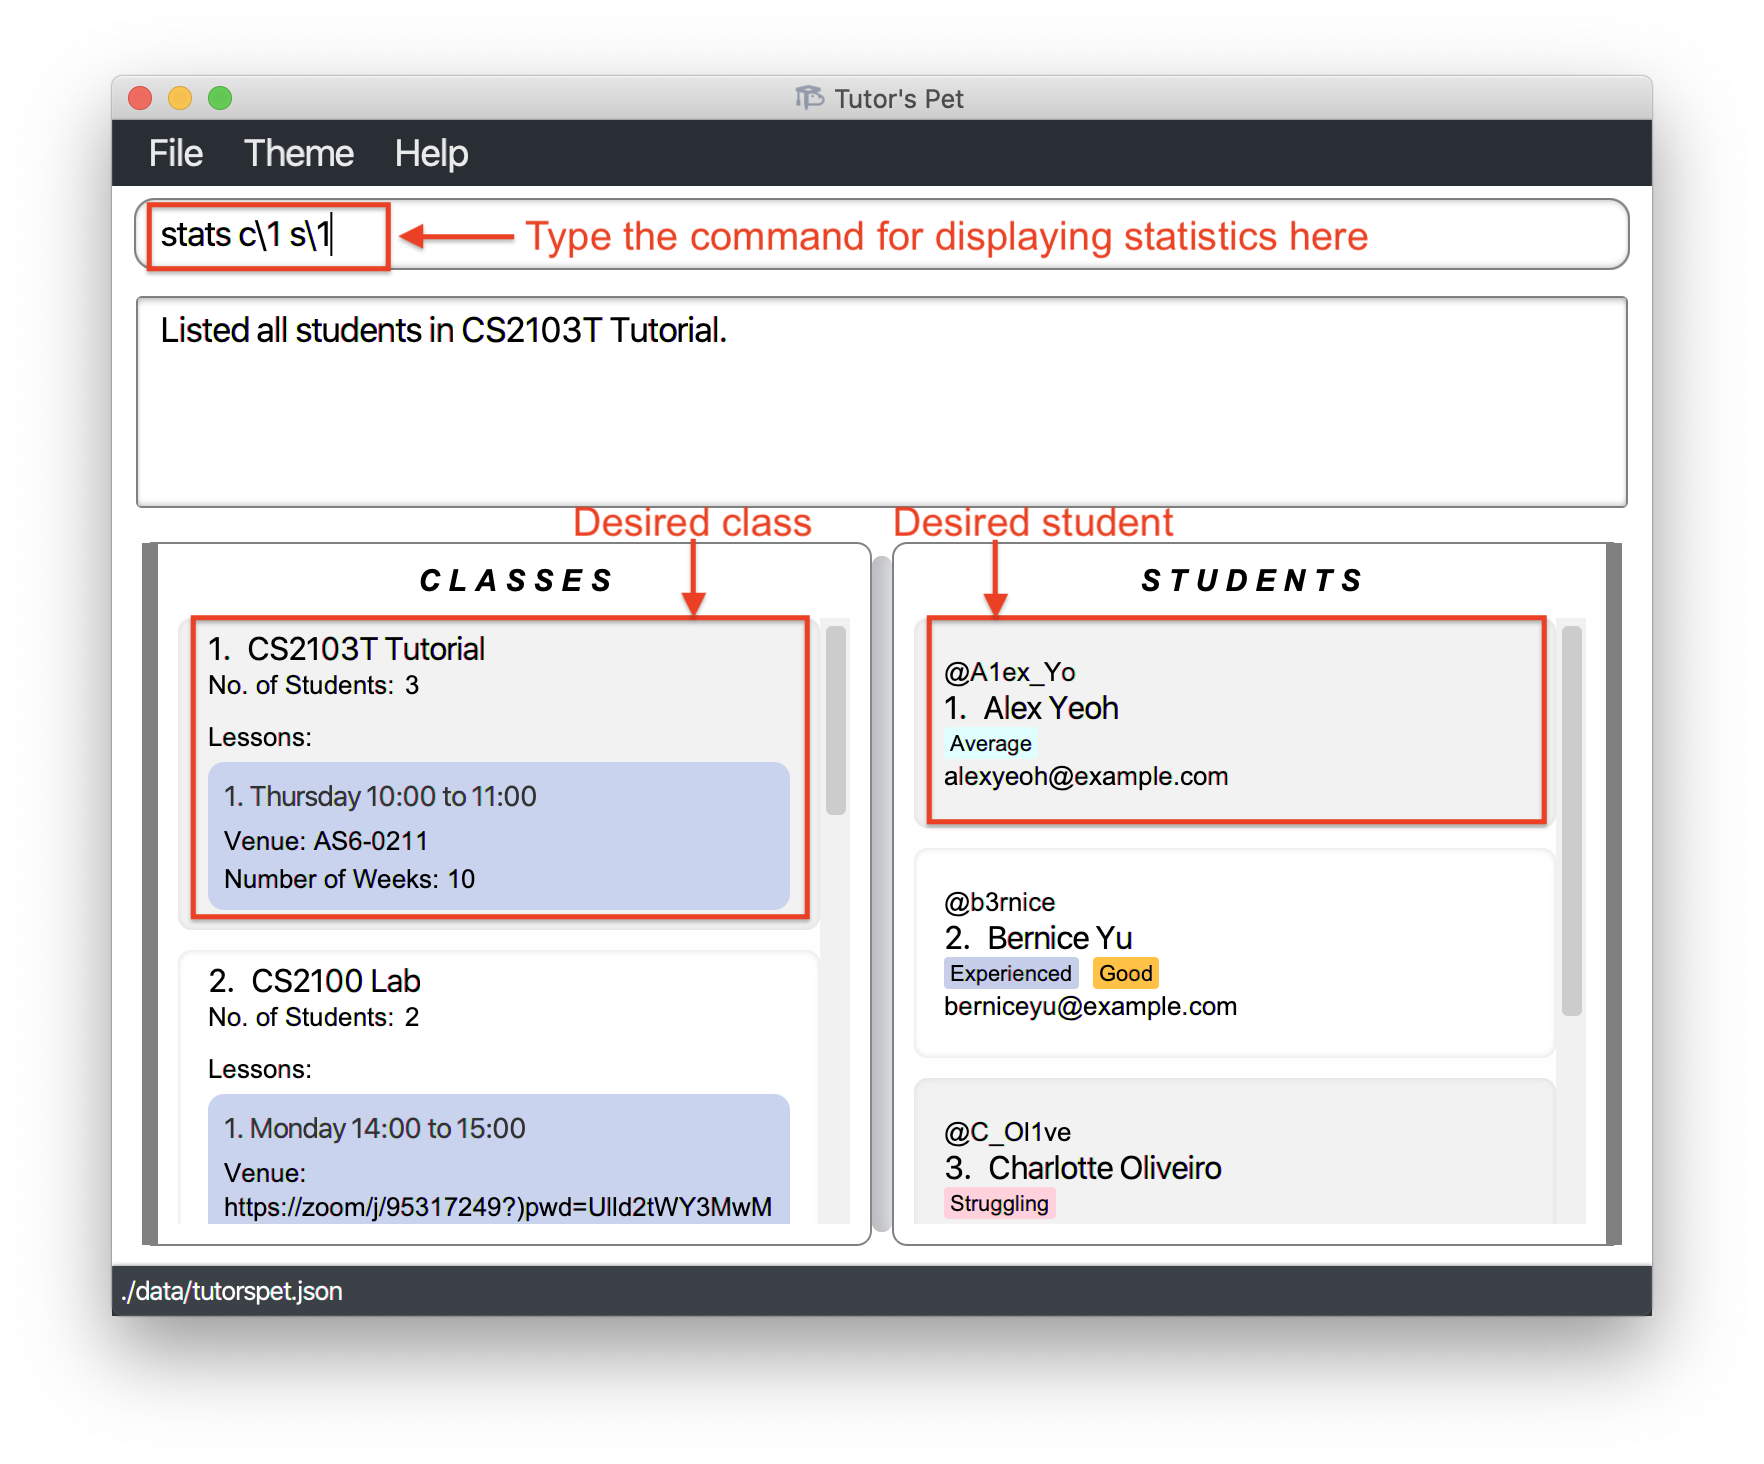
-
Now, you can see his average participation score and overall attendance to give a corresponding grade.
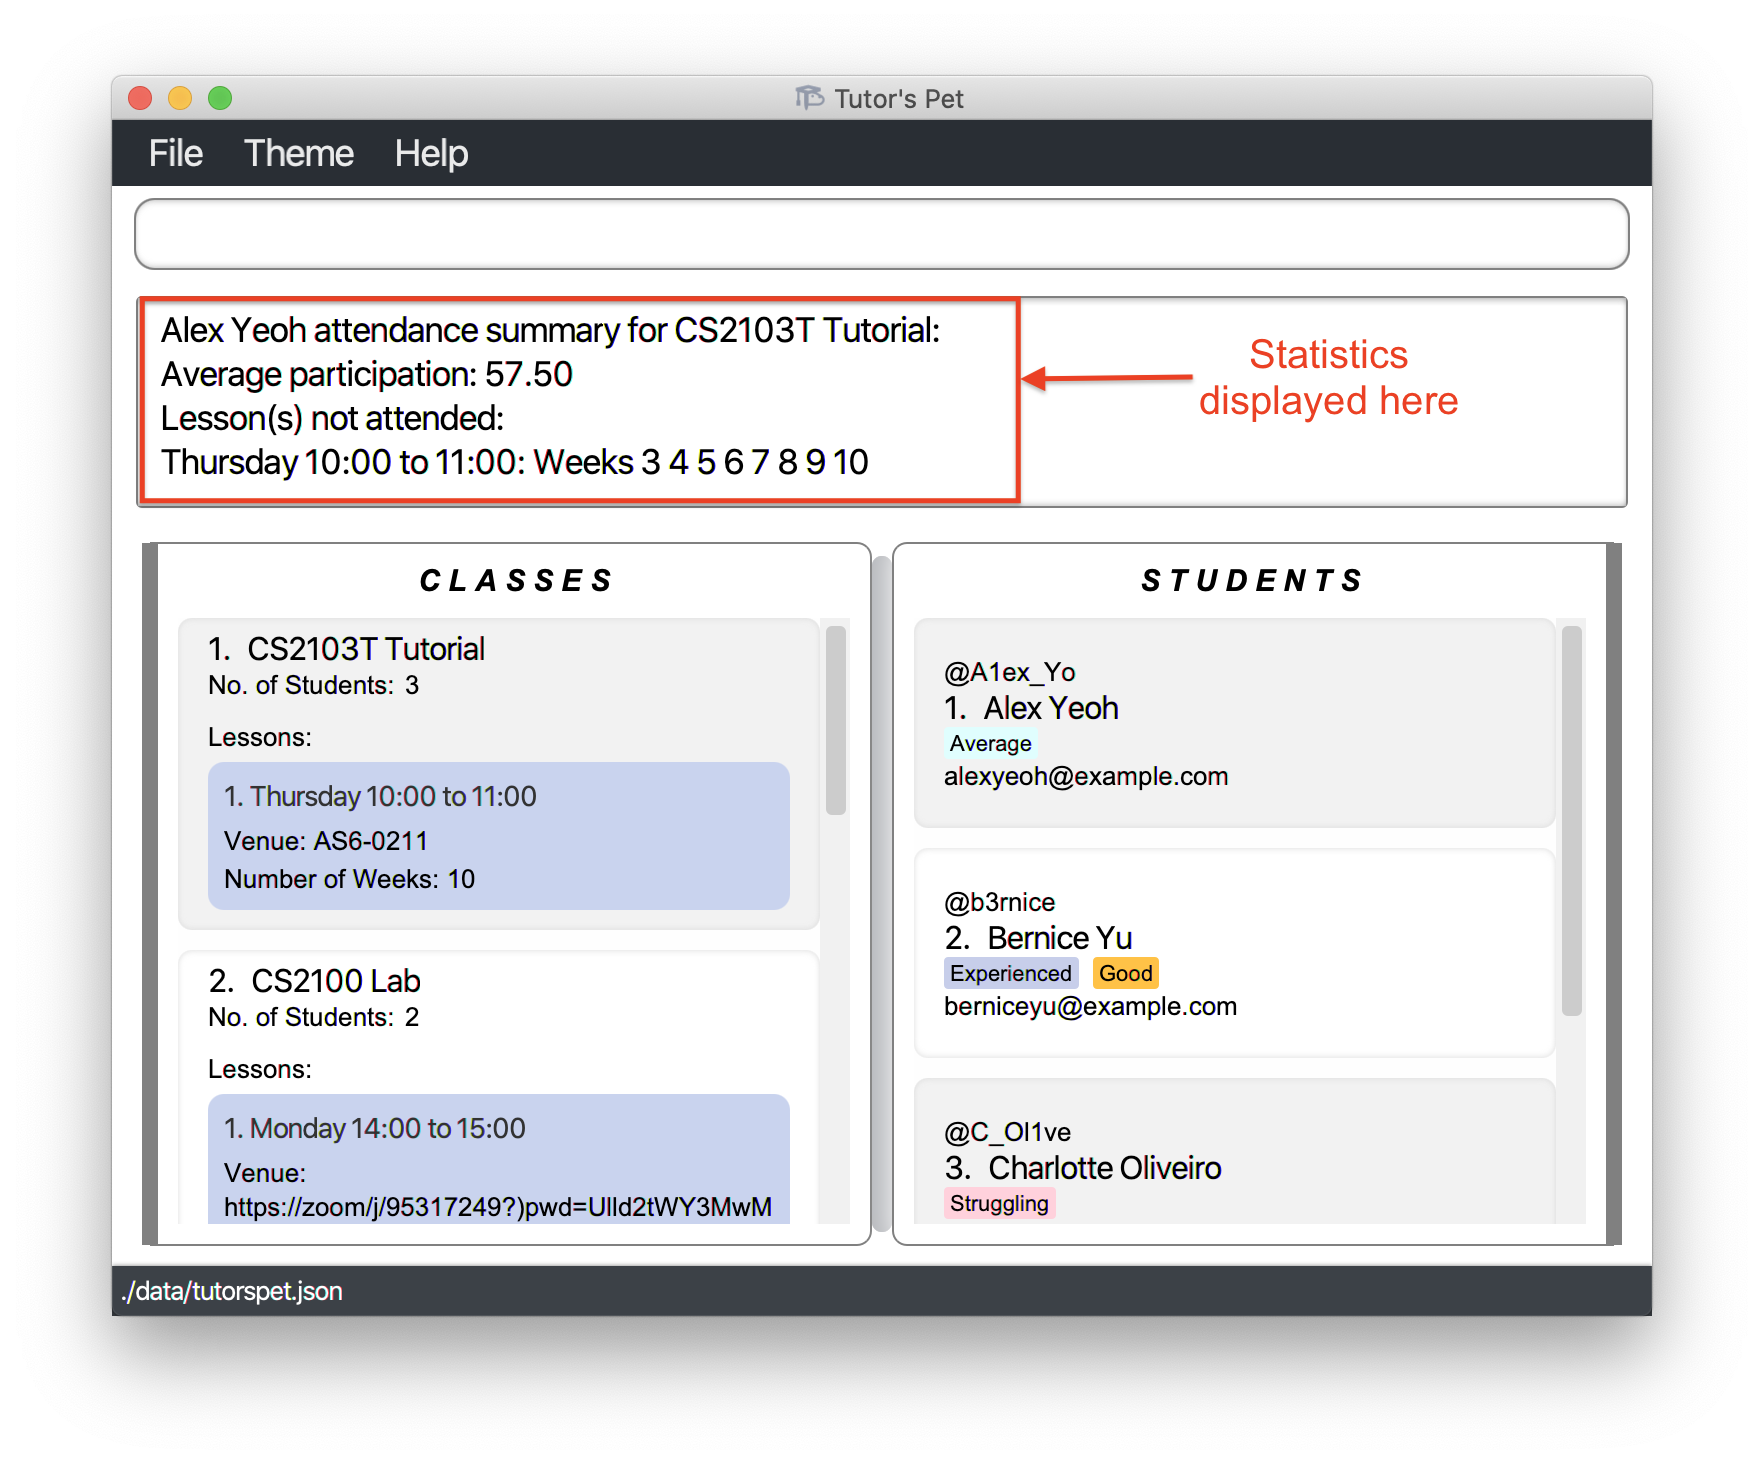
![]() Notes about the command:
Notes about the command:
-
Lesson(s) not attendeddisplays all lessons that the student did not attend. This means that future lessons are also displayed.
FAQ
Q: How do I transfer my data to another computer?
A: Download Tutor’s Pet in the other computer. Replace the empty data file it creates with the file that
contains data from your previous Tutor’s Pet home folder.
Glossary
This glossary provides definitions for the special terms used in this user guide.
Attendance Record: The attendance and participation score of a student in a particular week of a particular lesson.
Case-insensitive: The treatment of uppercase and lowercase letters in the same way.
Class: A group of students that attend the same lessons.
Command: The text typed in by the user as an instruction for Tutor’s Pet.
Index: The number beside the corresponding entry in a list.
Lesson: The timeslot, venue, and number of times a lesson takes place.
Tag: A word or phrase that labels a student.
Telegram: A popular social messaging application.
Venue: The location or an online meeting room link where a lesson is held.